# Zoho People for Docusign IAM
> Connect Zoho People to your Docusign agreement workflows. Read employees to pre-fill agreements, create or update the employee when the document is signed, and file the signed PDF on the employee in Zoho People Files.
- Web page: https://fluidlabs.com/documentation/zoho-people-for-docusign
- Published by: Fluidlabs
- Status: In development (not yet listed on the Docusign App Center)
- Last updated: 2026-11-18
- Support: docusign-support@fluidlabs.com
## Contents
- [Quick Start](https://fluidlabs.com/documentation/zoho-people-for-docusign#1-quick-start)
- [Supported Objects](https://fluidlabs.com/documentation/zoho-people-for-docusign#2-supported-objects)
- [Employee](https://fluidlabs.com/documentation/zoho-people-for-docusign#3-employee)
- [Custom Fields](https://fluidlabs.com/documentation/zoho-people-for-docusign#4-custom-fields)
- [Picklists](https://fluidlabs.com/documentation/zoho-people-for-docusign#5-picklists)
- [Other Known Behaviors](https://fluidlabs.com/documentation/zoho-people-for-docusign#6-other-known-behaviors)
- [Installation and Configuration](https://fluidlabs.com/documentation/zoho-people-for-docusign#7-installation-and-configuration)
- [How to Use the App](https://fluidlabs.com/documentation/zoho-people-for-docusign#8-how-to-use-the-app)
- [Read from Zoho People](https://fluidlabs.com/documentation/zoho-people-for-docusign#9-read-from-zoho-people)
- [Writeback to Zoho People](https://fluidlabs.com/documentation/zoho-people-for-docusign#10-writeback-to-zoho-people)
- [File Upload to Zoho People](https://fluidlabs.com/documentation/zoho-people-for-docusign#11-file-upload-to-zoho-people)
- [FAQ & Troubleshooting](https://fluidlabs.com/documentation/zoho-people-for-docusign#12-faq--troubleshooting)
---
## 1. Quick Start
### 1. Check Your Zoho People Account
- You need a **Zoho People administrator** account.
- Picklist values come in the language of that Zoho account, so check its language before you connect.
- See [Prerequisites](https://fluidlabs.com/documentation/zoho-people-for-docusign#prerequisites).
### 2. Install the App in Docusign
- Open the [**Docusign App Center**](https://apps.docusign.com/app-center/extensionapps) and search for **Zoho People**.
- Open the **Zoho People** app card, click **Install App**, then **Install and Authorize**.
### 3. Connect Your Account
- On the Zoho People app page, click **Connect Account**, choose the connection visibility, name the connection, and click **Log In**.
- Sign in to Zoho and click **Accept** on Zoho's consent screen.
- See [Connecting Your Account](https://fluidlabs.com/documentation/zoho-people-for-docusign#connecting-your-account).
### 4. Create a Workflow
- In Docusign, open **Automations → Workflows** and create a workflow in **Docusign Workflow Manager**.
- Choose your preferred workflow start type.
- Add a Zoho People step: **Read**, **Writeback**, or **File Output**.
### 5. Available Actions
- [**Read from Zoho People**](https://fluidlabs.com/documentation/zoho-people-for-docusign#9-read-from-zoho-people): pull an employee into your workflow to pre-fill an agreement.
- [**Writeback to Zoho People**](https://fluidlabs.com/documentation/zoho-people-for-docusign#10-writeback-to-zoho-people): create or update the employee after signing.
- [**File Output to Zoho People**](https://fluidlabs.com/documentation/zoho-people-for-docusign#11-file-upload-to-zoho-people): file the signed document on the employee in Zoho People Files.
### 6. Useful Information
- [Supported Objects](https://fluidlabs.com/documentation/zoho-people-for-docusign#2-supported-objects): the object the app reads and writes.
- [Employee](https://fluidlabs.com/documentation/zoho-people-for-docusign#3-employee): the employee fields, and how writing, reading, and searching work.
- [Custom Fields](https://fluidlabs.com/documentation/zoho-people-for-docusign#4-custom-fields): which custom field types the app supports.
- [Picklists](https://fluidlabs.com/documentation/zoho-people-for-docusign#5-picklists): fields that take a value from a Zoho People list.
- [Other Known Behaviors](https://fluidlabs.com/documentation/zoho-people-for-docusign#6-other-known-behaviors): Record ID, new employees, and what to expect when a step fails.
- Common questions: [FAQ & Troubleshooting](https://fluidlabs.com/documentation/zoho-people-for-docusign#12-faq--troubleshooting).
---
## 2. Supported Objects
Select the object in the **Zoho People object** dropdown of a Read or Writeback step.
This object can be read and written:
- [Employee](https://fluidlabs.com/documentation/zoho-people-for-docusign#3-employee), with the [custom fields](https://fluidlabs.com/documentation/zoho-people-for-docusign#4-custom-fields) of your organization's Employee form
File Output to Zoho People saves a file on an employee, see [File Output to Zoho People](https://fluidlabs.com/documentation/zoho-people-for-docusign#11-file-upload-to-zoho-people).
---
## 3. Employee
**Employee** is a person in your organization's Zoho People employee list, including Inactive and Resigned employees. The field list is loaded when you connect, so a field added to the Employee form later appears after **Reload Objects**, see [Managing Connections](https://fluidlabs.com/documentation/zoho-people-for-docusign#managing-connections).
### Employee Fields
The Read step offers the fields of Zoho People's Employee form and your [custom fields](https://fluidlabs.com/documentation/zoho-people-for-docusign#4-custom-fields): Record ID and Employee ID, names, emails and phones, Department, Designation, Location, the Reporting Manager, employment status and type, dates of joining, exit, and birth, experience and age, profile texts, and the present and permanent address.
**Writable:** Employee ID, First Name, Last Name, Email address, Personal Email Address, Personal Mobile Number, Work Phone Number, Department Name, Department ID, Designation Name, Designation ID, Location Name, Location ID, Reporting Manager Email, Reporting Manager Record ID, Employment Type, Date of Joining, Date of Exit, Gender, Marital Status, and [custom fields](https://fluidlabs.com/documentation/zoho-people-for-docusign#4-custom-fields) of the writable types. **Employee Status** is written by **Update** only. Every other field is read only.
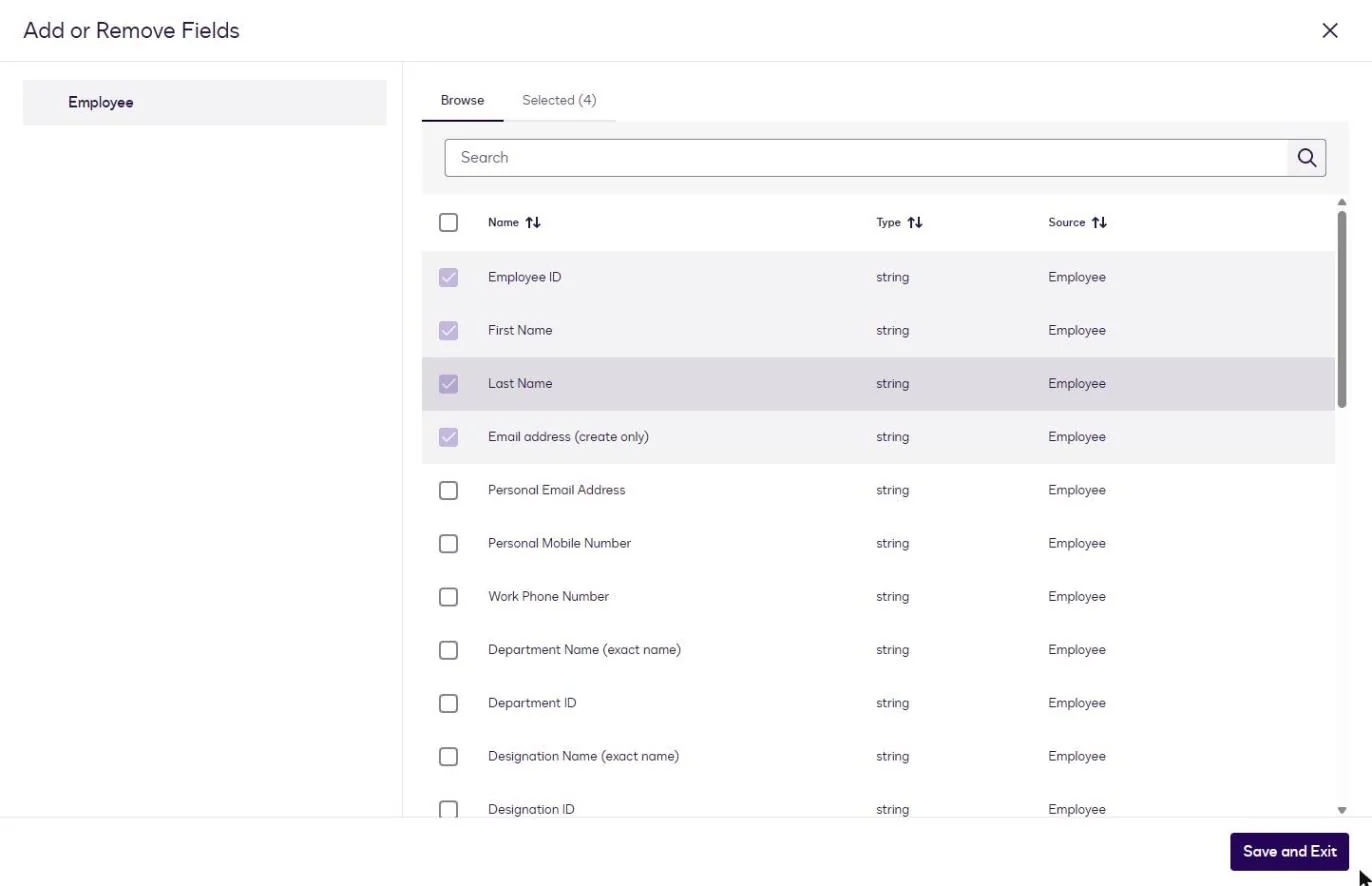
**Required:** Employee ID, First Name, Last Name, and Email address. In Create and Update or Create the step adds them already ticked and does not let you remove them.
**Identifiers:** Record ID is Zoho's internal number for the employee, `91201000000241316`. Employee ID is the employee's number in your company, `S2`. See [Record ID and Employee ID](https://fluidlabs.com/documentation/zoho-people-for-docusign#record-id-and-employee-id).
**Labels:** `(exact name)` marks a name that must match a Zoho People entry exactly, `(create only)` marks Email address, which cannot be changed after the employee exists, `(not searchable)` marks a field a rule cannot use, and `(Custom)` marks a custom field.
All Employee fields
| Field | Type | Read | Search | Create | Update | Required |
| --- | --- | --- | --- | --- | --- | --- |
| Record ID | Text | Yes | Yes | No | No | |
| Employee ID | Text | Yes | Yes | Yes | Yes | Yes |
| First Name | Text | Yes | Yes | Yes | Yes | Yes |
| Last Name | Text | Yes | Yes | Yes | Yes | Yes |
| Nick name | Text | Yes | Yes | No | No | |
| Email address | Text | Yes | Yes | Yes | Yes | Yes |
| Personal Email Address | Text | Yes | Yes | Yes | Yes | |
| Personal Mobile Number | Text | Yes | Yes | Yes | Yes | |
| Work Phone Number | Text | Yes | Yes | Yes | Yes | |
| Extension | Text | Yes | Yes | No | No | |
| Department Name | Text | Yes | Yes | Yes | Yes | |
| Department ID | Text | Yes | Yes | Yes | Yes | |
| Designation Name | Text | Yes | Yes | Yes | Yes | |
| Designation ID | Text | Yes | Yes | Yes | Yes | |
| Location Name | Text | Yes | Yes | Yes | Yes | |
| Location ID | Text | Yes | Yes | Yes | Yes | |
| Seating Location | Text | Yes | Yes | No | No | |
| Reporting Manager Name | Text | Yes | Yes | No | No | |
| Reporting Manager Email | Text | Yes | Yes | Yes | Yes | |
| Reporting Manager Record ID | Text | Yes | Yes | Yes | Yes | |
| Employee Status | Text | Yes | Yes | No | Yes | |
| Employment Type | Text | Yes | Yes | Yes | Yes | |
| Source of Hire | Text | Yes | Yes | No | No | |
| Onboarding Status | Text | Yes | No | No | No | |
| Date of Joining | Date | Yes | Yes | Yes | Yes | |
| Current Experience (years) | Number | Yes | Yes | No | No | |
| Total Experience (months) | Number | Yes | Yes | No | No | |
| Date of Exit | Date | Yes | Yes | Yes | Yes | |
| Date of Birth | Date | Yes | Yes | No | No | |
| Age (years) | Number | Yes | Yes | No | No | |
| Gender | Text | Yes | Yes | Yes | Yes | |
| Marital Status | Text | Yes | Yes | Yes | Yes | |
| About Me | Text | Yes | Yes | No | No | |
| Ask me about/Expertise | Text | Yes | Yes | No | No | |
| Tags | Text | Yes | Yes | No | No | |
| Present Address: Address Line 1 | Text | Yes | No | No | No | |
| Present Address: Address Line 2 | Text | Yes | No | No | No | |
| Present Address: City | Text | Yes | No | No | No | |
| Present Address: State | Text | Yes | No | No | No | |
| Present Address: Country | Text | Yes | No | No | No | |
| Present Address: Postal Code | Text | Yes | No | No | No | |
| Permanent Address: Address Line 1 | Text | Yes | No | No | No | |
| Permanent Address: Address Line 2 | Text | Yes | No | No | No | |
| Permanent Address: City | Text | Yes | No | No | No | |
| Permanent Address: State | Text | Yes | No | No | No | |
| Permanent Address: Country | Text | Yes | No | No | No | |
| Permanent Address: Postal Code | Text | Yes | No | No | No | |
Custom fields are added to this list, see [Custom Fields](https://fluidlabs.com/documentation/zoho-people-for-docusign#4-custom-fields).
### Writing Employees
The Writeback to Zoho People step offers **Create**, **Update**, and **Update or Create** on Employee.
- **Employee ID, First Name, Last Name, and Email address are required for Create and Update or Create.** In Update nothing is required: a field you do not map is not changed.
- **Employee ID and Email address are unique in Zoho People.** A second employee with the same Employee ID or email fails the step.
- **Email address cannot be changed.** Zoho People does not allow it. In Update or Create, map the employee's current address, for example the Email address of a Read from Zoho People step. A different address fails the step.
- **Write Department, Designation, and Location by ID**: Department ID, Designation ID, Location ID. A Read from Zoho People step returns the IDs. A Name works when it matches exactly one entry in Zoho People, in any letter case. A name that matches no entry, or several, fails the step. When the Name and the ID are both mapped, the ID is used.
- **Write the Reporting Manager by Reporting Manager Record ID**, the manager's Record ID from a Read or Writeback step. Reporting Manager Email also works. An Employee ID or a name fails the step, and so do a Record ID and an email that name two different people.
- **Employee Status, Employment Type, Gender, and Marital Status take a value from your organization's list**, in any letter case. See [Picklists](https://fluidlabs.com/documentation/zoho-people-for-docusign#5-picklists).
- **First Name and Last Name take up to 100 characters.**
- **Personal Mobile Number is stored as digits.** The app removes spaces, brackets, hyphens, dots, and a leading `+`: `+1 (555) 010-0000` is stored as `15550100000`. Letters or an extension such as `ext 12` fail the step. Work Phone Number takes any text.
- **Dates typed in the step are MM/DD/YYYY**: `12/01/2026` is December 1, 2026. Date of Exit cannot be earlier than Date of Joining.
- **An empty value is not written.** A mapped field that arrives empty keeps its value in Zoho People, so a workflow cannot clear a field. A step in which every mapped value is empty fails.
- **Employee Status is written by Update.** Zoho People keeps a new employee **Inactive** until they accept Zoho's invitation, and refuses a status change until then. After that, Active to Resigned works. Back to Active needs a free Zoho People licence.
- **A signed resignation can set Employee Status to Resigned and Date of Exit in one Update step.**
> ⚠️ **Set Department, Designation, Location, and the Reporting Manager when you create the employee, or in the first update while they are empty.** After they have a value, Zoho People allows a change only through its own HR Process, and the step fails. Writing the value the employee already has is accepted.
### Reading Employee Data
- **Dates read as midnight UTC on that day**: Date of Joining `2026-11-02T00:00:00.000Z`.
- **Reporting Manager Name reads as Zoho People shows it**, the name followed by the manager's Employee ID: `Jane Doe E1`.
- **Age and Current Experience read whole years, Total Experience reads months.** Zoho People computes them.
- **Seating Location is the free-text seat**, `Floor 3, desk 12`, not the Location.
- **Tags reads as one text.**
- **Onboarding Status is filled when the step finds up to five employees**, for example by Record ID. A broader rule returns it empty.
- **An employee the app creates reads Inactive** until they accept Zoho People's invitation.
- **Picklist values read in the language of the Zoho account that connected.** See [Picklists](https://fluidlabs.com/documentation/zoho-people-for-docusign#5-picklists).
### Searching for an Employee
- **A rule can use every field except those marked `(not searchable)`**: Onboarding Status, the Present Address and Permanent Address parts, and custom Address fields.
- **Text matches in any letter case, and spaces at the start and the end are ignored.** Accented letters must match.
- **Picklist fields take a value from your organization's list**, in any letter case: `active` finds Active employees. Any other value fails the step.
- **Record ID finds one employee or nothing.** A Record ID that matches no employee, or is not a Zoho number, finds nothing.
- **The ID fields work the same way**: Department ID, Designation ID, Location ID, Reporting Manager Record ID, and the Record ID of a custom lookup. A value that is not a Zoho ID finds nothing.
- **A condition with an empty value fails the step**, except Record ID. Check that the variable is filled.
- **A date condition takes a workflow variable**, from the workflow start or an earlier step, and compares calendar days.
- **Inactive and Resigned employees are found too.** Add an Employee Status condition to match current staff only.
> ⚠️ **In Update or Create, identify the employee by Record ID alone.** Record ID joined with AND to another condition finds the employee only when that condition holds as well. When it does not, the rule finds nothing, and Update or Create creates a new employee.
---
## 4. Custom Fields
When you connect, the app loads the custom fields of your organization's Employee form. A custom field's label ends with `(Custom)`.
**Read and written:** Single Line, Multi Line, Email, URL, Phone, Number, Decimal, Currency, Date, Date - Time, Decision box, Dropdown, Radio, and the Record ID of a Lookup.
**Read only:** Multi-select, the name of a Lookup, Country, Address, and Formula.
**Not supported:** File upload and Image.
- **Number takes whole numbers.** Decimal and Currency take a dot for decimals: `1234.5`. `1,234.50` is stored as 1234.5, and a decimal comma (`4,5`) fails the step. Currency stores the amount only.
- **Single Line takes up to 255 characters.**
- **Decision box takes true or false**, also yes or no and 1 or 0. A box nobody ticked reads false.
- **Dropdown and Radio take one of the field's choices**, in any letter case. Any other value fails the step, so a workflow never adds a choice.
- **A Lookup reads as two fields**: the record as Zoho People shows it, `E1 - Jane - Doe`, and `… Record ID (Custom)`. Write it by Record ID, the Record ID of a record the lookup lists.
- **Date - Time reads the clock time Zoho People shows, labelled UTC**, and is written back the same way. 14:30 in Zoho People reads `14:30:00Z`. No time zone is converted.
- **Multi-select reads its choices joined by `;`**: `Red;Blue`.
- **A custom field your organization made mandatory** must be mapped in Create, or Zoho People refuses the new employee.
- **After adding, renaming, or removing a custom field in Zoho People, run Reload Objects**, see [Managing Connections](https://fluidlabs.com/documentation/zoho-people-for-docusign#managing-connections).
---
## 5. Picklists
| Field | Values |
| --- | --- |
| Employee Status | `Active`, `Terminated`, `Deceased`, `Resigned`, `Probation`, `Notice period`. A new employee reads `Inactive` until they accept Zoho's invitation |
| Employment Type | `Permanent`, `On Contract`, `Temporary`, `Trainee` |
| Gender | `Male`, `Female`, `Others` |
| Marital Status | `Single`, `Married` |
| Source of Hire (read only) | `Advertisement`, `Direct`, `Newspaper`, `Referral`, `Web` |
| Onboarding Status (read only) | `Not Triggered`, `Triggered`, `In progress`, `Completed` |
| Department, Designation, Location | The entries of your Zoho People organization |
| Custom Dropdown and Radio fields | The choices of the field in your Zoho People organization |
- **These are Zoho People's default values.** Your organization may have edited its lists. A value written or used in a rule must match your organization's list, in any letter case, or the step fails. The value is stored in Zoho's spelling: `permanent` is stored as `Permanent`.
- **Values come in the language of the Zoho account that connected.** Connect with an account whose language is English to work with the values above, see [Connecting Your Account](https://fluidlabs.com/documentation/zoho-people-for-docusign#connecting-your-account).
---
## 6. Other Known Behaviors
### Record ID and Employee ID
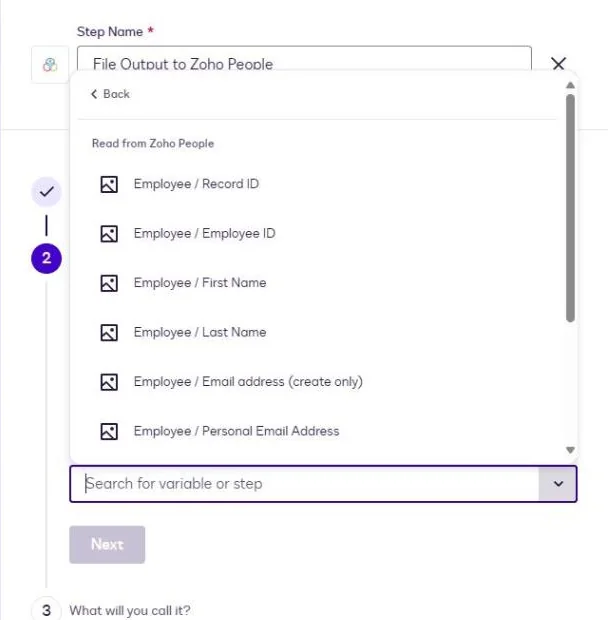
- **Record ID is Zoho's internal number for an employee**, a long number such as `91201000000241316`. A Read from Zoho People step returns it as **Employee / Record ID**, and a Writeback to Zoho People step with Create or Update or Create returns it as **Record ID**.
- **Employee ID is the employee's number in your company**, `S2`. It is not accepted where a Record ID is expected: Reporting Manager Record ID, the Record ID of a custom Lookup, and **Select record** in File Output.
- **Keep a Record ID in a Text variable.** As a number it has too many digits to arrive exactly.
### New Employees
- **Zoho People sends its invitation email to every employee the app creates**, as when an administrator adds an employee in Zoho People. Use test addresses while you build a workflow.
- **Each employee takes a Zoho People licence.** When the organization has no free licence, Create fails.
- **A new employee is Inactive until they accept the invitation.** Until then Employee Status cannot be changed, and a file sent to the employee is stored as UNASSIGNED, see [When the File Is Stored as UNASSIGNED](https://fluidlabs.com/documentation/zoho-people-for-docusign#when-the-file-is-stored-as-unassigned).
- **Employees cannot be deleted from a workflow.** Remove them in Zoho People.
### When a Step Fails
**Docusign may show a general error when a Zoho People step fails.** The usual causes:
- A value that is not in your organization's list: a picklist field, a Department, Designation, or Location name, or a custom Dropdown or Radio.
- An Employee ID, an email, or a name where a Record ID is expected.
- A change to Department, Designation, Location, or the Reporting Manager after they were set, see [Writing Employees](https://fluidlabs.com/documentation/zoho-people-for-docusign#writing-employees).
- A changed Email address, or an Employee ID or email that another employee already has.
- A Status change for an employee who has not accepted Zoho's invitation.
- A rule on a field marked `(not searchable)`, or a condition with an empty value.
- A date, number, or email in the wrong format.
---
## 7. Installation and Configuration
### Prerequisites
- A **Zoho People administrator** account.
- A Zoho account whose language is **English**. Picklist values such as Employee Status, Employment Type, Gender and Marital Status come in the language of the account that connects. See [Picklists](https://fluidlabs.com/documentation/zoho-people-for-docusign#5-picklists).
- A **Docusign** account with admin rights to install and manage apps in the App Center.
### How to Install the App
- Open the [**Docusign App Center**](https://apps.docusign.com/app-center/extensionapps) and search for **Zoho People**.
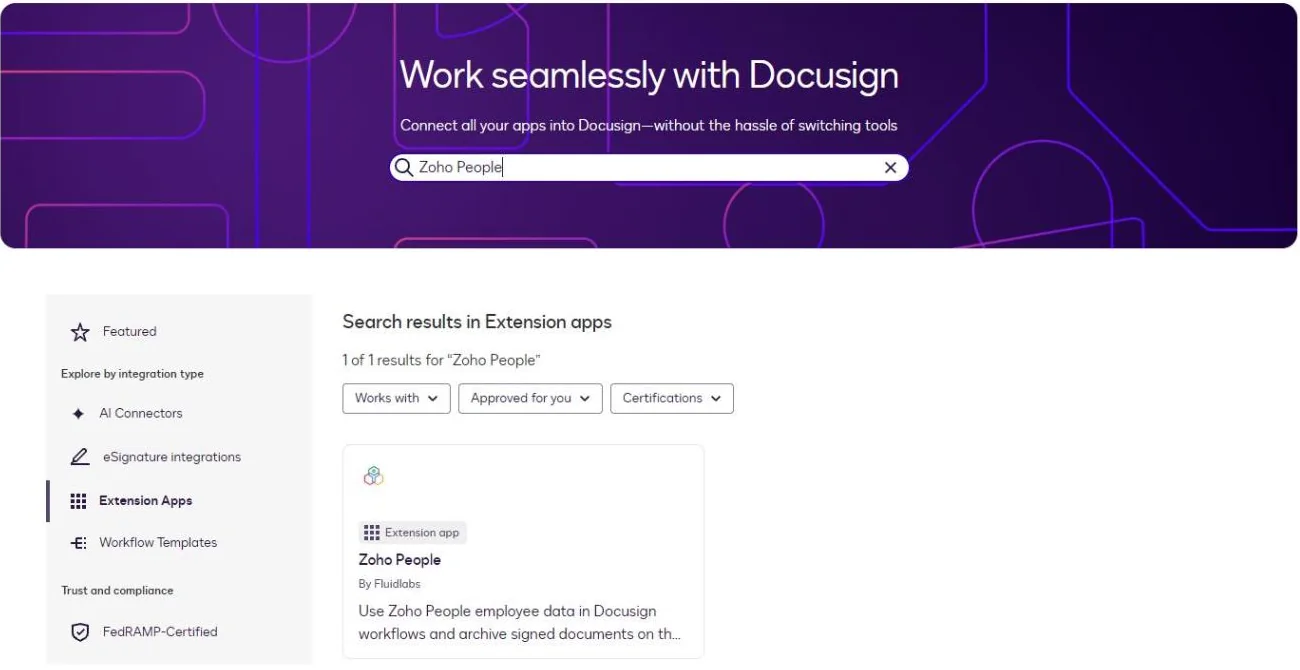
- Click the **Zoho People** app card, then click **Install App** (**Log In to Install** if you are not signed in).

- Review the access the app requests and click **Install and Authorize**.
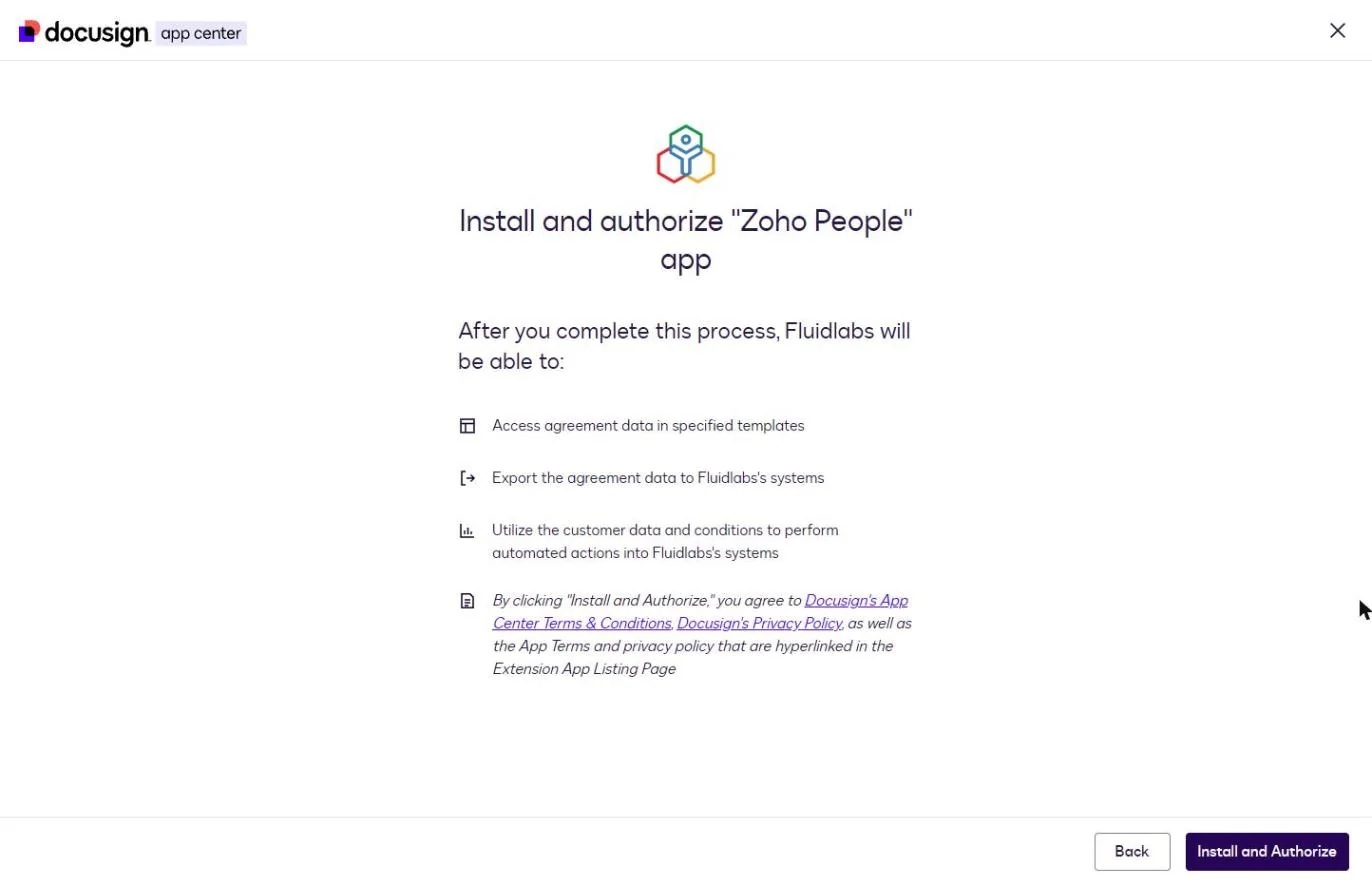
The app now appears with an **Installed** status.
### Connecting Your Account
Connect with the Zoho People administrator account, in English.
1. On the installed app page, click **Connect Account**. To add a connection later, click **New Connection** on the Connections page.
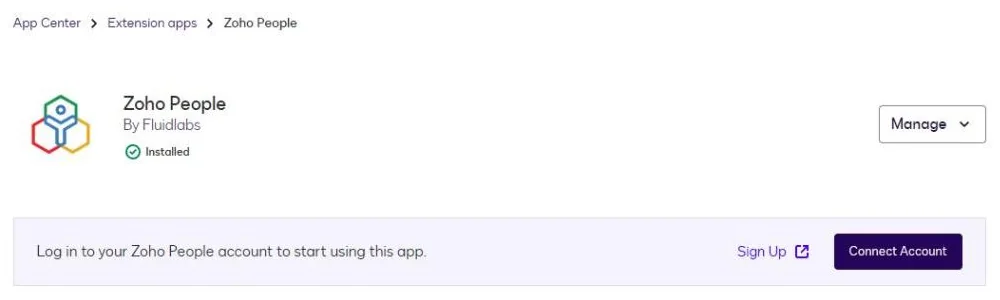
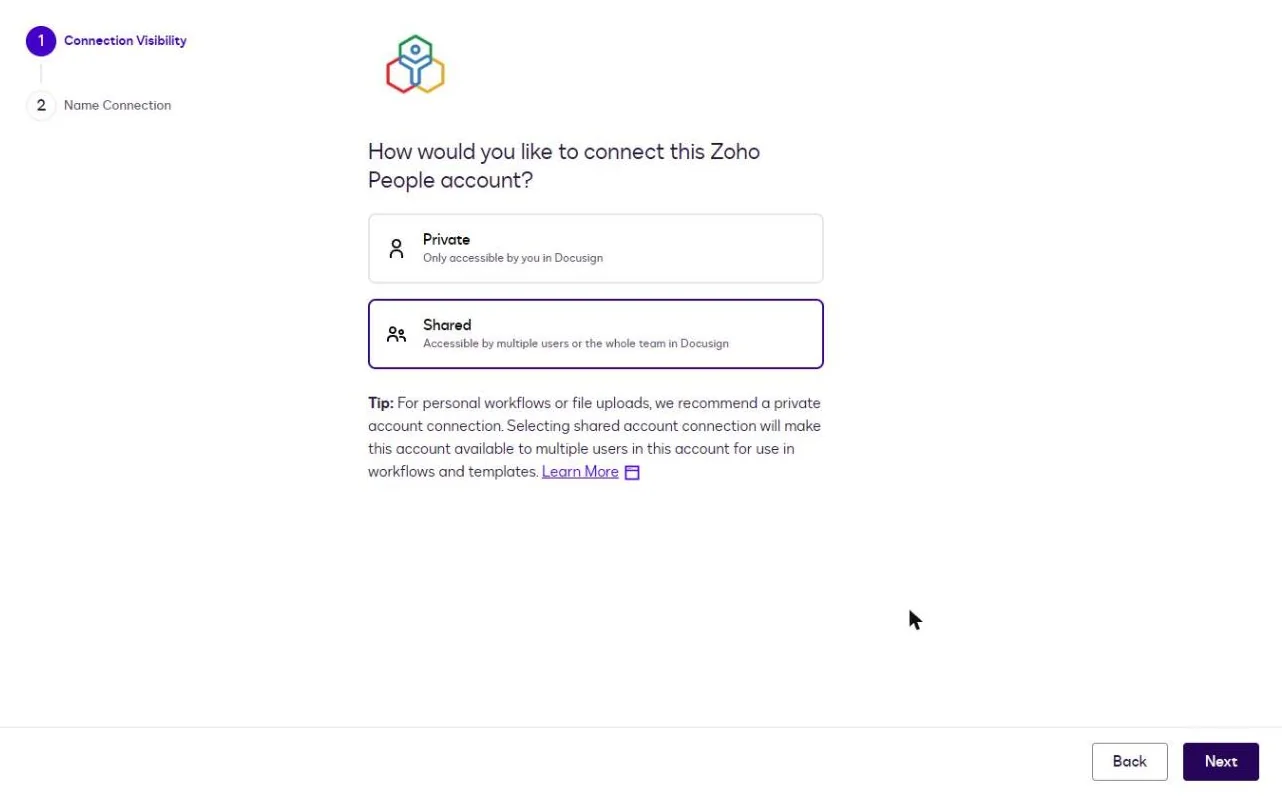
2. **Connection Visibility**: choose how the connection is shared, then click **Next**.
- **Private**: accessible only by you in Docusign.
- **Shared**: accessible by multiple users or the whole team.
3. **Name Connection**: enter a name that identifies the Zoho People organization, for example `Zoho People Demo`. It appears in workflow steps. Click **Log In**.
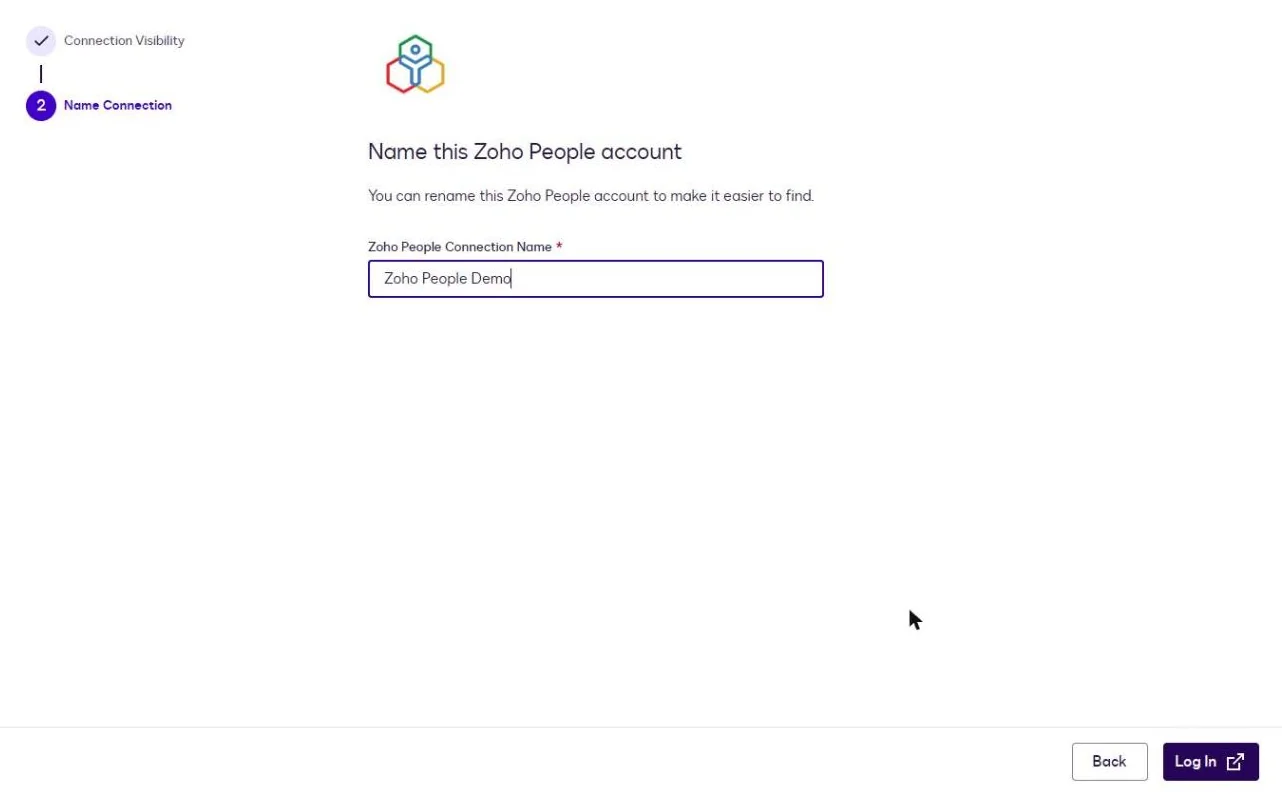
4. Sign in to Zoho if you are not signed in already.
5. On Zoho's consent screen, click **Accept** to grant access.
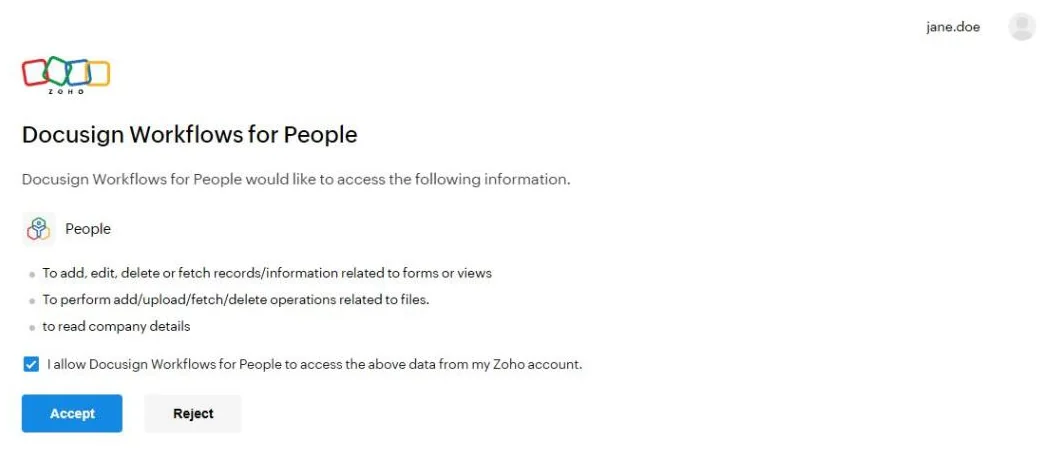
The connection is added and ready to use in workflow steps. Each connection works with one Zoho People organization: the one of the account that accepted.
### Managing Connections
On the Zoho People app page, open the **Manage** dropdown.
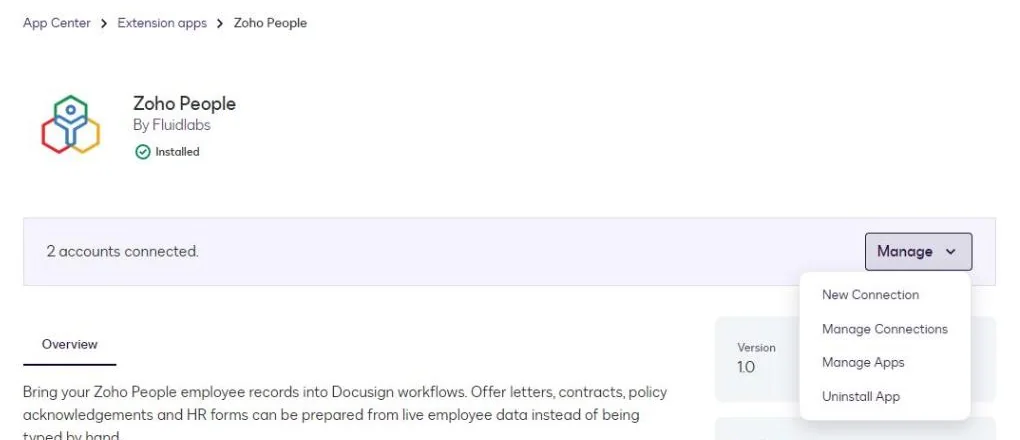
Select **Manage Connections** to see every connection.
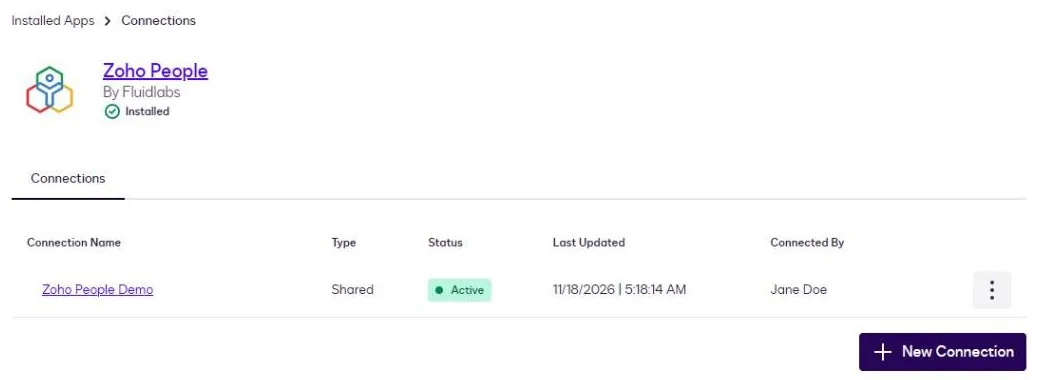
Use the three-dot (⋮) menu next to a connection:
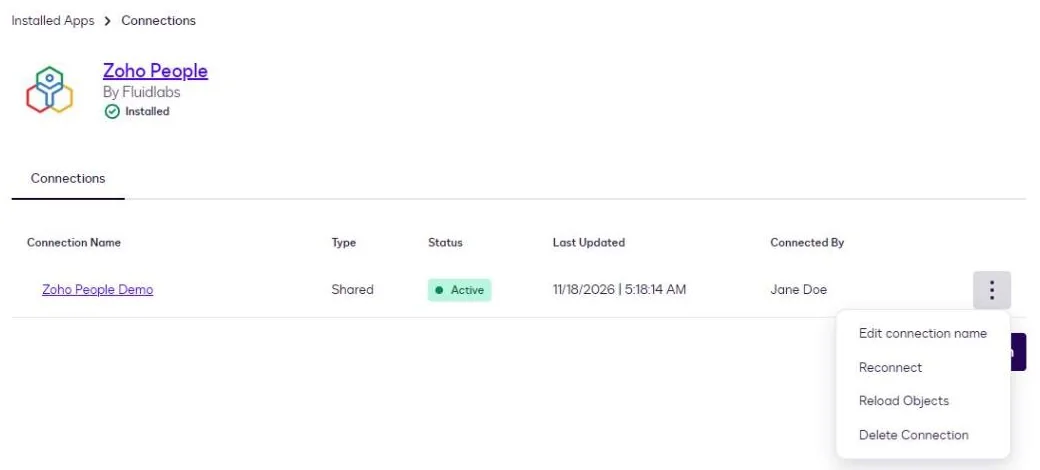
- **Edit connection name**: rename the connection.
- **Reconnect**: sign in to Zoho and accept the consent screen again. Run it after the connected account's password changes or its access is revoked.
- **Reload Objects**: refresh the Employee fields. Run it after an app update, and after a custom field is added, renamed or removed in Zoho People. Then re-open the Zoho People steps to see the current field list. Fields already mapped keep working. **Reconnect** refreshes the fields as well.
- **Delete Connection**: remove the connection. ⚠️ This may break workflows that use it.
### Adding a New Connection
Use **Manage → New Connection** on the app page, or **+ New Connection** on the Connections page. Each connection appears separately in workflow steps. To connect another Zoho People organization, sign in with an administrator account of that organization.
### Revoking Access
Delete the connection under **Manage Connections**.
---
## 8. How to Use the App
### Create a Workflow
- Log in to Docusign and go to **Automations → Workflows**.
- Click **Create Workflow**.
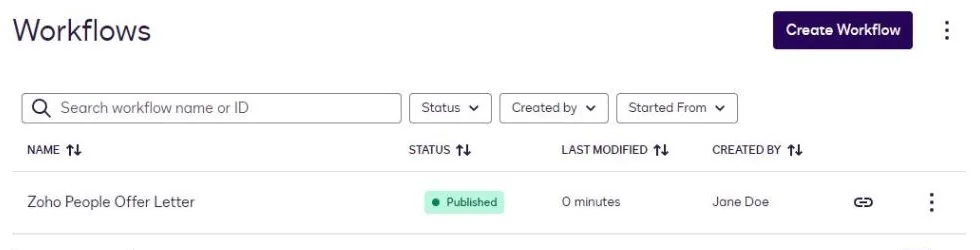
- Build your workflow using the available steps, including the Zoho People actions.
- Publish the workflow when it is ready.
### Available Zoho People Actions
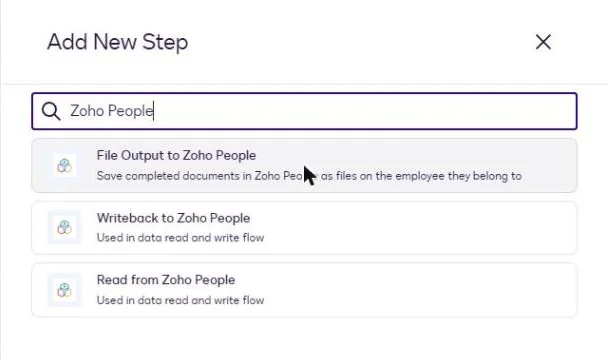
Click **+ Add Step** and search for **Zoho People**:
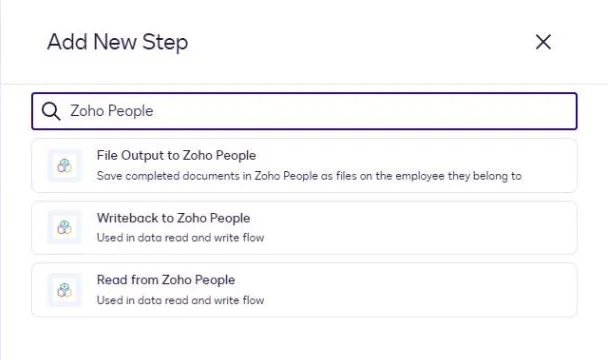
- **Read from Zoho People**: fetch an employee and expose the fields as workflow variables. See [Read from Zoho People](https://fluidlabs.com/documentation/zoho-people-for-docusign#9-read-from-zoho-people).
- **Writeback to Zoho People**: create or update an employee. See [Writeback to Zoho People](https://fluidlabs.com/documentation/zoho-people-for-docusign#10-writeback-to-zoho-people).
- **File Output to Zoho People**: save a signed document as a file on the employee in Zoho People Files. See [File Output to Zoho People](https://fluidlabs.com/documentation/zoho-people-for-docusign#11-file-upload-to-zoho-people).
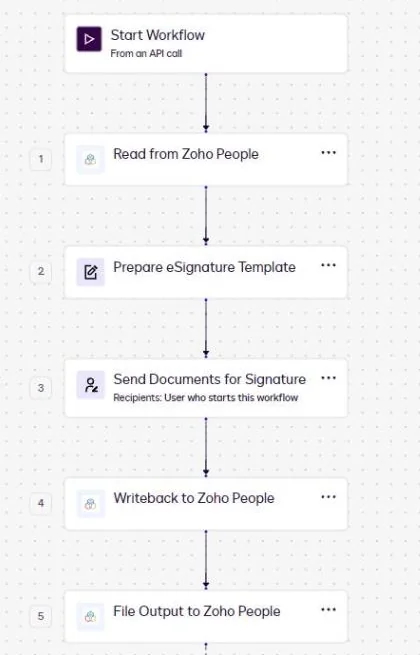
A typical HR flow, such as an offer letter or a contract change:
1. **Start**: **From an API Call**, with the employee's Record ID in a Text variable `record_id`.
2. **Read from Zoho People**: read the employee.
3. **Prepare eSignature Template**: pre-fill the document with the employee's data.
4. **Send Documents for Signature**: the employee confirms their details and signs.
5. **Writeback to Zoho People**: write the values the signer confirmed.
6. **File Output to Zoho People**: file the signed document on the employee.
---
## 9. Read from Zoho People
The **Read from Zoho People** step retrieves an employee and exposes the fields as workflow variables.
### Start the Workflow
The example starts the workflow **From an API Call** with one **Text** variable, `record_id`, that carries the employee's Record ID. Keep it Text: a Record ID such as `91201000000241316` has too many digits to pass exactly as a number. Any start type works: with a web form, use the form's field wherever this example uses `record_id`.
### 1. Add the Read Step
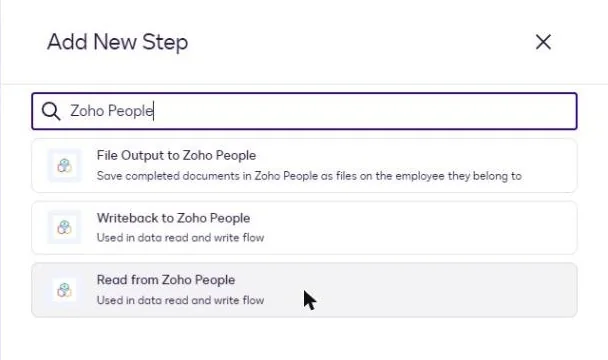
On the workflow canvas, click **+** below the start, search for **Zoho People**, and select **Read from Zoho People**.
### 2. Configure Connection and Object
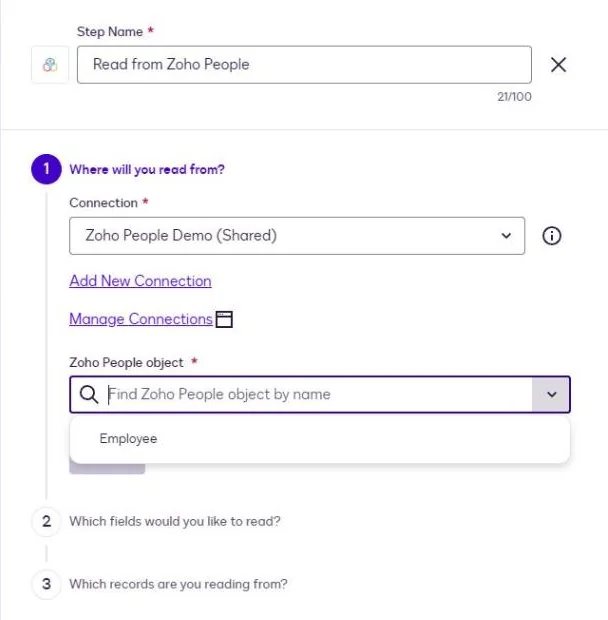
- **Connection**: select the connection you created during [installation](https://fluidlabs.com/documentation/zoho-people-for-docusign#7-installation-and-configuration).
- **Zoho People object**: **Employee**, the only object.
Click **Next**.
### 3. Select Fields
Click **Add or Remove Fields** and tick the fields your workflow needs. The selected fields become workflow variables for later steps. A field marked **(not searchable)** can be read but not used in a rule; **(Custom)** marks a [custom field](https://fluidlabs.com/documentation/zoho-people-for-docusign#4-custom-fields) of your organization.
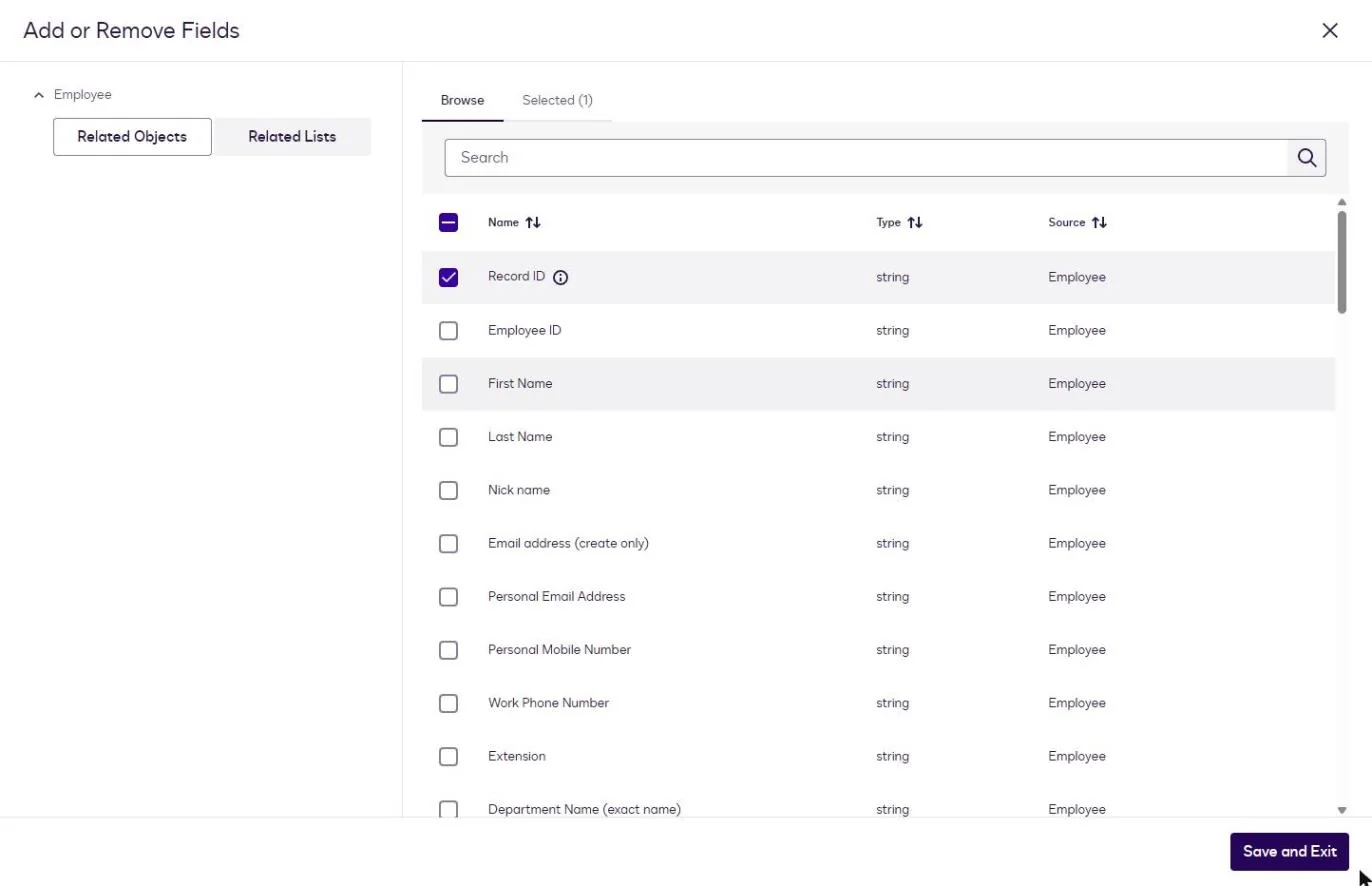
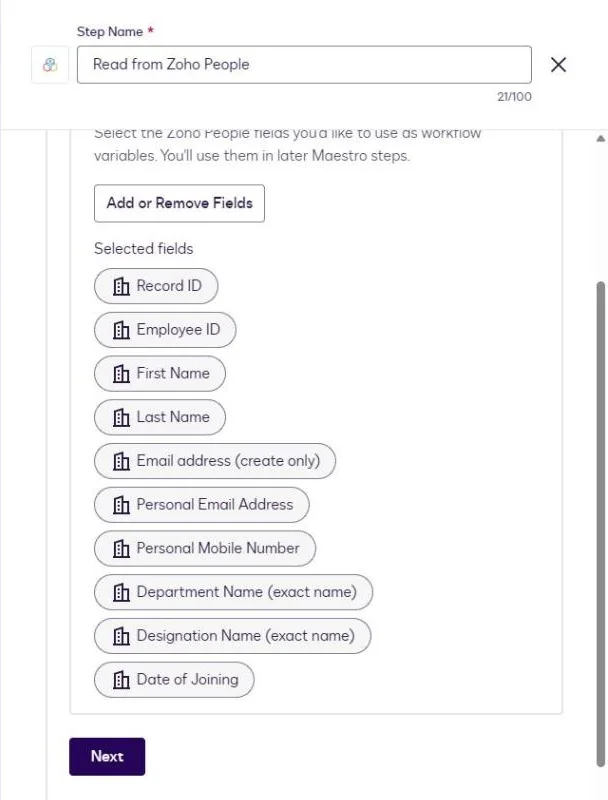
What each field returns is under [Reading Employee Data](https://fluidlabs.com/documentation/zoho-people-for-docusign#reading-employee-data).
Click **Next**.
### 4. Identify the Record
Create a rule that tells the step which employee to read. In this example, match **Record ID** to the `record_id` variable from the workflow start:
- **Zoho People field:** Record ID
- **Operator:** Equal to
- **Workflow field:** `record_id`, under **Variables From Workflow Start**
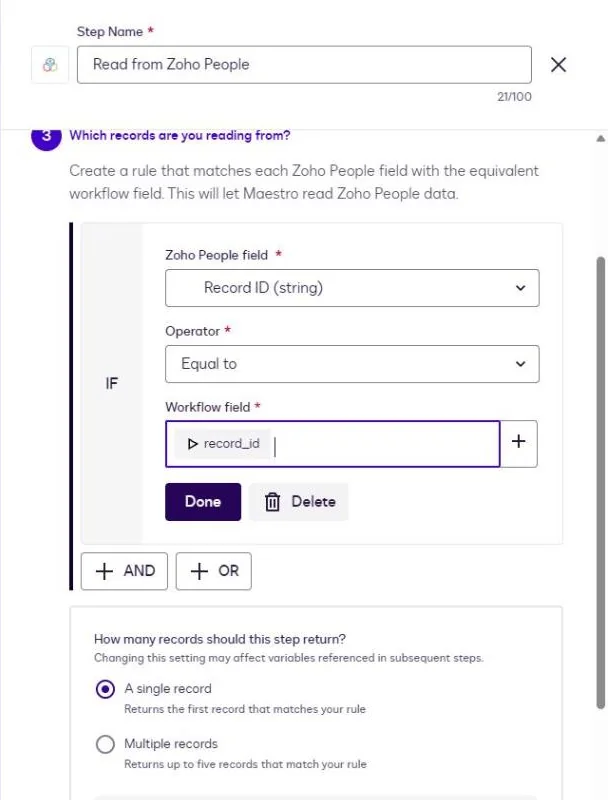
Click **Done**. Under **How many records should this step return?**, pick **A single record**. With **Multiple records**, the step returns up to five employees that match the rule, in Zoho's listing order.
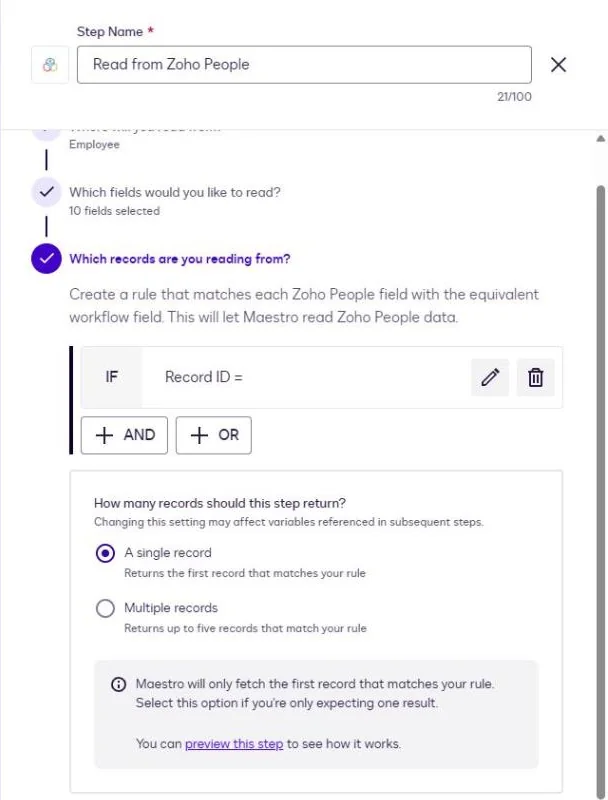
Use **preview this step** to check the rule against live data, then click **Apply**. If the preview shows **Unable to load data**, the rule uses a field that cannot be searched, an empty value, or a value the field does not take.

> ⚠️ **Match Record ID, Email address, or Employee ID.** Each names one employee; a name can match several. How to build other rules is under [Searching for an Employee](https://fluidlabs.com/documentation/zoho-people-for-docusign#searching-for-an-employee).
---
## 10. Writeback to Zoho People
The **Writeback to Zoho People** step creates an employee or updates one.
### 1. Add the Writeback Step
On the workflow canvas, click **+** where the writeback belongs, for example after **Send Documents for Signature**. Search for **Zoho People** and select **Writeback to Zoho People**.
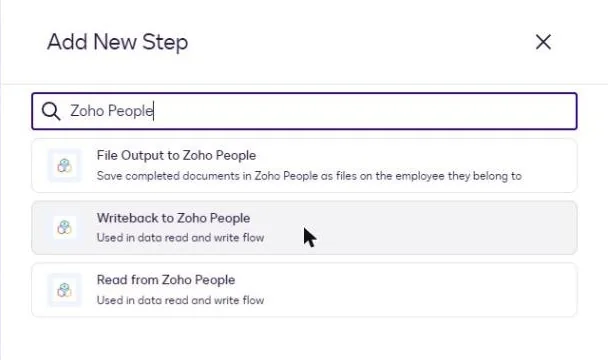
### 2. Configure Connection, Object, and Write Setting
- **Connection**: select your Zoho People connection.
- **Zoho People object**: **Employee**.
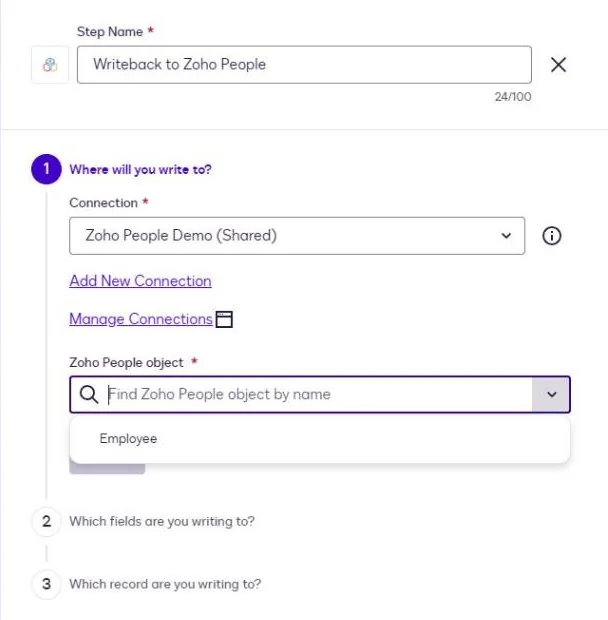
- **Write settings**:
- **Update or Create**: updates the matching employee, or creates one if the rule finds nothing.
- **Update**: updates an existing employee only. The rule must match exactly one employee. Only the mapped fields change. This is the only setting that offers **Employee Status**.
- **Create**: always creates an employee.
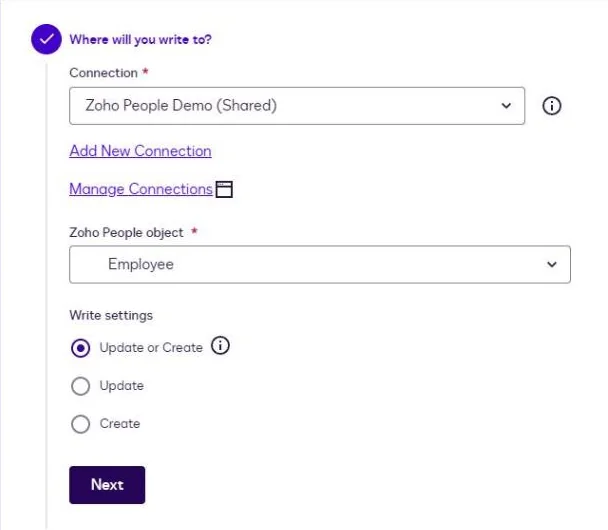
Click **Next**.
### 3. Map Fields
In **Create** and **Update or Create** the step starts with the required fields already ticked: **Employee ID**, **First Name**, **Last Name**, and **Email address**. Click **Add or Remove Fields** to tick the other fields you want to write. On **Update** no field is required, and a field you do not map stays as it is.
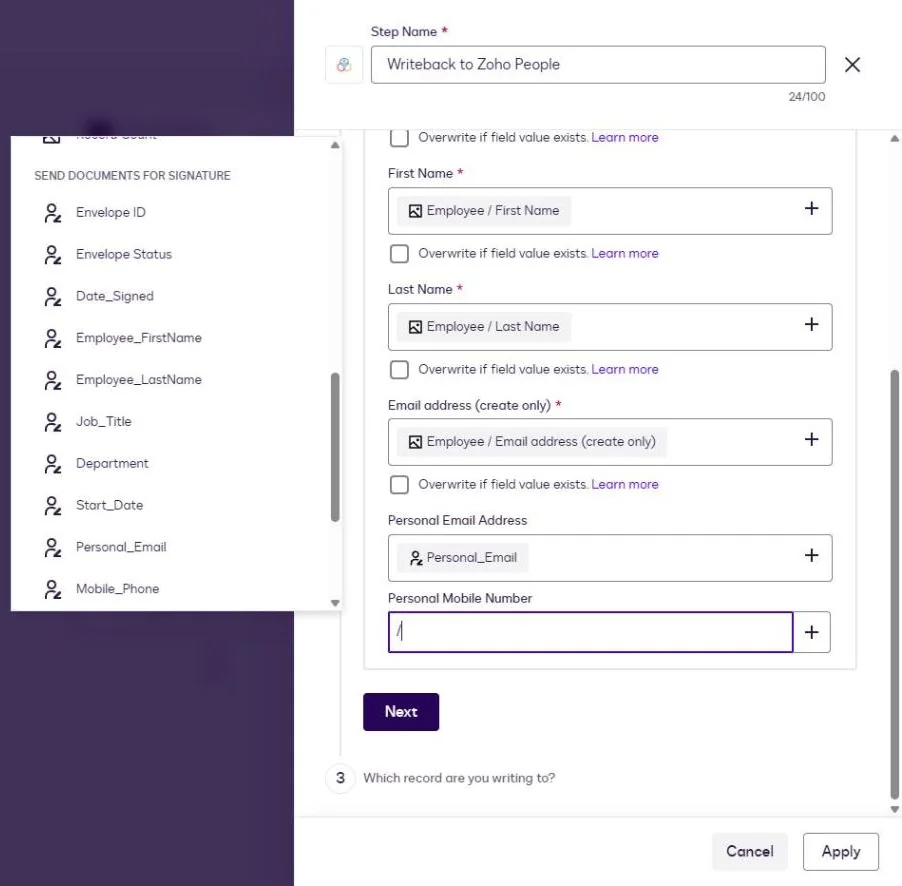
Map each field to the workflow variable that supplies the value, or type a value. In this example the fields come from **Send Documents for Signature**: the values the signer confirmed.
- **Reporting Manager Record ID takes an employee's Record ID**: the **Employee / Record ID** of a **Read from Zoho People** step, or the **Record ID** of a **Writeback to Zoho People** step with **Create** or **Update or Create**. An Employee ID is a different value and does not match.
- **Dates typed in the step are MM/DD/YYYY.** `12/01/2026` is December 1, 2026.
- **Overwrite if field value exists** appears on the required fields under **Update or Create**. Unchecked, a value already filled in Zoho People stays. Optional fields are always overwritten.
⚠️ **Map from the right source.** The variable picker also lists the output of your **Read from Zoho People** step. Mapping from there writes the original values back unchanged. Map new values from the step that collected them, such as **Send Documents for Signature**. A required field the document does not carry, such as Employee ID, can come from the Read step.
The writable fields and their rules, including what Update or Create does with Email address and Department, are under [Writing Employees](https://fluidlabs.com/documentation/zoho-people-for-docusign#writing-employees).
Click **Next**.
### 4. Identify the Record to Write
For **Update or Create** and **Update**, create a rule that finds the employee. Match **Record ID** to the **Employee / Record ID** of the Read from Zoho People step:
- **Zoho People field:** Record ID
- **Operator:** Equal to
- **Workflow field:** **Employee / Record ID**, under the Read from Zoho People step
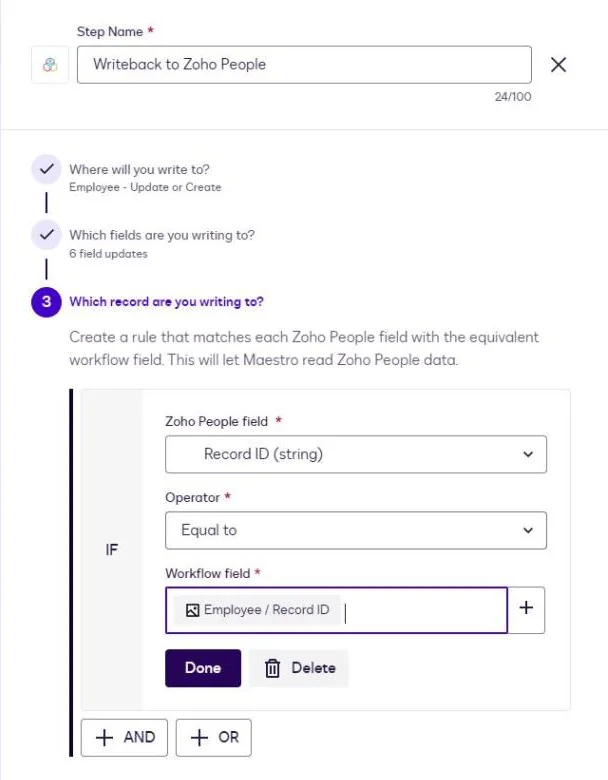
Click **Done**, then **Apply**.
With **Update or Create**, a rule that finds no employee creates one. Before you add conditions to the Record ID, read [Searching for an Employee](https://fluidlabs.com/documentation/zoho-people-for-docusign#searching-for-an-employee).
When Zoho People refuses a value, the step fails. The usual causes are under [Writing Employees](https://fluidlabs.com/documentation/zoho-people-for-docusign#writing-employees).
---
## 11. File Upload to Zoho People
The **File Output to Zoho People** step saves a document from the workflow as a file on an employee in Zoho People **Files**, in the folder you choose.
### 1. Add the File Output Step
Add a step after signing completes, search for **Zoho People**, and select **File Output to Zoho People**.
### 2. Select the File
Under **What are you storing?**, choose the file or envelope from an earlier step. In this example it is the **Combined Envelope File** from **Send Documents for Signature**.
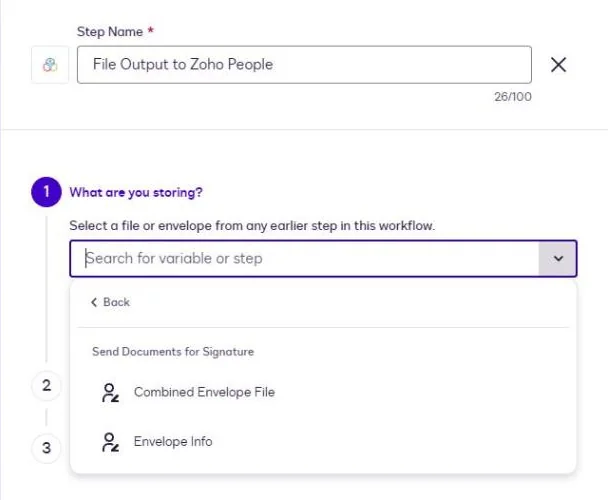
> An empty list means no earlier step produced a file. Check that a step such as **Send Documents for Signature** comes before File Output.
### 3. Choose the Employee and the Folder
Under **Where are you storing it?**, set the fields in this order. Each field appears once the one before it has a value.
- **Select connection**: your Zoho People connection.
- **Select record**: the employee's **Record ID**. Open the list, choose the step, and select the Record ID. Two steps return it: **Read from Zoho People** as **Employee / Record ID**, and **Writeback to Zoho People** with **Create** or **Update or Create** as **Record ID**. A `record_id` start variable works too.
- **Object**: **Employee**, filled in for you.
- **Document Category**: the Zoho People **Files** folder for the document. The list shows your organization's Files folders. If the step has no category, or your organization has no folder, the file goes to the folder **Docusign Signed Documents**, which Zoho creates with the first file.
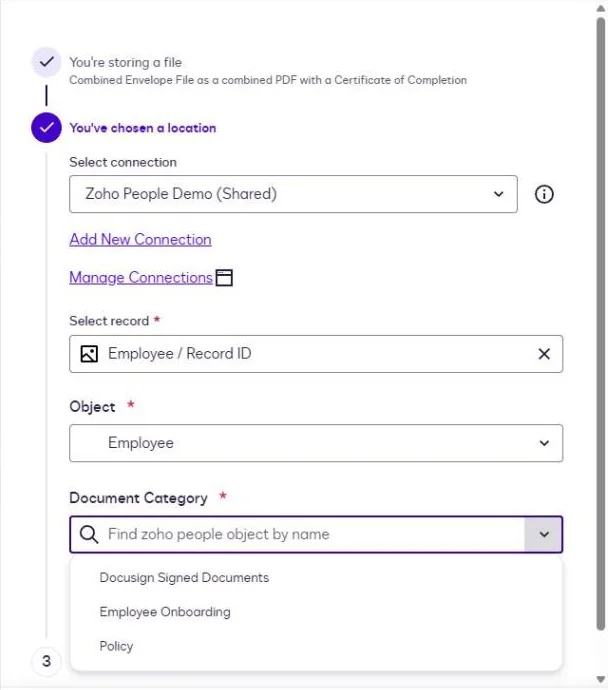
> ⚠️ **Map the employee's Record ID in Select record.** Take **Employee / Record ID** from Read from Zoho People, or **Record ID** from Writeback to Zoho People with Create or Update or Create. An Employee ID or an email names no employee, and the file is stored unassigned, see [When the File Is Stored as UNASSIGNED](https://fluidlabs.com/documentation/zoho-people-for-docusign#when-the-file-is-stored-as-unassigned).
Click **Next**.
### 4. Name the File
Under **What will you call it?**, build the file name with **Add Variable** and **Add Text**, for example the employee's First Name followed by ` - Offer Letter`. **File path** shows the result.
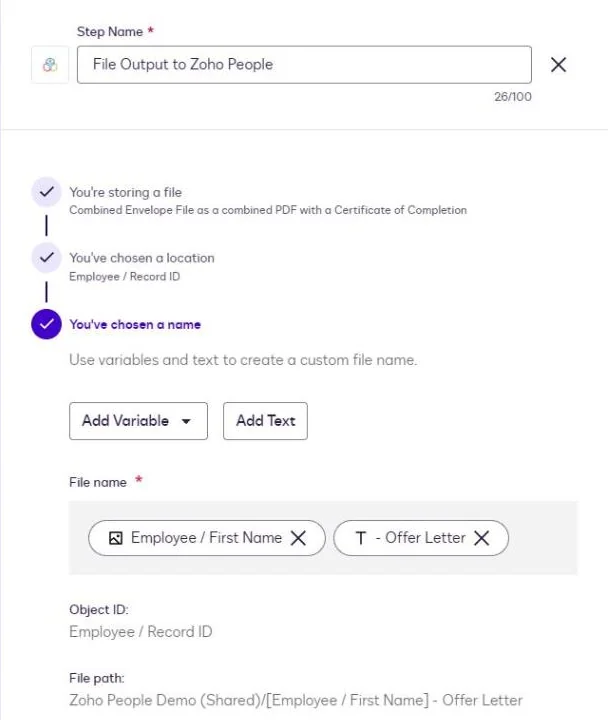
Zoho People takes file names made of Latin letters, digits, spaces, hyphens (`-`), underscores (`_`), and dots (`.`), up to 100 characters including the extension. The app adjusts any other name before the upload, and the step completes:
- Every other character becomes `_`: `Offer (R&D), 2026.pdf` is stored as `Offer _R_D_ 2026.pdf`.
- A longer name is shortened to 100 characters, the extension kept.
- A name with nothing left becomes `Signed document.pdf`.
To get an exact name, build it from the allowed characters. A variable can carry other characters, such as an accented last name, and the name may then be adjusted.
Click **Apply**.
### 5. Verification
In Zoho People, open **Files → Employee Files**. The document is on the employee, in the folder you chose in Document Category. The employee can view and download it.

### When the File Is Stored as UNASSIGNED
A signed document is never lost. When the Record ID in **Select record** is empty, names no employee, or names an employee who has not accepted Zoho's invitation yet (Employee Status Inactive), the step still completes. The file is stored for the **Admin** role only, named `UNASSIGNED - `.
- **An employee created by the same workflow is in this state** until they accept Zoho's invitation.
- **Find the file in Files → Employee Files** with File access **Role-based**, and move it to the employee by hand.
- **The file does not move by itself when the invitation is accepted.** Files the workflow sends after the acceptance go to the employee.
---
## 12. FAQ & Troubleshooting
**Who can connect Zoho People?**
> A Zoho People administrator. See [Prerequisites](https://fluidlabs.com/documentation/zoho-people-for-docusign#prerequisites).
**Picklist values come in another language.**
> The connection was made with a Zoho account in another language. Connect with an account whose language is English, see [Connecting Your Account](https://fluidlabs.com/documentation/zoho-people-for-docusign#connecting-your-account).
**A custom field I added in Zoho People is missing from the step.**
> The step lists the fields loaded with the connection. See [Managing Connections](https://fluidlabs.com/documentation/zoho-people-for-docusign#managing-connections).
**A Zoho People step failed.**
> Check the values against [Writing Employees](https://fluidlabs.com/documentation/zoho-people-for-docusign#writing-employees) for Writeback, and the rule against [Searching for an Employee](https://fluidlabs.com/documentation/zoho-people-for-docusign#searching-for-an-employee) for Read and for Update or Create.
**The rule preview shows "Unable to load data".**
> The rule uses a field marked (not searchable), a condition with an empty value, or a value the field does not take. See [Searching for an Employee](https://fluidlabs.com/documentation/zoho-people-for-docusign#searching-for-an-employee).
**Update or Create made a second employee.**
> The rule found nothing, so the step created an employee. The usual causes: Record ID combined with a condition the employee does not meet, or an ID field such as Department ID with a value that is no Zoho id, which finds nothing. See [Searching for an Employee](https://fluidlabs.com/documentation/zoho-people-for-docusign#searching-for-an-employee).
**The Employee Status of a new employee cannot be changed.**
> Zoho keeps a new employee Inactive until they accept Zoho People's invitation. Update the status after the acceptance, see [Writing Employees](https://fluidlabs.com/documentation/zoho-people-for-docusign#writing-employees).
**Department did not change.**
> Department, Designation, Location, and the Reporting Manager can be set once. After that, change them in Zoho People through its HR Process. See [Writing Employees](https://fluidlabs.com/documentation/zoho-people-for-docusign#writing-employees).
**Can I set the Reporting Manager by name?**
> No. Map **Reporting Manager Record ID** (recommended) or **Reporting Manager Email**.
**Personal Mobile Number was refused.**
> The value has letters or an extension such as `ext 12`. Spaces, brackets, hyphens, dots, and a leading `+` are removed before the number is sent, and Zoho stores the digits. See [Writing Employees](https://fluidlabs.com/documentation/zoho-people-for-docusign#writing-employees).
**Creating an employee fails although every required field is mapped.**
> Each created employee takes a Zoho People licence. Free one up in Zoho People, or add licences.
**The signed file is not on the employee.**
> **Select record** had something other than the employee's Record ID, or the employee has not accepted Zoho's invitation yet. Look for `UNASSIGNED …` in **Files → Employee Files** with File access **Role-based**. See [When the File Is Stored as UNASSIGNED](https://fluidlabs.com/documentation/zoho-people-for-docusign#when-the-file-is-stored-as-unassigned).
**The file was stored as "UNASSIGNED - …" with no Record ID.**
> The workflow started without a value for `record_id`. Values in the query string of a workflow's trigger URL do not reach its start variables. Start the workflow with **Run Workflow**, or with an API call that sends the Record ID in the request body.
**The file name in Zoho People differs from the name in the step.**
> Zoho People takes only Latin letters, digits, spaces, `-`, `_`, and `.`, up to 100 characters, and the app adjusts any other name. See [Name the File](https://fluidlabs.com/documentation/zoho-people-for-docusign#4-name-the-file).
---
Zoho People for Docusign IAM is published by Fluidlabs. Docusign is a trademark of Docusign, Inc.