Sections
Quick Start
Procore Integration Quick Start
1. Installation
-
Install the Procore app from the Docusign App Center.
-
During installation, you will be prompted to create a connection.
- A connection links Procore app to a specific Procore company and project.
- If you selected the wrong project or need an additional one, use Manage Connection.
After the app is installed and a connection is created, the setup is complete.
2. Creating a Workflow
-
All workflows are created in Docusign Workflows.
-
The Procore app provides two main workflow actions:
- Read From Procore — reads User or Vendor (Company) data from Procore.
- Writeback to Procore — writes processed or updated data back to Procore.
-
Workflows can:
- run directly in Docusign, or
- be launched from Procore using the Procore Side Panel.
3. Using the Procore Side Panel
- Open a specific User or Company in Edit mode in Procore.
- Open the Docusign Workflow Builder Launcher (Side Panel).
- Authorize with Docusign (one-time step).
- Select a published workflow and click Start Workflow.
The workflow will run in the context of the opened Procore record.
4. What Is object_id and Why It Matters
-
When a workflow is launched from Procore, the Side Panel passes
object_idinto the workflow. -
object_idis the Procore entity ID (Id):contact_IDfor Project Users- Vendor ID for Project Vendors
- 💡 More details
-
To work correctly for project vendors:
- Read From Procore must use
Id = object_id - Writeback to Procore must use
Id = object_id
- Read From Procore must use
-
To work correctly for project users:
- Read From Procore must use
contact_id = object_id - Writeback to Procore must use
contact_id = object_id
- Read From Procore must use
More details: see Read From Procore and Writeback to Procore sections.
5. Need a Full Example?
- For a complete end-to-end scenario (Read → Sign → Writeback), see
- Workflow Example: End-to-End Procore Integration.
- For detailed configuration steps, use the individual sections linked above.
💡 Recommended reading order if you’re new:
1. Supported Objects & Terminology
The Procore integration supports working with the following objects:
Users (project_users)
Users are individual people added to a Procore project and listed in the Project Directory.
A user may be:
- associated with a company (vendor), or
- independent and not linked to any company.
Users represent people who can participate in project activities and workflows.
Companies (Vendors) (project_vendors)
Companies are organizations added to a Procore project and listed in the Companies section of the Project Directory.
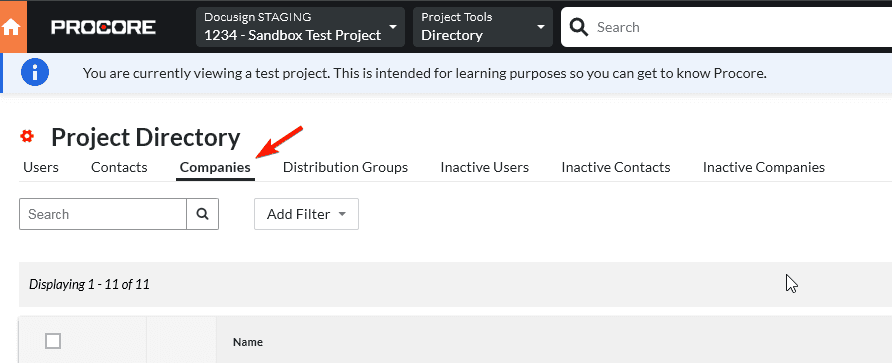
In Procore, companies added to a project are often referred to as vendors.
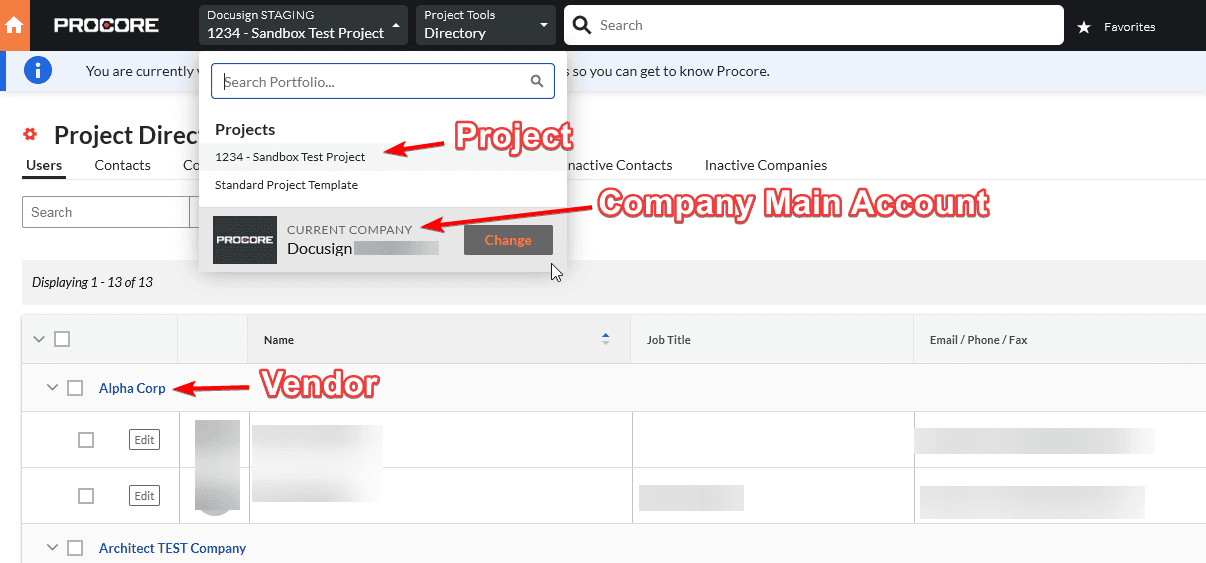
💡Note:
In Procore, there is a main company account and companies added inside projects. In this documentation, vendor refers to a company within a project.
Docusign Workflows can be launched for both Users and Companies (Vendors), depending on the context from which the workflow is started.
We also recommend to check Data for Workflow Setup before moving to Installation & Configuration.
Data for Workflow Setup
When a Docusign Workflow is launched from Procore using the Side Panel (Workflow Builder Launcher), a set of context data is automatically passed to the workflow.
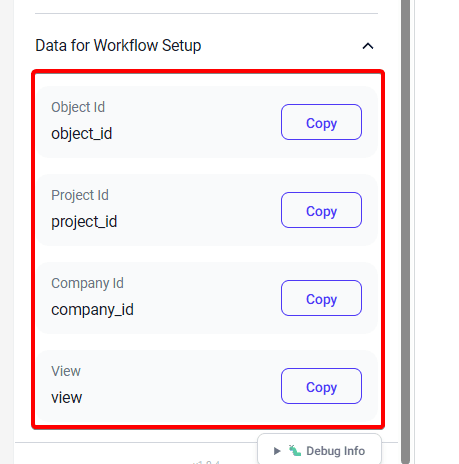
This data can be used during workflow configuration to identify the target object.
The following parameters are provided:
Object ID (object_id)
The unique ID of the selected Procore object:
-
User ID when the workflow is launched from a user page
-
called
contact_IDin variables in Procore Read\Writebackproject_users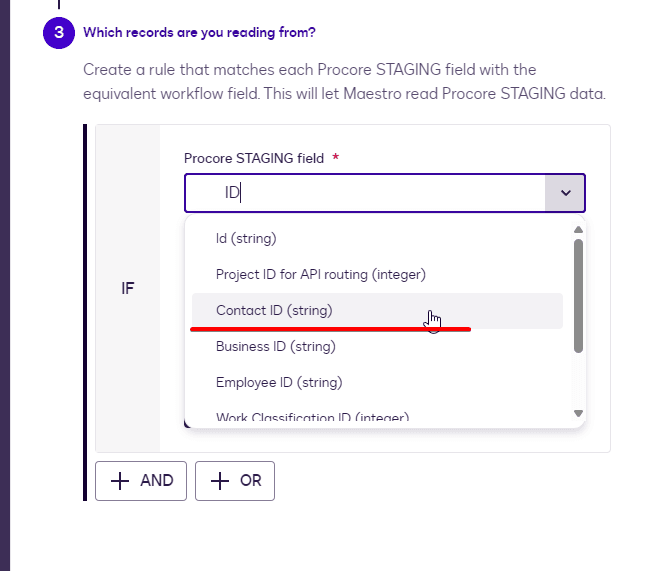
-
Vendor ID when the workflow is launched from a company (vendor) page
-
called
IDin variables in Procore Read\Writebackproject_vendors
💡This is the actual Procore entity ID stored in the system (not any other ID type).
Project ID (project_id)
The ID of the Procore project from which the workflow is launched.
This parameter is available for reference but is not required for most workflow scenarios.
Company ID (company_id)
The ID of the main Procore company account.
💡This is not the same as a vendor (company within a project).
View (view)
This parameter is provided for context and is not typically required for workflow configuration.
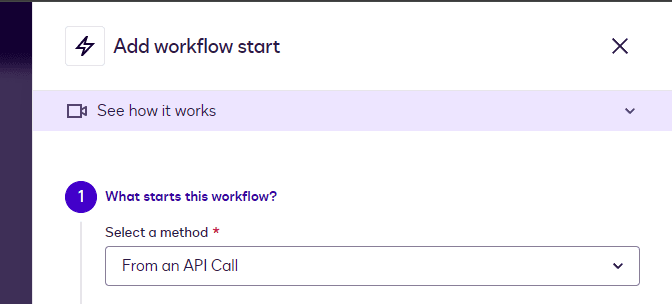
Defining object_id in the Workflow Start
To receive object_id from Procore, when you launch workflow from side panel (example) the workflow must be configured to start From an API Call.
During workflow setup:
-
Select From an API Call as the workflow start method.
-
Create a variable named
object_id(Text type).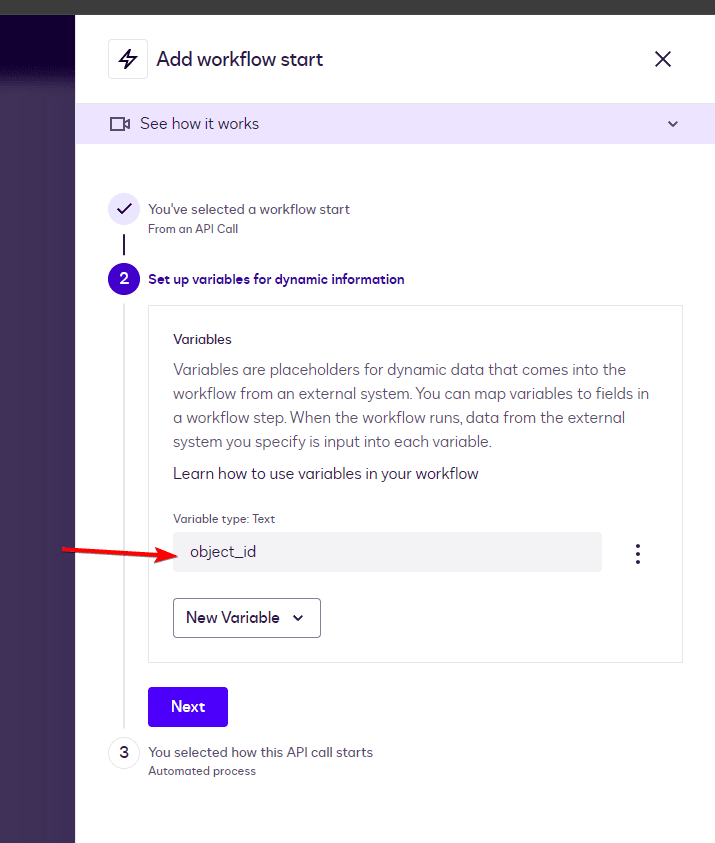
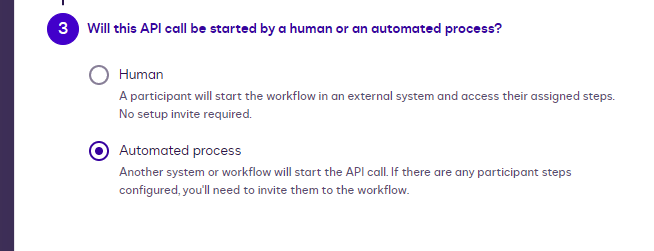
-
Choose Automated process as the trigger type.

This allows external systems, such as the Procore Side Panel, to pass the required identifier into the workflow.
Once configured, the Read From Procore step retrieves the selected Procore data and makes it available as workflow variables.
These variables can then be used in subsequent Workflow Builder steps.
2. object_id with Procore Side Panel
When a workflow is launched from Procore using the Procore Side Panel (Workflow Builder Launcher), Procore passes a single identifier to the Workflow.
object_idis the actual Procore ID of the currently opened record.- This is the different ID field for project users and project vendors
This behavior is consistent for both supported objects:
- Project Users —
object_idequals the Project Usercontact_id - Project Vendors —
object_idequals the Project Vendor (Company)id
Required Mapping in the Read From Procore Step
To ensure the workflow works correctly when launched from the Procore Side Panel, the Read From Procore step must be configured to use this identifier for project vendors
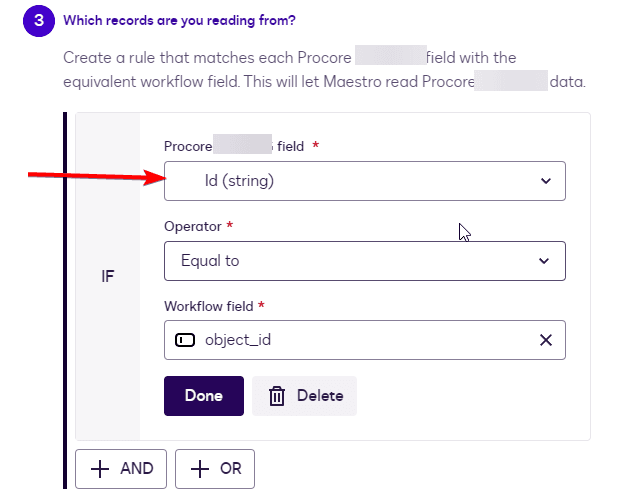
In the Which records are you reading from? section:
- Select the Procore field
Id(the primary ID field) for project vendors, - Use the Equal to operator,
- Map it to the workflow field
object_id.
This explicit mapping tells Workflow Builder to read the exact Procore record that was opened in Procore when the workflow was launched.
Procore step must be configured to use this identifier for project users
In the Which records are you reading from? section:
- Select the Procore field
contact_idfor project users , - Use the Equal to operator,
- Map it to the workflow field
object_id.
This explicit mapping tells Workflow Builder to read the exact Procore record that was opened in Procore when the workflow was launched.
If this mapping is not configured, the workflow will not be able to correctly identify the target User or Vendor.
3. Object Hierarchy in File Upload
⚠️ Current limitation: At this time, file upload is supported only for Prime Contracts. Other targets visible in the UI are still in development and are not functional.
How File Upload Location Works
Although the File Upload UI uses “Folder / Subfolder” terminology, these fields do not represent a file system.
They define a Procore entity hierarchy that determines where the file will be attached.
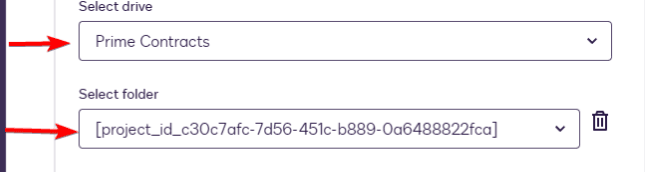
To attach a file to a Prime Contract, the location must be configured as:
- Drive: Prime Contracts
- Folder: Project ID
- Subfolder: Object ID (Prime Contract ID)
This hierarchy means:
- the Project defines the scope,
- the Prime Contract defines the exact target record.
Folder & Subfolder — What They Represent
- Folder
- Represents the Project ID associated with the Prime Contract.
- Subfolder
- Represents the Object ID of the Prime Contract itself.
📌 Important:
If Project ID and Object ID are swapped or incorrectly mapped, the file will not be attached to the expected record.
4. Installation & Configuration
Installing the Procore App in Docusign
The first step is to install the Procore application in Docusign.
-
Open Docusign App Center.
-
Make sure you have Admin rights to install the Procore app from the Docusign App Center.
-
Locate the Procore application.
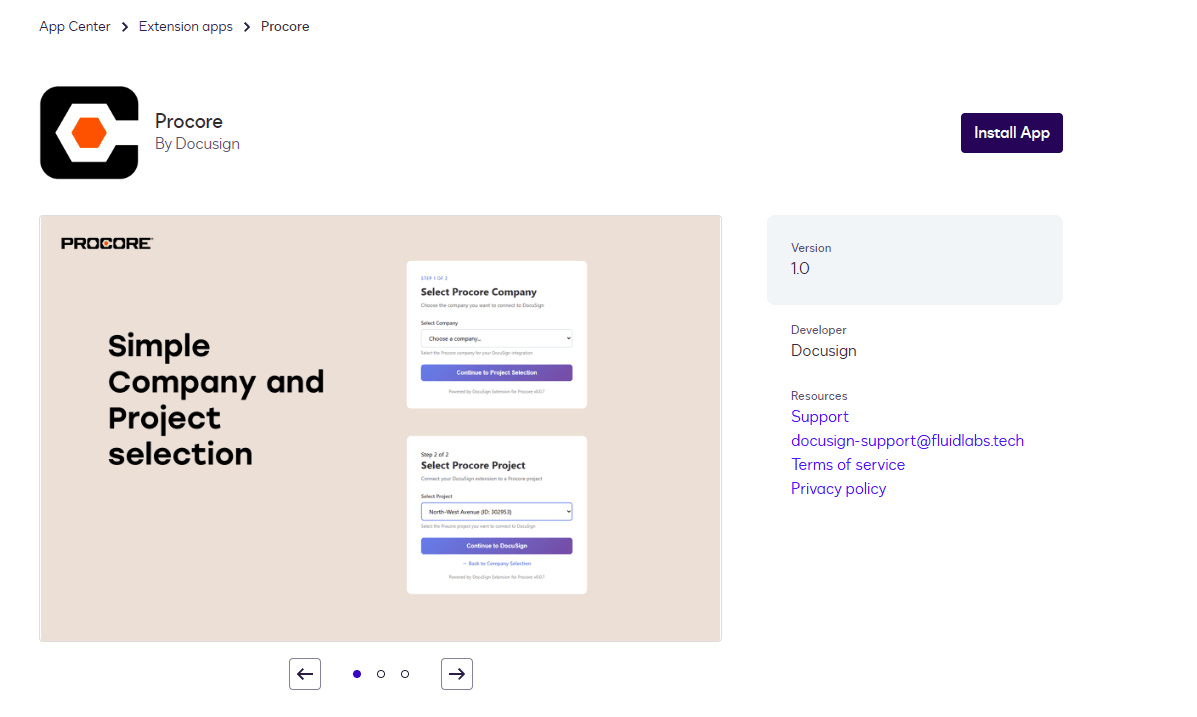
-
Click Install App to begin the installation.
-
During installation, connect your Procore account and grant the required permissions.
-
You will be asked to select Company and Project during this process.
💡 See Manage Connection for more details about configuring and updating connections.
Once the app is installed, a connection becomes available and can be selected in Workflow steps such as Read and Write.
After Installation
After the Procore app is installed and a connection is configured:
- The connection becomes available inside Workflows.
- Read and Write steps can use this connection to interact with Procore data from the selected project.
No additional setup is required at this stage.
Manage connection
During installation, you will be prompted to create a connection.
A connection represents your direct authorization to work with a specific Procore company and project.
This connection is later used inside Workflows to read or write data in Procore.
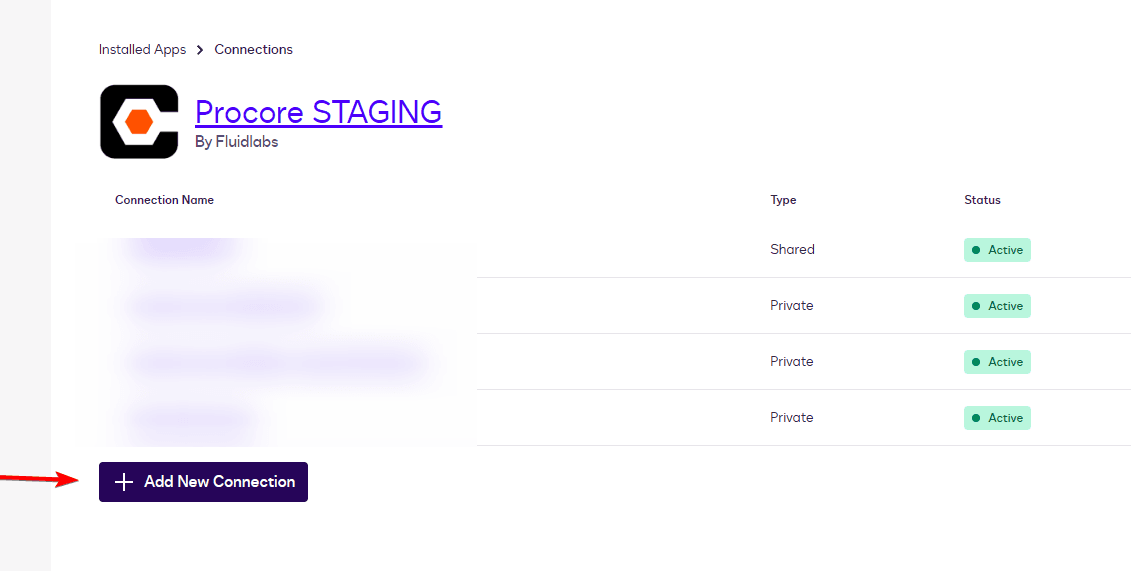
Updating or Adding a Connection
If you selected the wrong project during installation, or if you want to add a new connection to a new project:
-
Open the Procore application settings in Docusign.
-
Click Manage Connection.
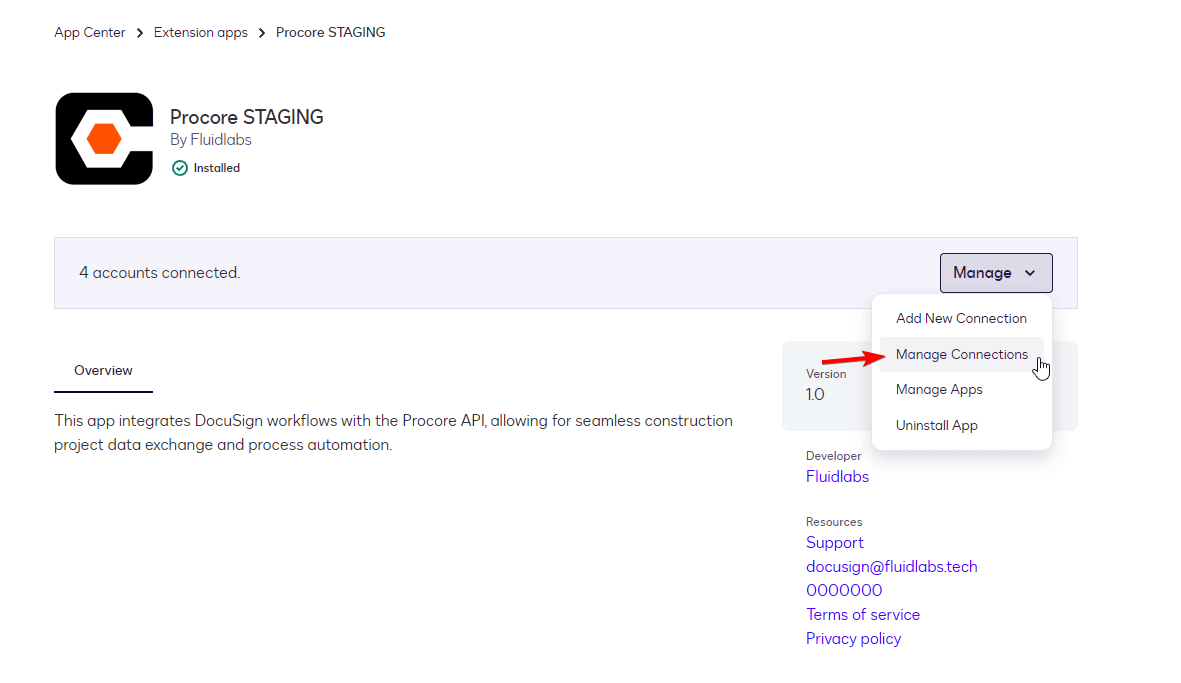
There is no need to reinstall the application.
The Manage Connection flow is the same as during the initial installation.
Creating a New Connection
When adding a new connection, you will be asked:
How would you like to connect this Procore account?
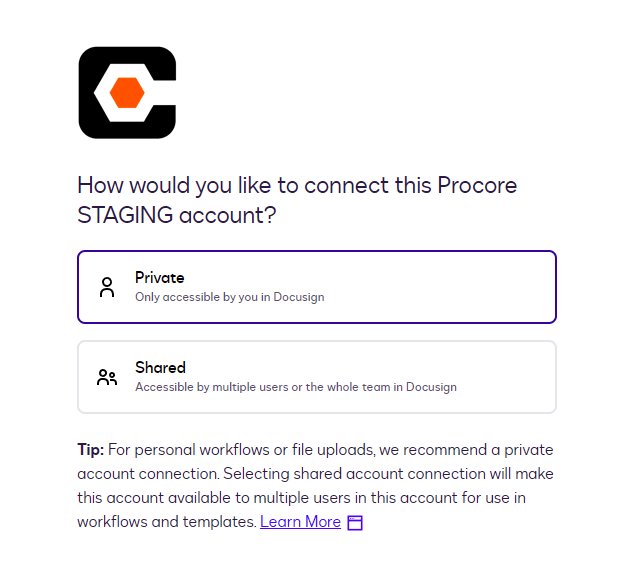
- Select Private or Shared depending on your needs.
- Click Next on the right bottom of the page
You will then be asked to provide a name for the connection.
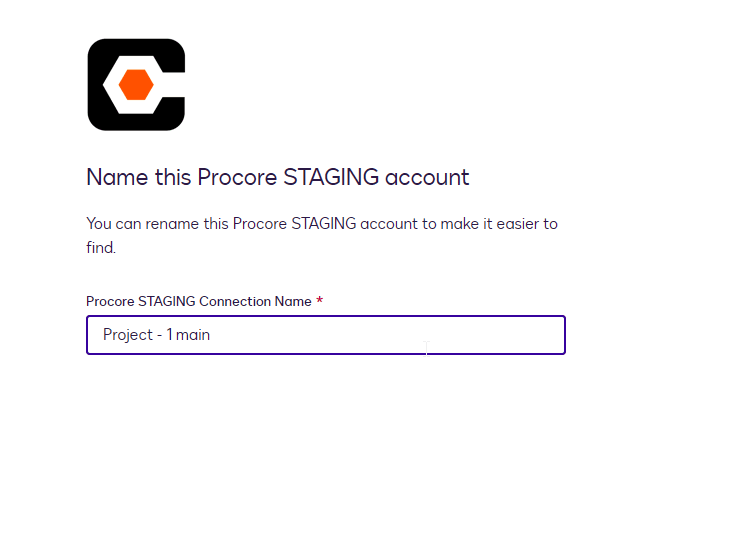
💡 We recommend using a name that clearly identifies the project (for example:
project1-main) to avoid confusion when selecting connections in workflows.
Next:
- Click Login (bottom-right).
- You will be redirected to Procore.
- Select your main Procore company (not a vendor). *what is Procore company
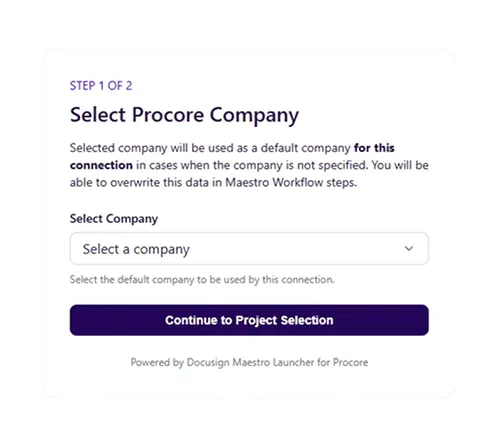
- Choose the specific project (*what is project) you want to connect.
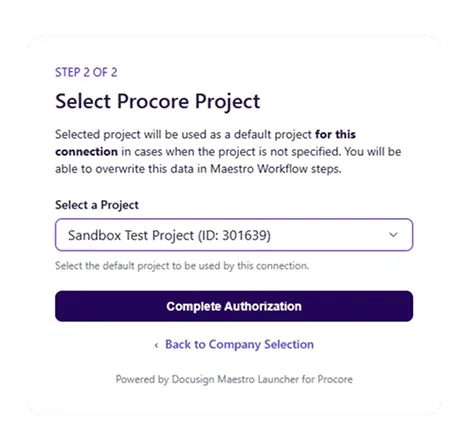
- Click Continue.
Once completed, the connection is created and can be used in Workflows.
5. Installing Procore Side Panel (Workflow Builder Launcher)
WIP - this page is in work in progress stage, and will be updated soon.
In general the process will look like this:
-
Go to Procore Marketplace at the top right corner
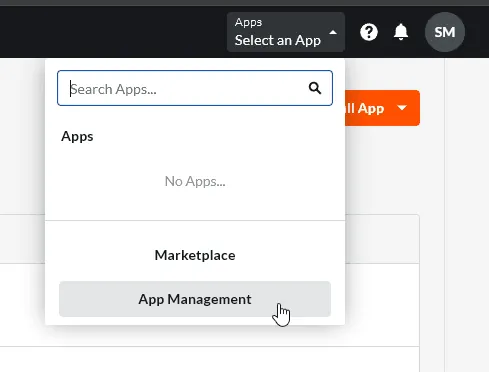
-
Find Docusign Workflow Builder Launcher
-
Install
6. How to Use the App
The Procore app enables you to work with Procore data directly within Docusign Workflows.
Using this app, you can create workflows in Docusign that read data from Procore, update Procore records, and send, track, or attach signed documents as part of an automated process.
Workflows can be:
- created and run directly in Docusign, or
- launched from Procore using the Procore Side Panel (Workflow Builder Launcher)
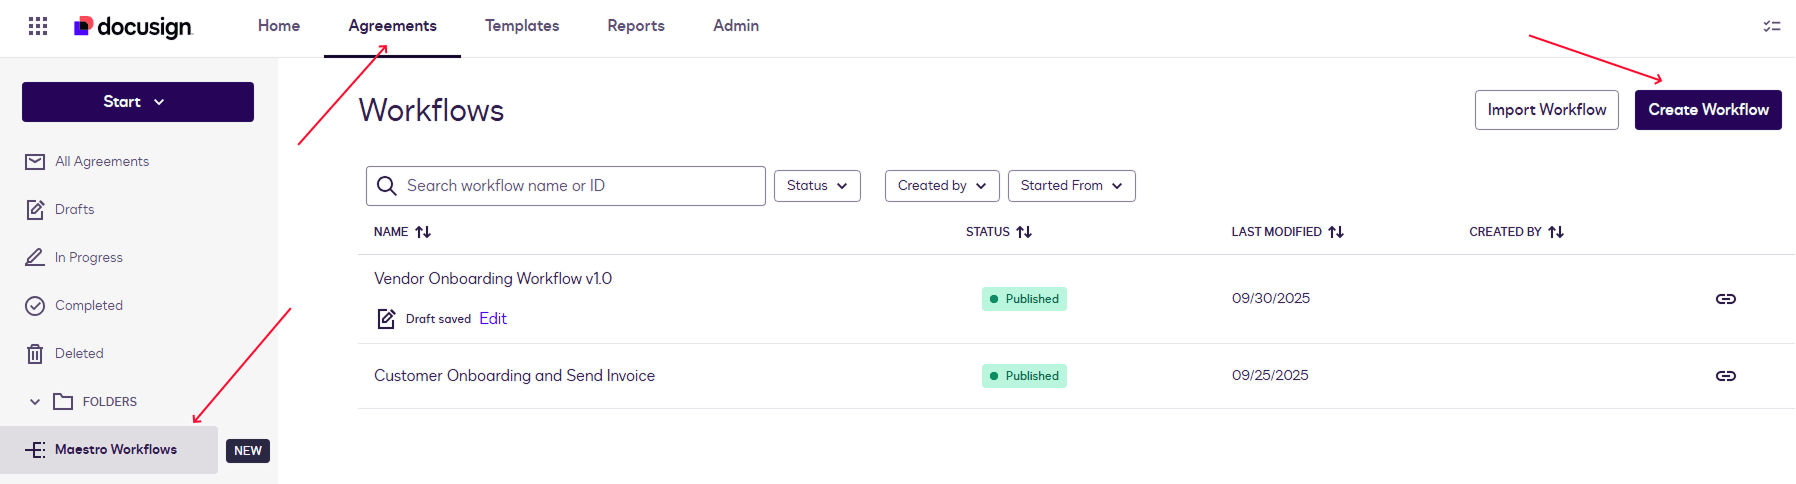
Create a Workflow Builder To start using the Procore integration, you first need to create a Workflow in Docusign.
- Log in to Docusign.
- Navigate to Agreements → Workflows.
- Click Create Workflow.
- Build your workflow using available steps, including Procore actions provided by the Procore app.
- Publish the workflow.
Run a Workflow
Once a workflow is created and published, it can be run in different ways:
- Directly from Docusign, using the Workflows interface, or
- From Procore, using the Procore Side Panel (Workflow Builder Launcher), which launches the workflow in the context of a selected User or Company and automatically passes Procore data to Docusign.
The same workflow can be reused in both scenarios.
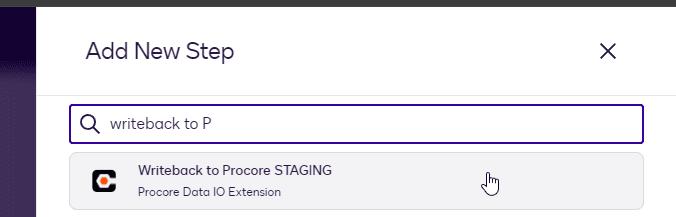
7. Available Procore Actions in Workflows
Within the Workflow Builder, the Procore app provides actions that allow you to interact with Procore data as part of an automated workflow.
These actions enable workflows to both read data from Procore and write processed data back, allowing Procore to participate as a source and destination within the same workflow.

The following Procore actions are available:
- read data from Procore (Read From Procore step)
- update Procore records (Writeback to Procore step)
- upload files to Procore system (File Upload step)
8. Read From Procore
The Read From Procore step allows a workflow to retrieve data for a specific Procore User or Company. To read data correctly, the workflow must be able to identify which Procore entity it should work with.
How this identification is performed depends on how the workflow is started.
Identifying the Procore Object
There are two common scenarios for identifying the target Procore object.
Scenario 1: Workflow started outside Procore
When a workflow is started directly in Docusign (for example, from a link, or manual start), the workflow author is responsible for defining how the Procore object is identified.
In this case:
- input parameters must be defined in the workflow,
- the Read From Procore step uses those parameters to locate the correct User or Company,
- the identification logic is fully controlled by the workflow configuration.
This approach is typically used when workflows are not tied to a specific Procore UI context.
See Workflow Start Methods - how workflow starts
Scenario 2: Workflow started from Procore Side Panel
When a workflow is launched from Procore using the Procore Side Panel (Workflow Builder Launcher), Procore automatically provides contextual data to the workflow.
💡Check Installing Procore Side Panel - Workflow Builder Launcher
In this case:
- the workflow is started from API,
- the Side Panel passes an
object_idparameter, object_idrepresents the Procore entityIDof the currently opened Company (vendor) orcontact_idof the currently opened User.
To use this value:
- the workflow must accept
object_idas an input variable, - the Read From Procore step maps
object_idto the corresponding Procore User ID or Company ID.
This allows the workflow to automatically operate on the Procore object selected in the Procore interface, without additional user input.
Important: When using the Procore Side Panel, the workflow must be configured to accept and use the
object_idprovided by Procore. Without this mapping, the Read From Procore step will not be able to identify the correct entity.
For detailed configuration options and examples, see Configuration Read From Procore Step below.
Configuration Read From Procore Step
The Read From Procore step allows a Workflow to retrieve data for a specific Procore entity, such as a Project User or Project Vendor (Company).
This step is commonly used to load Procore data into a workflow so it can be used in later steps, such as document generation, signing, or data updates.
Step Overview
Configuring the Read From Procore step consists of the following stages:
- selecting the Procore connection and object,
- choosing which fields should be read,
- defining how the target record is identified.
- Using
object_idwith Procore Side Panel
The example below demonstrates reading data for a Project User.
The same configuration logic applies when working with Project Vendors (Companies).
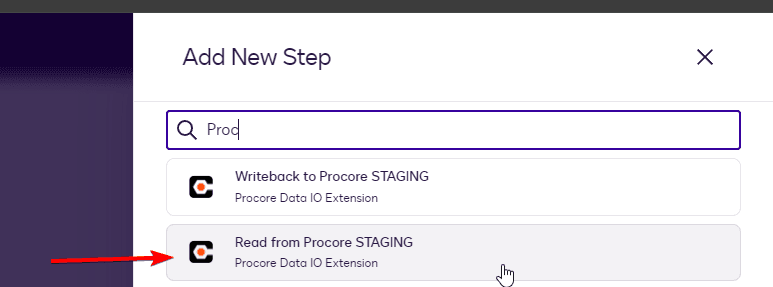
💡 How to add block "Read from Procore" check in Workflow Example
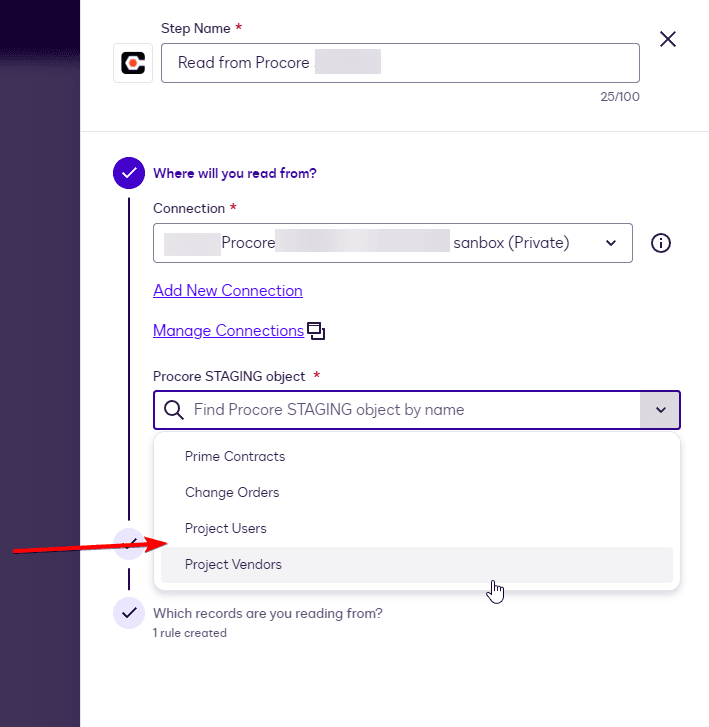
1. Select Where You Will Read From
In the first step, you define the Procore source for the data.
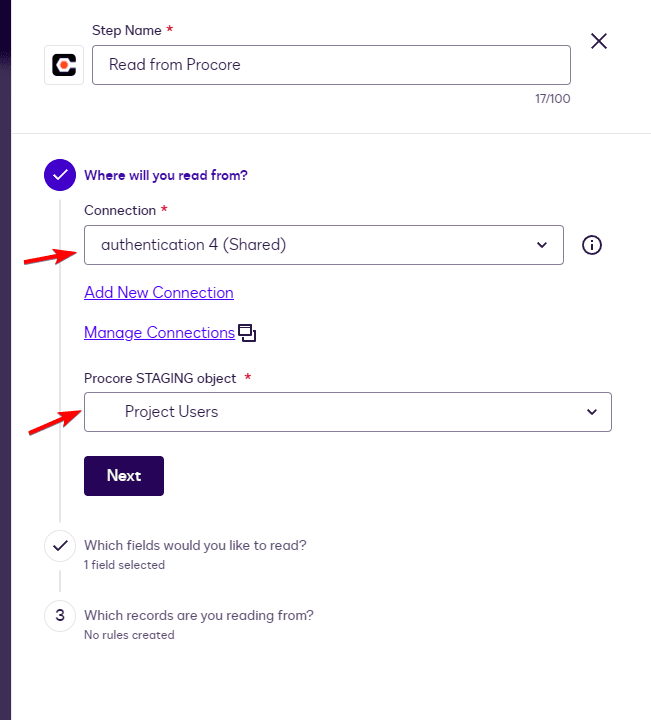
-
Connection
- Select the Procore connection that was created during app installation.
- 💡You can manage connection if you need to change it.
-
This connection determines which Procore company and project the workflow will access.
-
Procore Object
-
Choose the type of Procore object you want to read from:
- Project Users — to work with users assigned to the project.
- Project Vendors — to work with companies (vendors) associated with the project.
-
⚠️ It is important to select the correct object here.
This choice determines which fields are available and how records are identified later in the step.
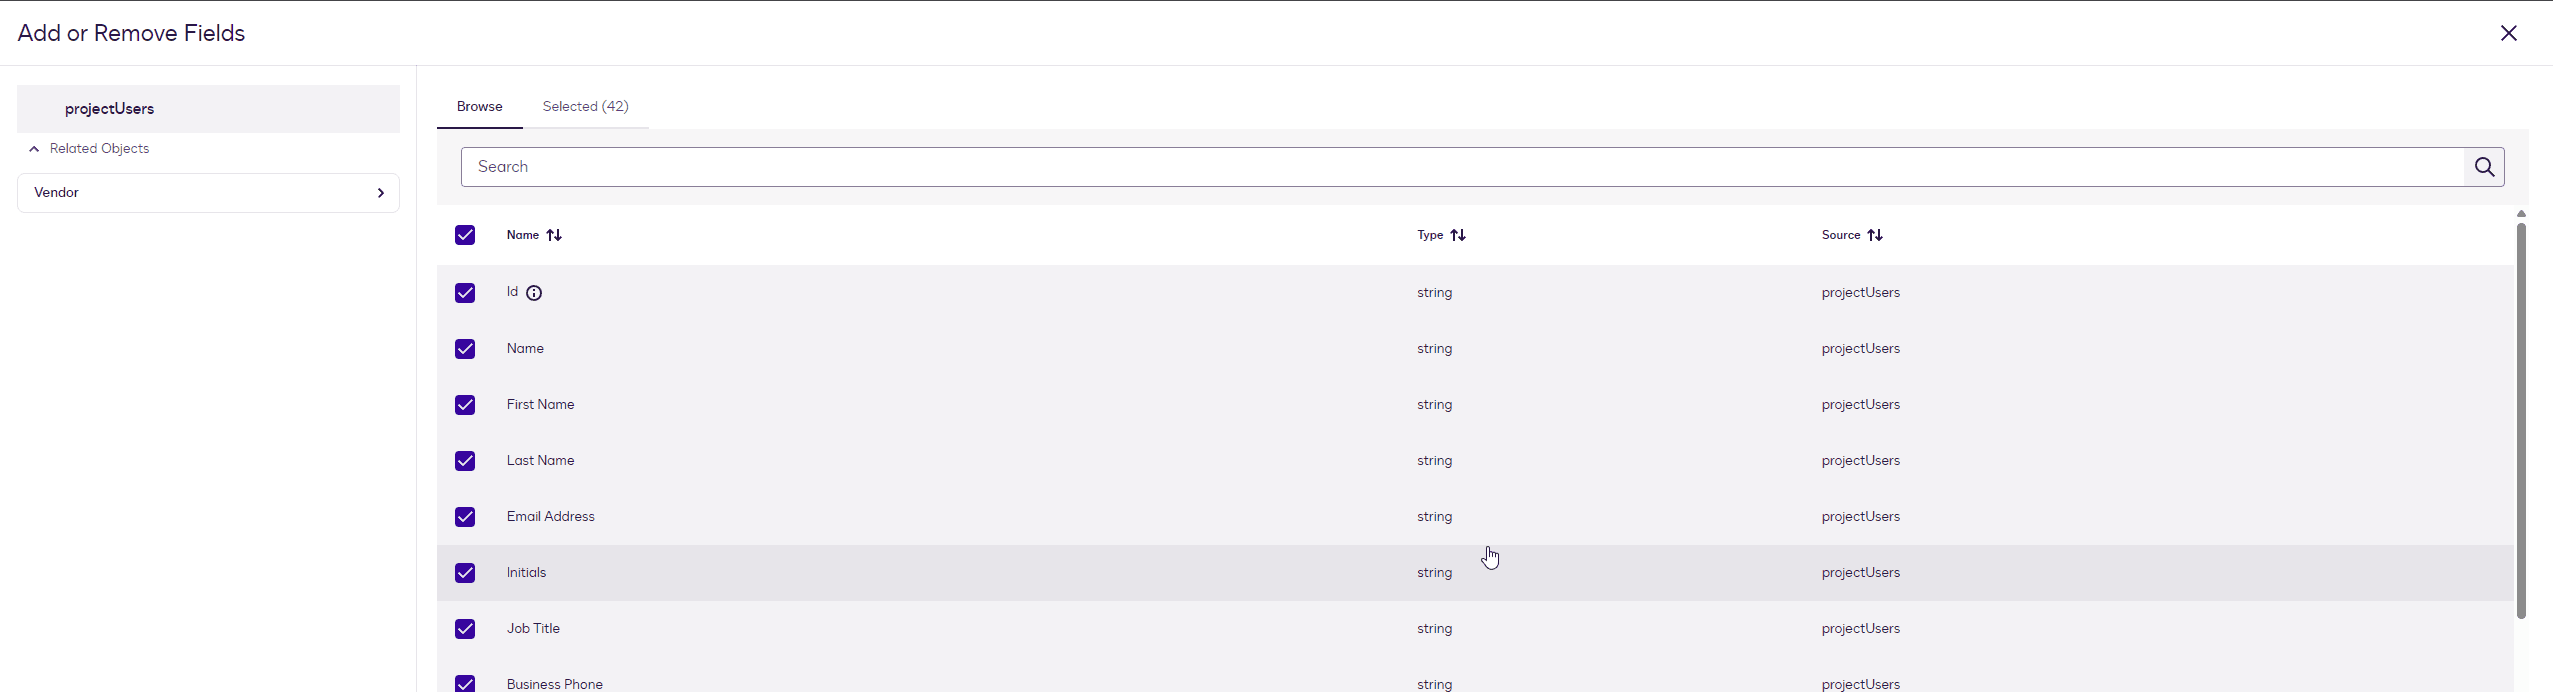
2. Select Fields to Read
Next, choose which Procore fields should be available as workflow variables.
-
Click Add or Remove Fields.
-
Select only the fields you need for your workflow.
-
Selected fields will become available for use in later Workflow Builder steps.
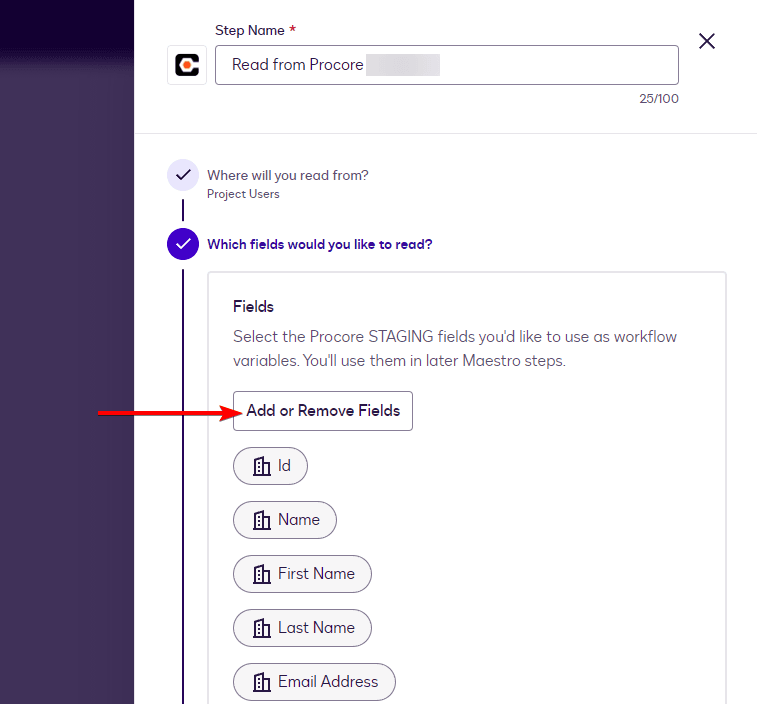
💡 Tip: Selecting only the required fields helps keep workflows easier to understand and maintain.
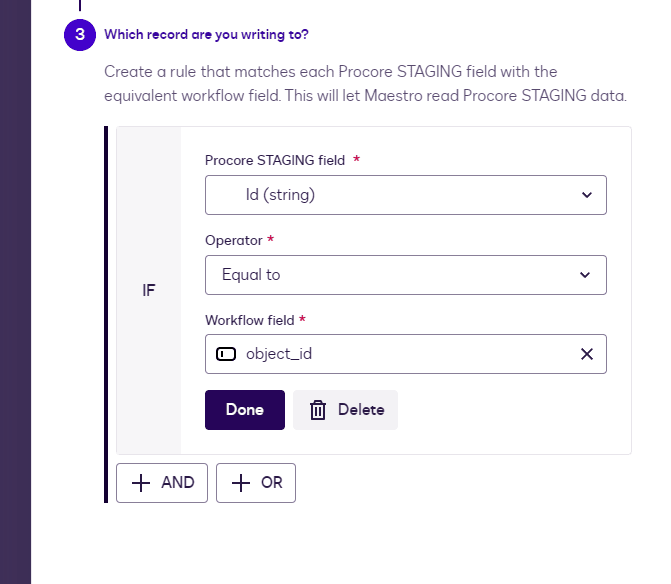
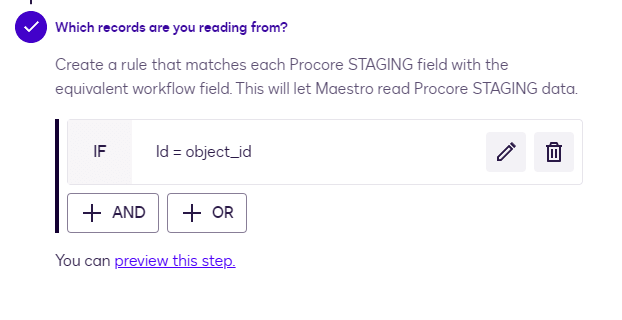
3. Define Which Record to Read
In this step, you define how the workflow identifies which Procore record (for example to identify client) should be read.
You create a rule that matches a Procore field to a workflow field.
Example configuration:
- Procore field:
Id- please check how to use object_id to know wich ID to select - Operator:
Equal to - Workflow field:
object_id
Tis rule tells the workflow to read the Procore record whose ID matches the value of object_id (configured in the workflow start\input)
Once configured, the Read From Procore step retrieves the selected Procore data and makes it available as workflow variables.
These variables can then be used in subsequent Workflow Builder steps.
9. Writeback to Procore
The Writeback to Procore action allows a workflow to update Procore records using data generated or processed during workflow execution.
This step is commonly used after actions such as document signing, approvals, or data transformation, when results need to be written back to Procore.
A common workflow pattern looks like this:
- Read user or company data from Procore.
- Use this data to prepare and send documents for signature.
- Receive signed documents and updated values within the workflow.
- Write the updated data back to Procore using the Writeback to Procore step.
Configuring the Writeback to Procore step consists of the following stages:
1. Select Where You Will Write To
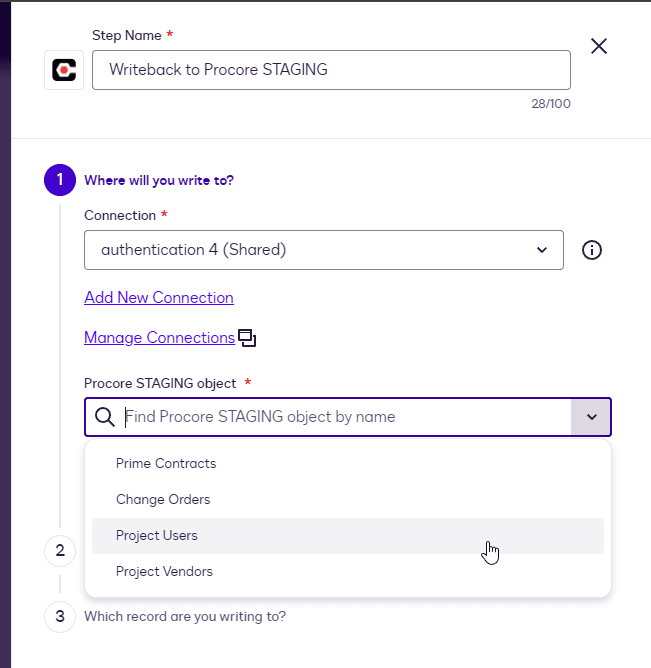
In the first step, define the Procore destination for the data.
-
Connection
- Select the Procore connection that points to the correct company and project.
-
Procore Object
-
Choose the Procore object you want to write to:
- Project Users — to update or create project users.
- Project Vendors — to update or create companies (vendors).
-
💡 Recommendation:
In most cases, this should match the object used in the corresponding Read From Procore step.
2. Choose Write Settings
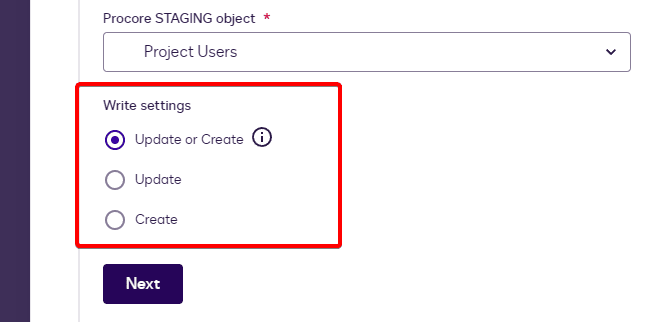
Next, select how Procore records should be written.
Available options:
-
Update
- Updates an existing Procore record.
- If no matching record is found, the write operation fails.
-
Create
- Always creates a new Procore record using the provided data, regardless of whether a matching record already exists.
-
Update or Create
-
A combined option:
- if a matching record is found, it is updated,
- if no matching record is found, a new record is created.
-
💡 Recommendation:
Use Update or Create for most workflows, as it provides the most flexible and fault-tolerant behavior.
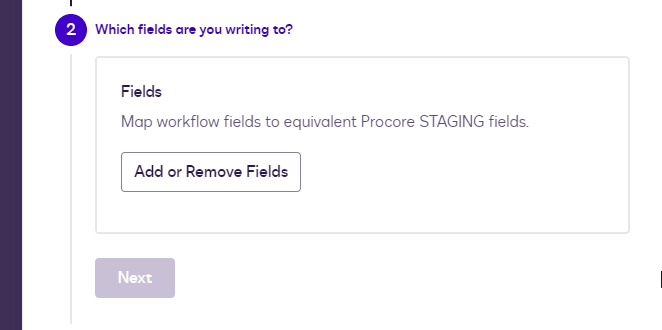
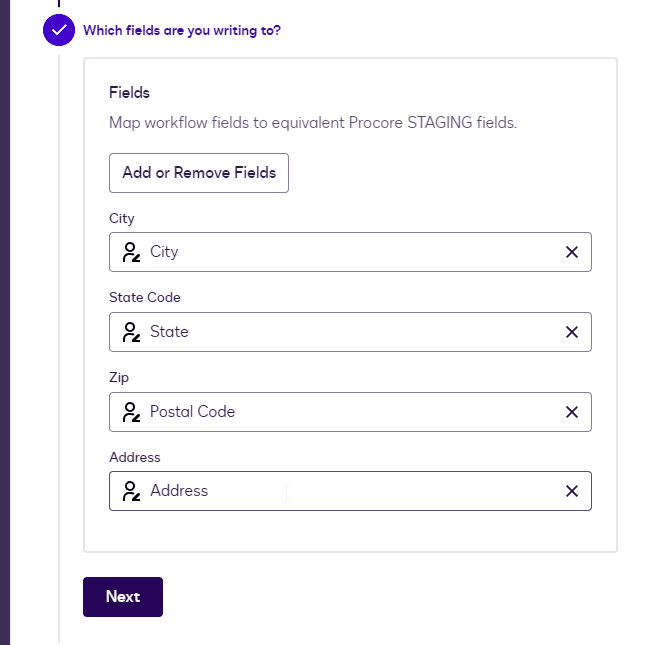
3. Select Fields to Write
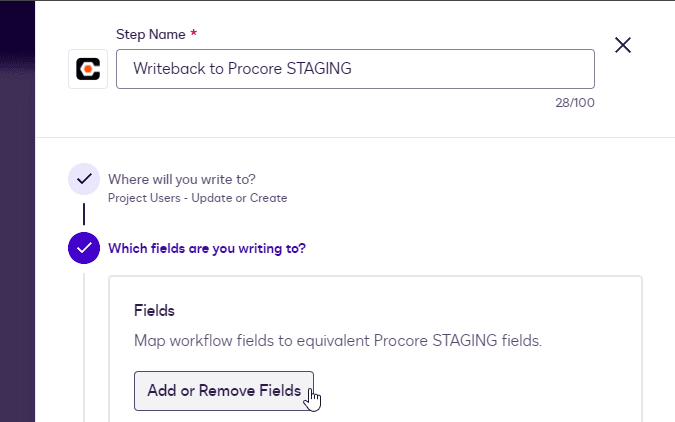
Choose which Procore fields should be updated or populated.
- Click Add or Remove Fields.
- Select only the fields you intend to update (for example: First Name, Last Name, City, State, Zip).
- Each selected Procore field must be mapped to a corresponding workflow value.
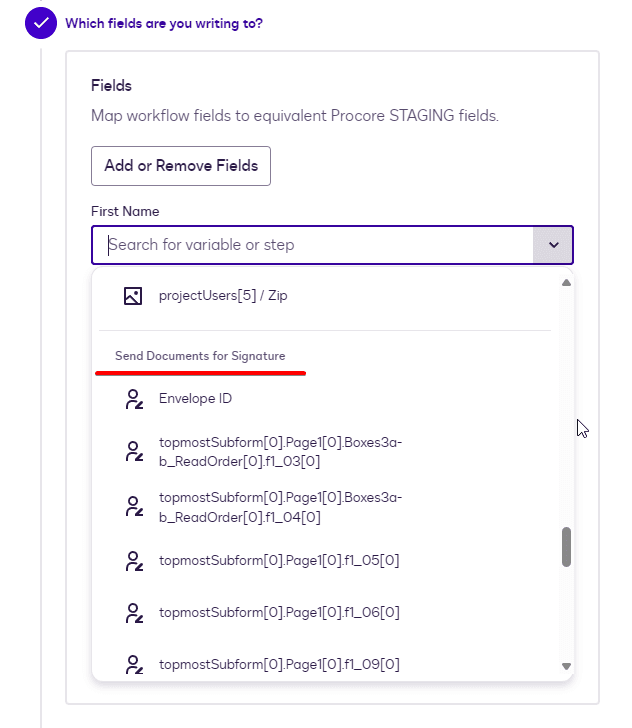
3.1 Mapping Workflow Data to Procore Fields
For each selected Procore field, choose the workflow value that should be written into it.
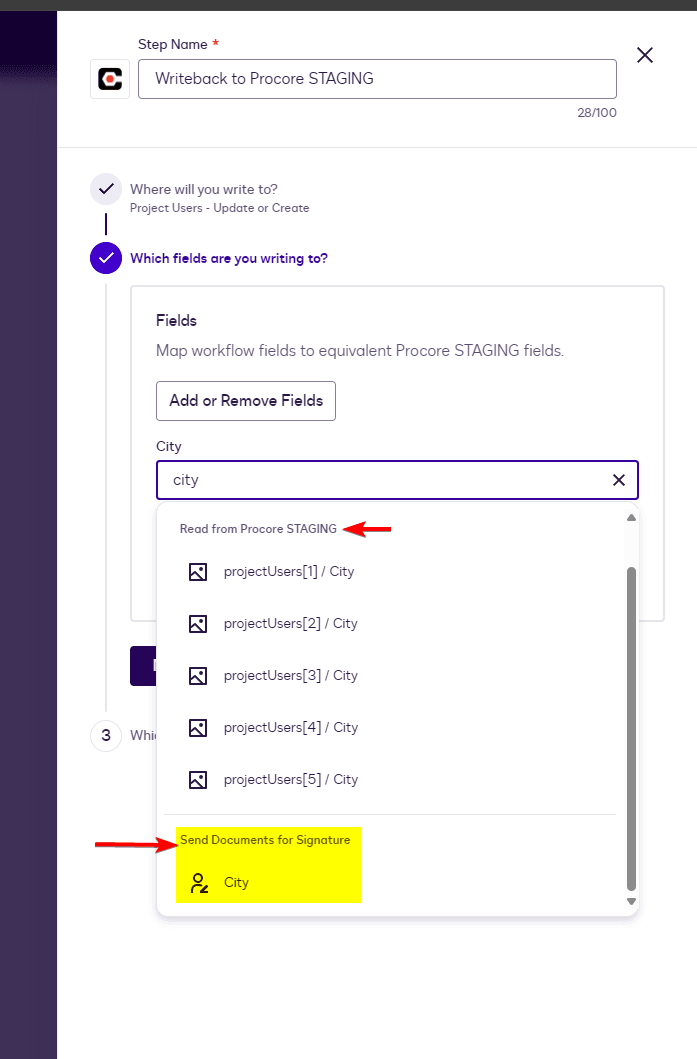
Workflow data can come from different steps, such as:
- Read From Procore (original data),
- Send Documents for Signature (data entered or updated during signing),
- other workflow steps.
⚠️ Important:
If you want Procore to receive updated values, make sure to map fields from the step where those values are finalized (for example, Send Documents for Signature).
Mapping fields from Read From Procore will simply write the original values back without changes.
4. Define Which Record to Write To
Finally, define how the workflow identifies the target Procore record.
When using the Procore Side Panel, configure the rule as follows:
- Procore field:
Id or contact_id - Operator:
Equal to - Workflow field:
object_id
This ensures that data is written back to the exact Procore User or Vendor from which the workflow was launched.
This rule works identically for:
- Project Users
- Project Vendors
Alternative Identification Methods
In workflows that are not launched from the Procore Side Panel, alternative identification rules can be used.
For example:
- matching by email address,
- matching by name,
- or using other workflow-provided values.
The identification strategy depends on how the workflow is designed and started.
Once configured, the Writeback to Procore step writes the selected workflow data back to Procore during workflow execution.
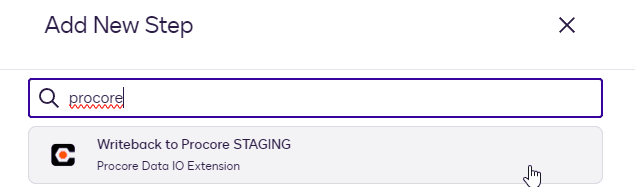
10. File Upload Procore
Add the File Upload Step
Add the File Upload action to your Workflow and open its configuration.

Select the File to Upload
You are starting with a file
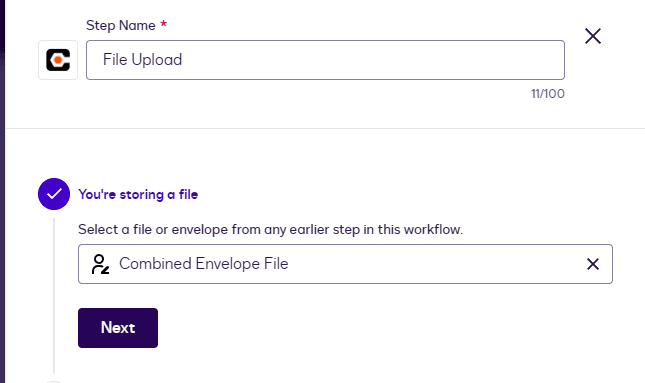
- Select Combined Envelope File
💡 Note: If no file is available for selection, it usually means that the file was not generated in previous workflow steps. Verify that your workflow includes steps such as document preparation and signing before File Upload.
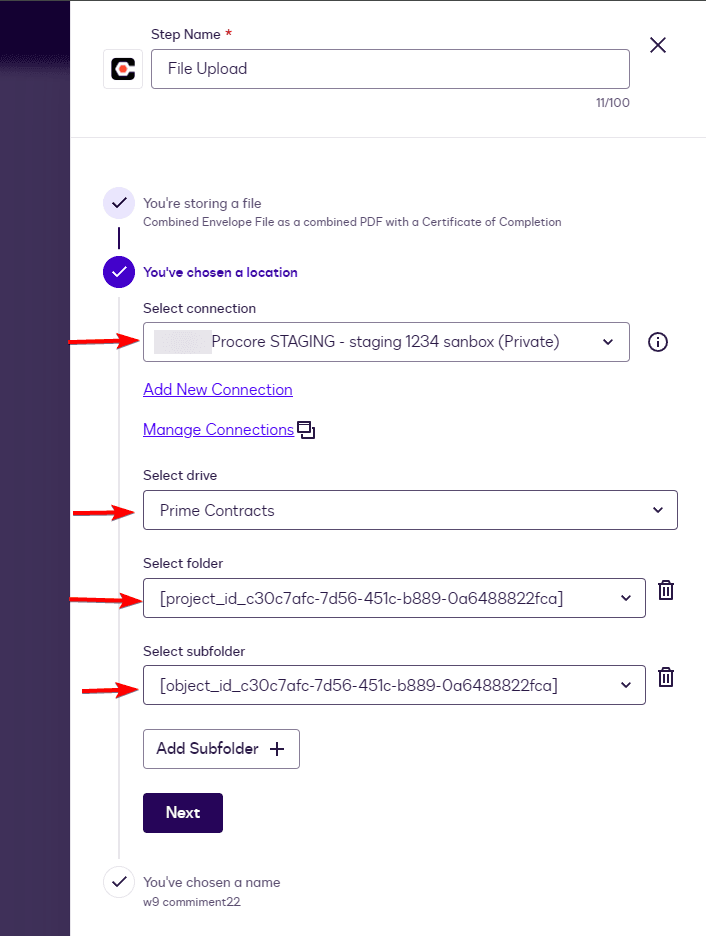
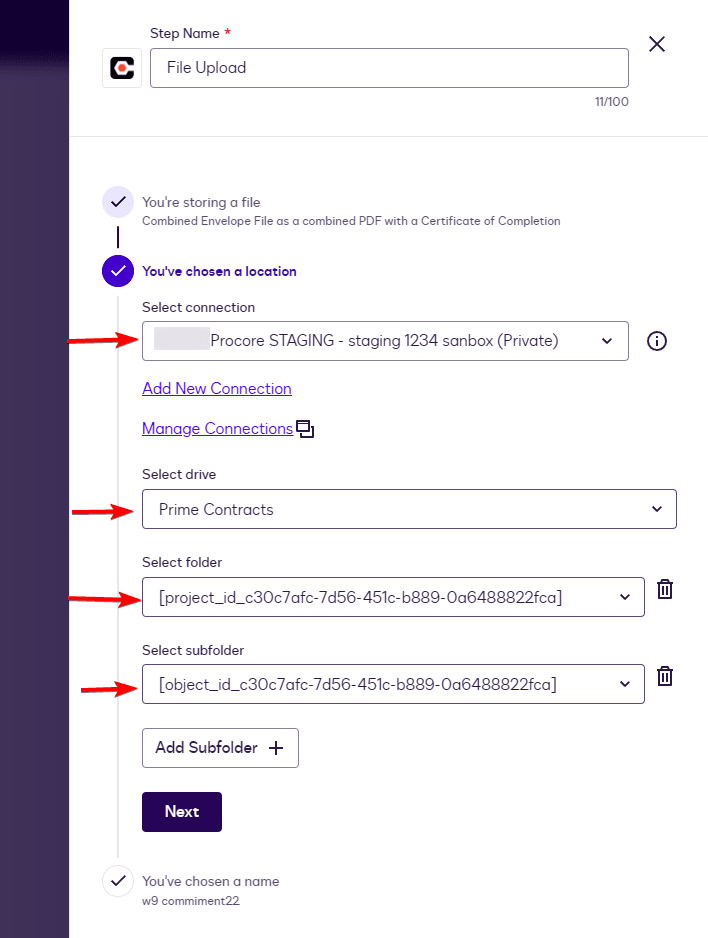
Choose the Upload Location
⚠️ Important: The UI uses “Folder/Subfolder” terminology, but the structure represents a Procore entity hierarchy. To attach a file to a Prime Contract, you must configure the location as: Drive: Prime Contracts Folder: Project_ID Subfolder: Object_ID (Prime Contract ID)
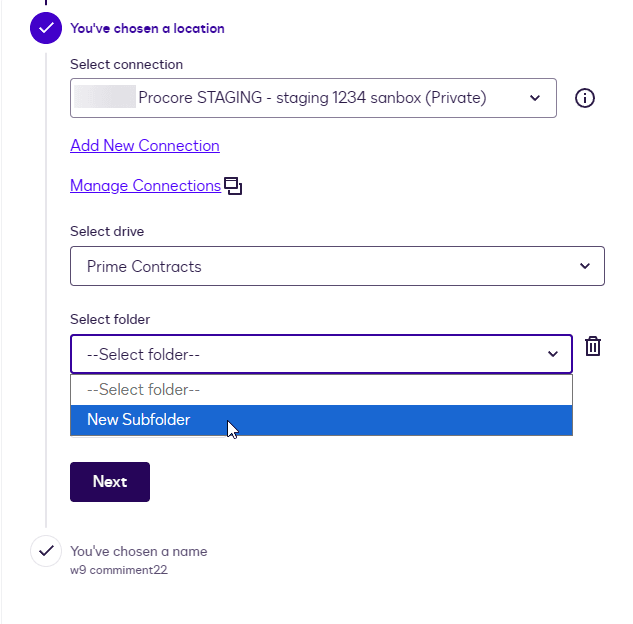
Step 1 — Select Drive
In Select Drive, choose Prime Contracts.
This sets the target entity type for the upload.

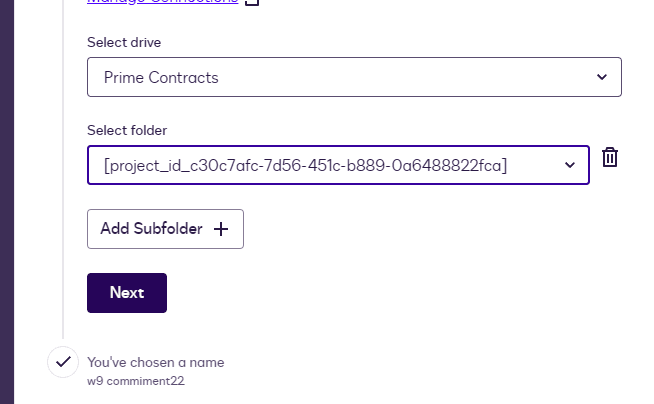
Step 2 — Create the Folder (Project ID)
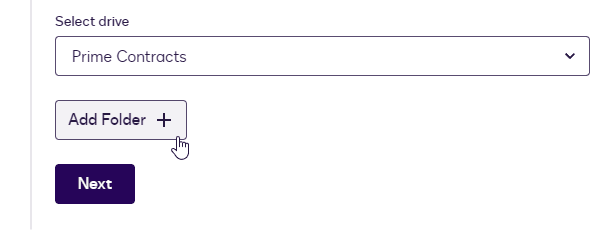
Under Select Folder, click New Subfolder.
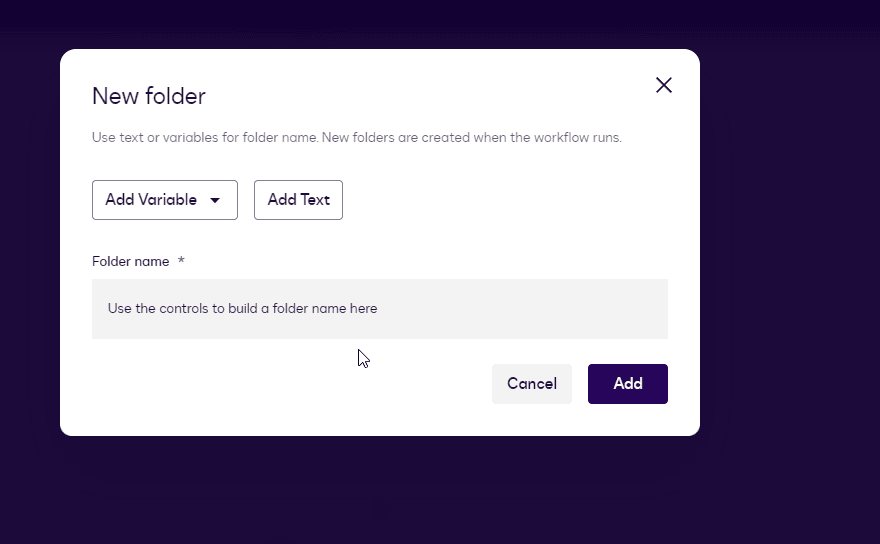
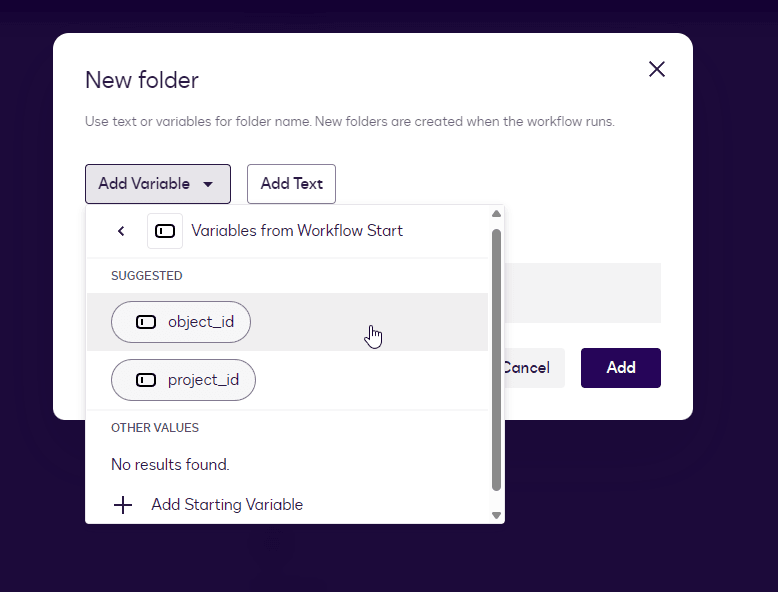
 In the dialog (New Folder), click Add Variable.
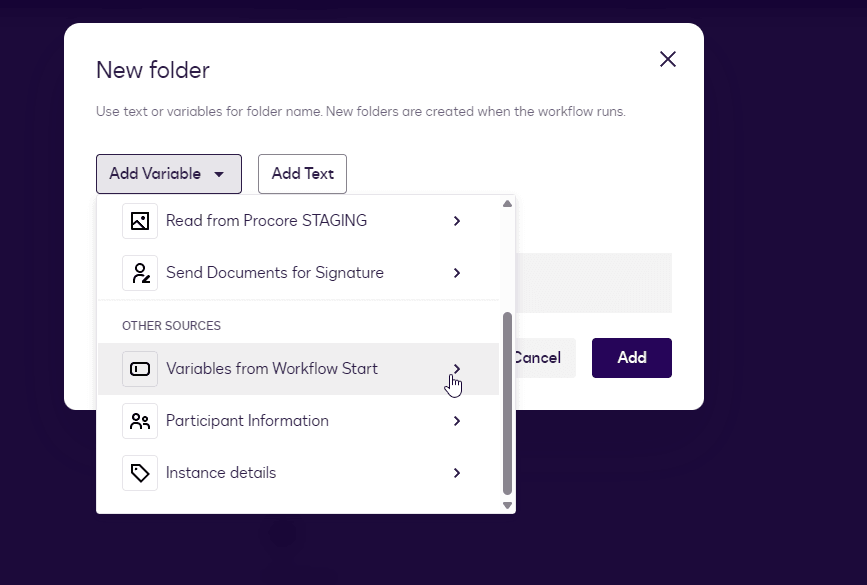
 Select the variable source:
Variable from workflow start(recommended when using Procore Side Panel / API start)
Select the variable source:
Variable from workflow start(recommended when using Procore Side Panel / API start)
 Choose: Project ID
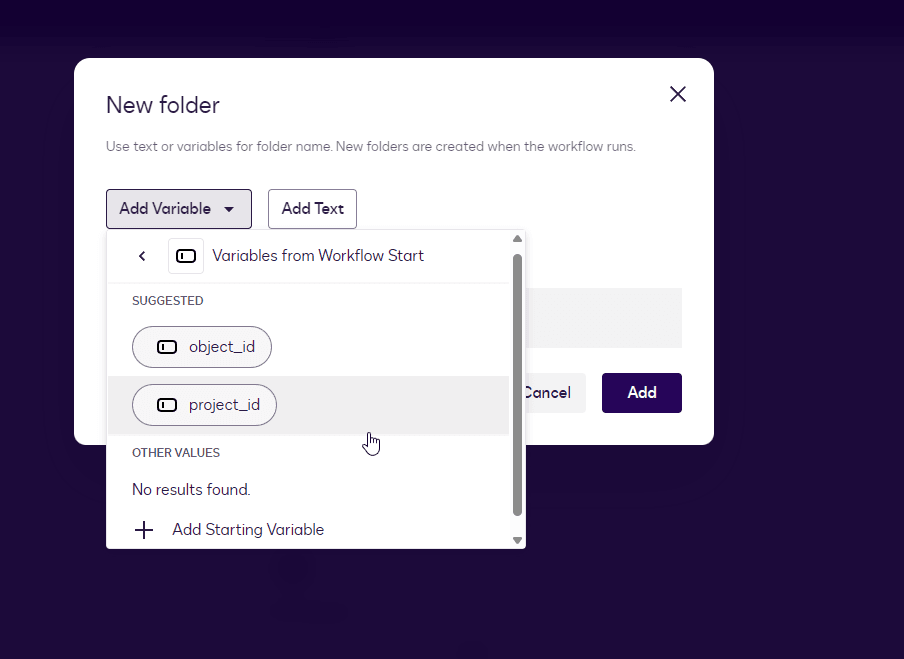 Click Add.
✅ Result: the Folder entry will appear in the File Upload location UI and will contain the Project ID variable.
Step 3 — Create the Subfolder (Object ID / Prime Contract ID)
Under Select Subfolder, click New Subfolder.
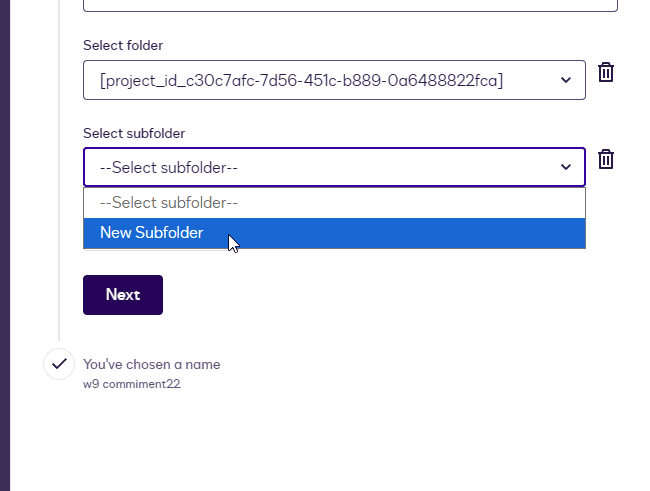
In the dialog, click Add Variable. Select: Variable from workflow start Choose: Object_ID
Click Add.
✅ Result: the Subfolder entry will appear and will contain the Object ID variable.
Final Expected Structure
After completing the steps above, your File Upload location should look like:
- Select Drive: Prime Contracts
- Folder: Project ID
- Subfolder: Object ID
This configuration attaches the uploaded file to the specified Prime Contract.
Where Project ID and Object ID Come From
Project ID and Object ID can be provided in different ways, depending on your workflow design:
- from Workflow Start variables (manual input, API call, or Procore Side Panel), or
- from previous workflow steps (for example, using Read From Procore outputs), or
- from other logic in the workflow.
This guide describes the workflow start approach because it is the most common setup for workflows launched from the Procore Side Panel.
For details on defining variables for workflows launched from Procore, see Defining Object ID in Workflow Start.
Using File Upload with Procore Side Panel
When the workflow is launched from the Procore Side Panel:
project_idcan be passed automatically,object_id(Prime Contract ID) can be passed automatically.
To support this:
-
define
object_id(and optionallyproject_id) as workflow variables in the Workflow Start (From API Call), -
map these variables in the File Upload step:
- Select Folder →
project_id - Select Subfolder →
object_id
- Select Folder →
This allows the file to be attached without manual input.
Choose File Name
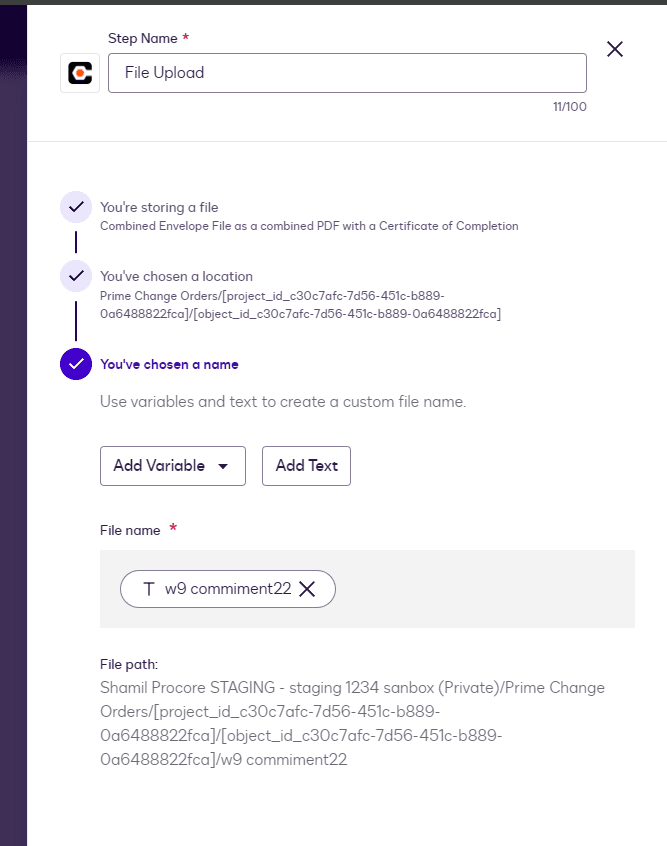
- You may specify a static file name, or
- generate it dynamically using workflow variables (for example, contract name or date).
When configured correctly:
- The file is uploaded to Procore
- It is attached to the specified Prime Contract
- The attachment follows the Project → Prime Contract relationship
11. Using the Procore Workflow Builder Launcher
Using the Procore Side Panel (Workflow Builder Launcher)
The Procore Side Panel (Docusign Workflow Builder Launcher) allows you to launch published Workflows in the context of a specific Procore record.
⚠️ Important:
The Side Panel becomes available only when a specific record is opened in Edit mode.
The type of the opened record determines which Procore object must be used inside the workflow.
Authorizing Docusign
Before you can use the Procore Side Panel, you must authorize your Docusign account.
When you open the Docusign Workflow Builder Launcher for the first time, the panel will display an Authorize with Docusign button.
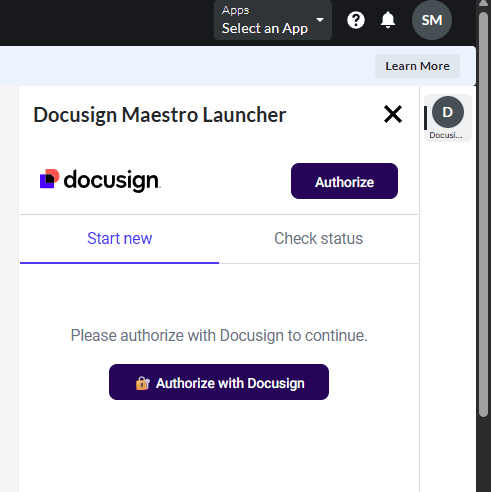
To authorize:
- Click Authorize with Docusign
- You will be redirected to Docusign to log in
- Complete the authorization flow
This is a one-time step.
After successful authorization, the Side Panel will refresh and display the available workflows.
Opening the Side Panel for launching workflow
In Procore, open a record in Edit mode:
- Open a specific user (
project_usersin read\write Procore step in Workflow) 
- Or open a specific company (
project_vendorsin read\write Procore step in Workflow)
Then open the Docusign Workflow Builder Launcher from the right-hand side panel.
At this moment, Procore knows which exact entity (User or Vendor) is currently open and will pass its ID into the workflow.
How Record Context Affects Workflow Configuration
The record type opened in Procore must match the Procore object selected in the workflow steps.
If a User (client) is opened in Procore:
- In Read from Procore step
- Procore object → project_users
- In Writeback to Procore srep
- Procore object → project_users
If a Project Vendor is opened in Procore:
- In Read from Procore step
- Procore object → project_vendors
- In Writeback to Procore step
- Procore object → project_vendors
💡 Using a mismatched object (for example, opening a Vendor (company) in Procore but configuring the workflow for Project Users) will result in incorrect behavior or no records being found.
Object ID Passed from the Side Panel
When a workflow is launched from the Procore Side Panel, Procore passes the following values into the Workflow:
-
object_id — the ID of the currently opened Procore record
- User ID when a User (client) is open
- Vendor ID when a Company is open
The object_id is always the Id of the opened record.
-
To work correctly for project vendors:
- Read From Procore must use
Id = object_id - Writeback to Procore must use
Id = object_id
- Read From Procore must use
-
To work correctly for project users:
- Read From Procore must use
contact_id = object_id - Writeback to Procore must use
contact_id = object_id
- Read From Procore must use
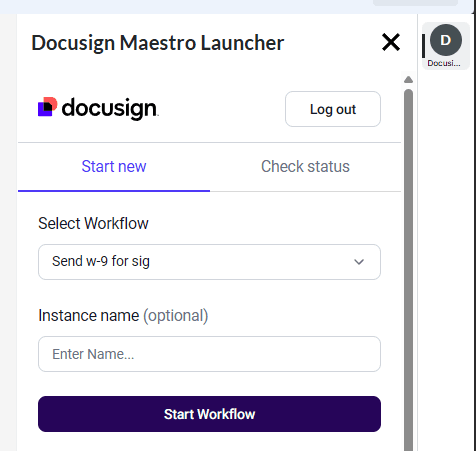
Launching the Workflow
After authorization:
- Select a published workflow from the dropdown
- Click Start Workflow
If the workflow is configured correctly, it will:
- Read data from the opened Procore record
- Execute the configured Workflow Builder steps
- Optionally write updated data back to the same record

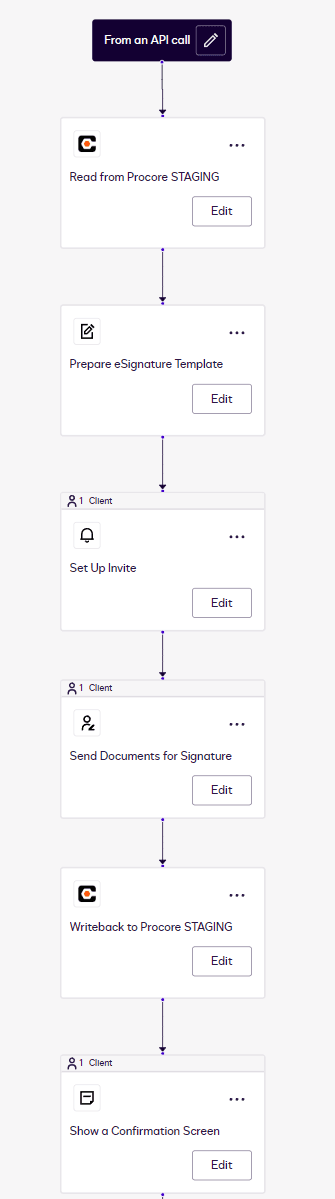
12. Workflow Expample
Workflow Example: End-to-End User Data Sync with Procore
This example demonstrates a complete Workflow that:
- reads a User record from Procore,
- sends a document for eSignature with pre-filled data,
- captures updated data from the signed document,
- writes the updated information back to Procore.
This workflow is designed to be launched from the Procore Side Panel, but it can also be triggered directly from Docusign.
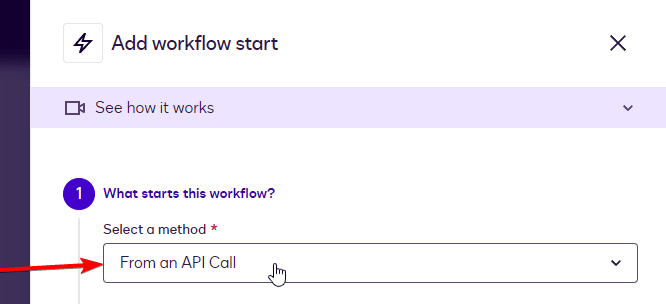
Step 1. Configure Workflow Start (From API Call)
To allow this workflow to be launched from Procore, the workflow must start with an API-triggered start.
- Add Workflow Start
- Select From an API Call
- Click Next
Set Up Variables for Dynamic Information
Create the following variable:
- Name:
object_id - Type: Text
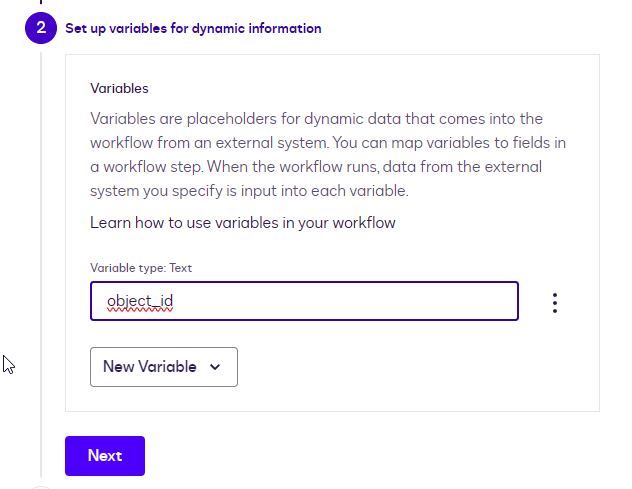
This variable represents the Procore entity ID (User ID or Vendor ID) that will be passed into the workflow when it is launched from the Procore Side Panel.
-
Click Next
-
Select Automated process
-
Apply changes
At this point, the workflow is ready to accept input from Procore.
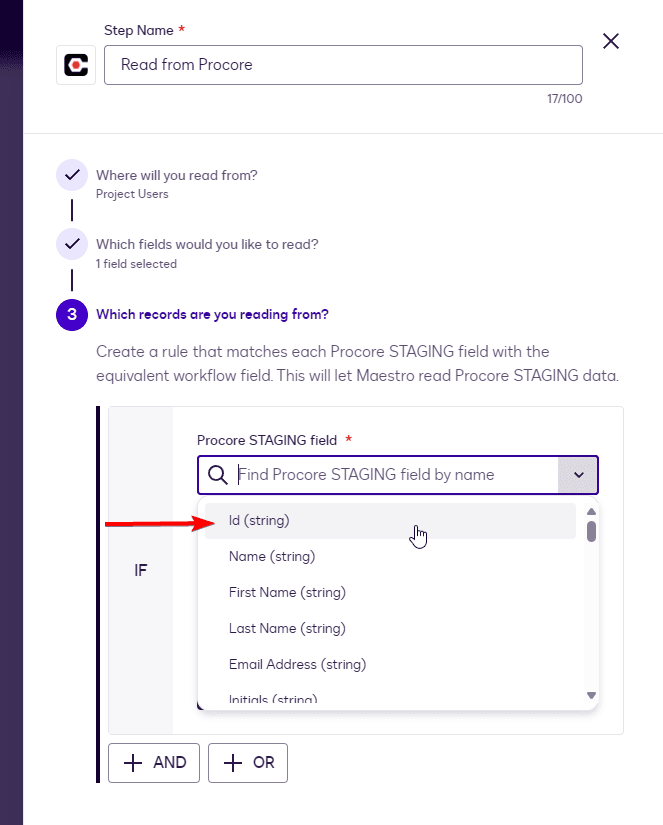
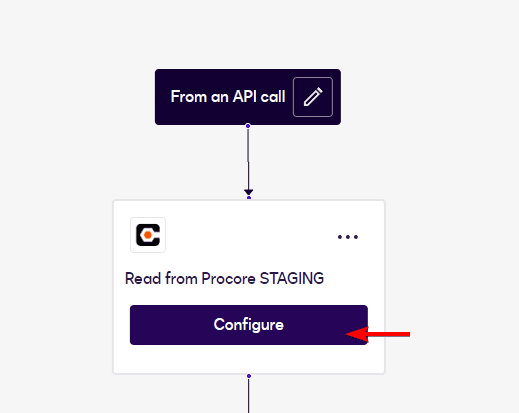
Step 2. Read Data from Procore
Add the Read from Procore step. This step retrieves data from Procore and makes it available as workflow variables.
Configuration
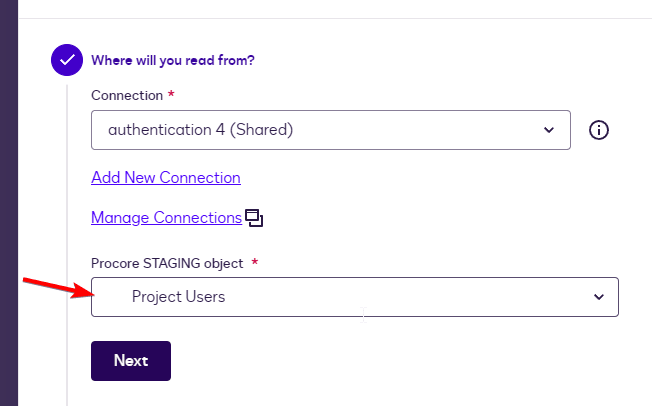
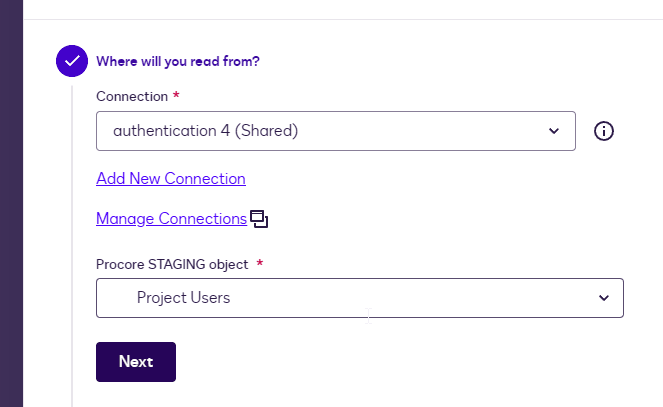
Where will you read from?
-
Select the Procore Connection (what is Connection and how it works here)
-
Select Procore object
Project Users(for this example as we work with exact client)- (The configuration is identical for Project Vendors)
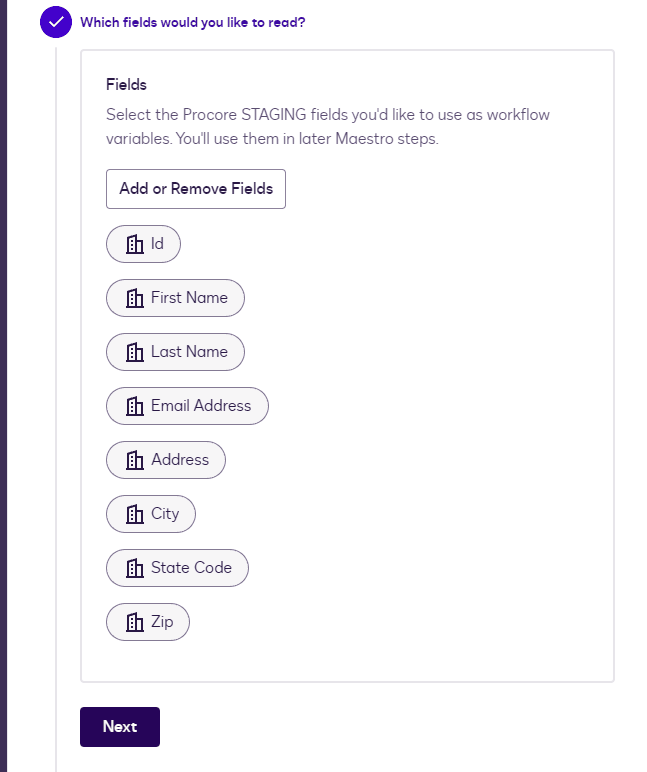
Select Fields to Read
Select the fields required for the document and later updates:
Id(required)First NameLast NameEmail AddressAddressCityStateZip
These fields will be available for mapping in later workflow steps.
Define Which Record to Read
To ensure the correct Procore record is retrieved, configure the matching rule:
-
Procore field:
Id -
Operator: Equal to
-
Workflow field:
object_id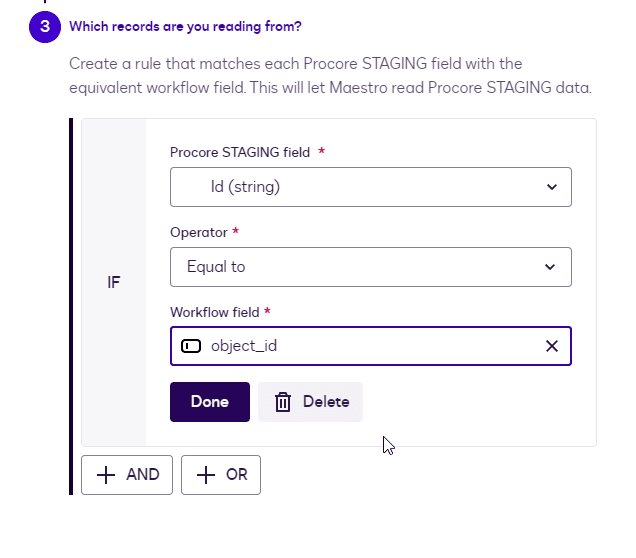
Important:
When the workflow is launched from the Procore Side Panel, Procore always passes theId of the currently opened Vendor or contact_id of the currently opened User.
To ensure correct behavior, object_id must always be matched to the right Id field
contact_id - for project users, id - for project vendors.
Apply the configuration.
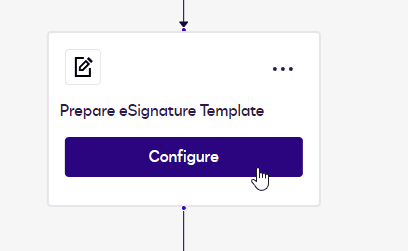
Step 3. Prepare eSignature Document
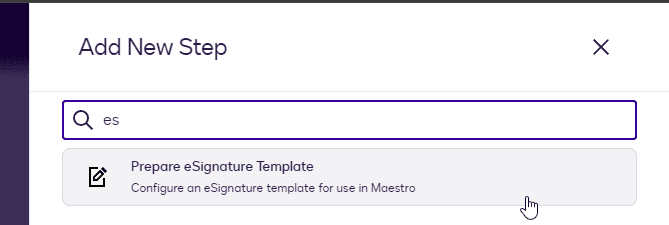 Add Prepare eSignature Template.
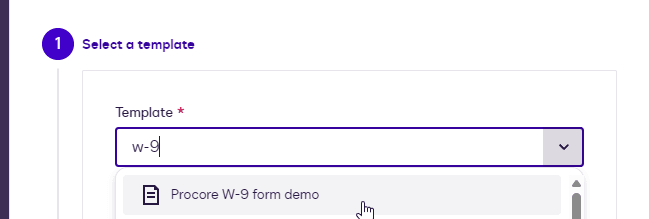
-
Select the template (e.g. W-9 Demo Form)
-
*Template created in other Docusign options, called "Templates"
-
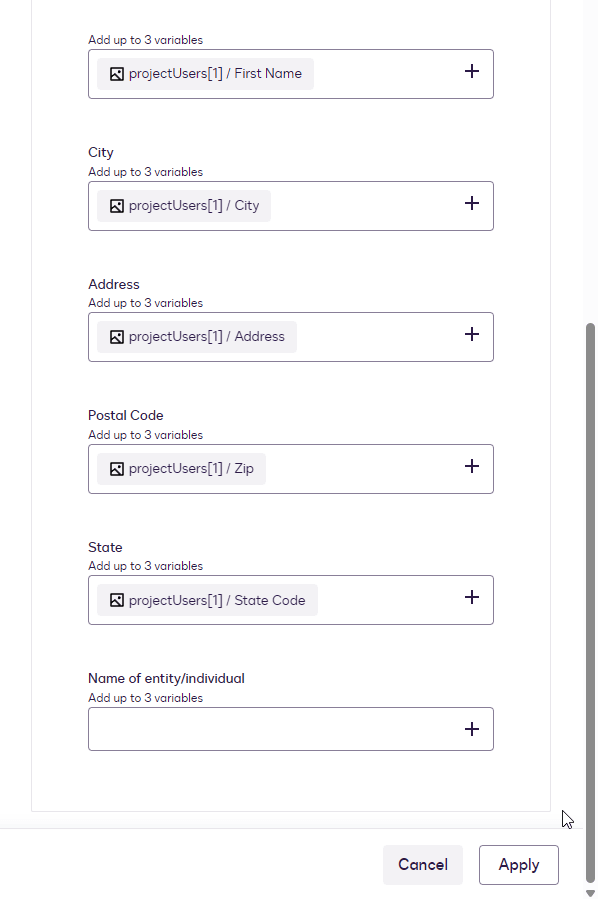
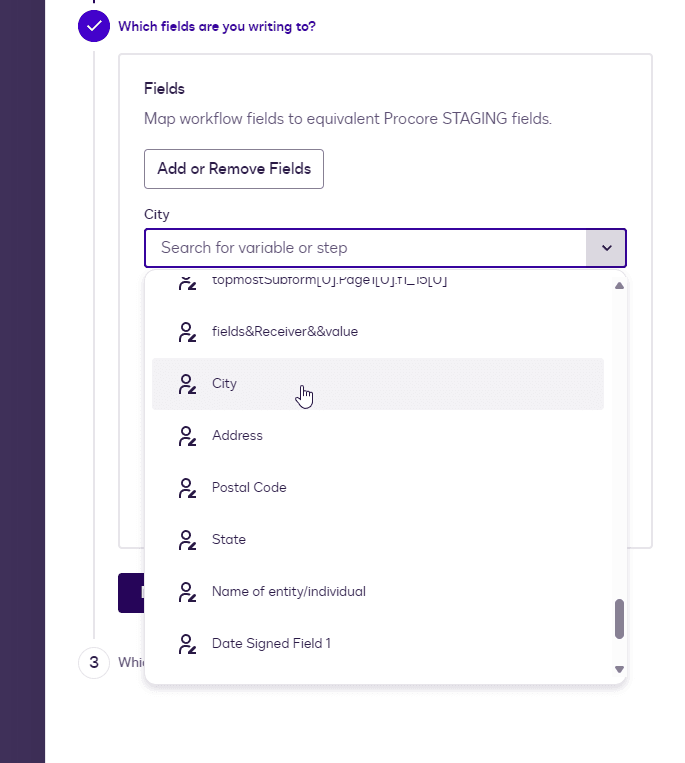
Map Procore fields to document fields, for example:
First Name→ First NameLast Name→ Last NameAddress→ AddressCity→ CityState→ StateZip→ Postal Code
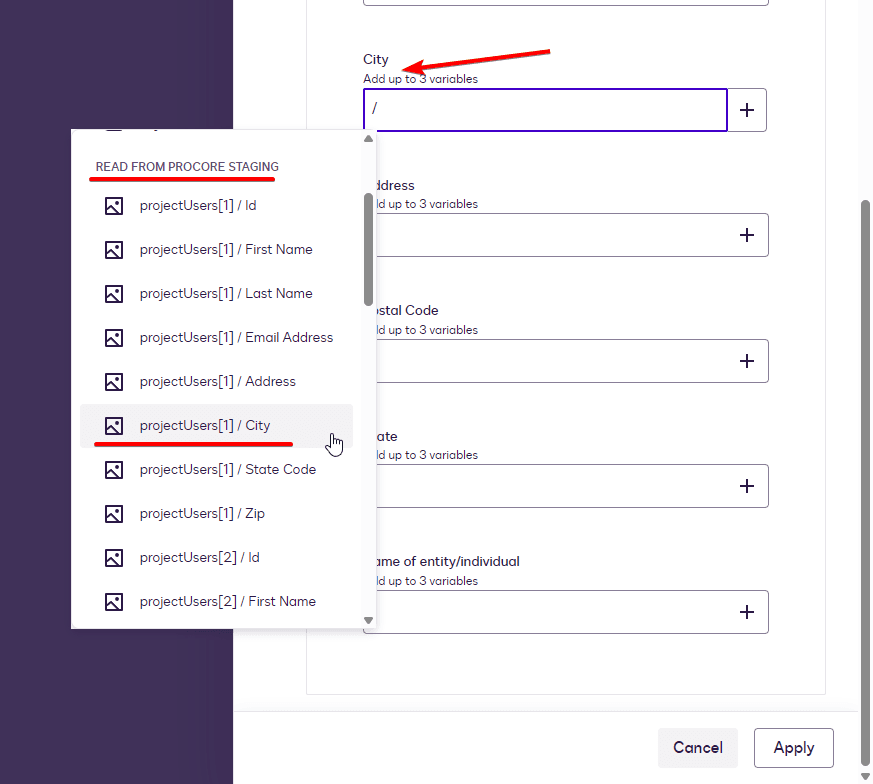 Important:
Make sure that you selected field from "READ FROM PROCORE" step. This is the data that Docusign retrieves from Procore.
This step pre-fills the document using data retrieved from Procore.
Apply changes.
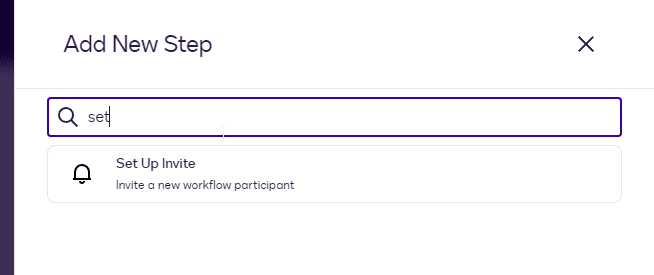
Step 4. Set Up Invite
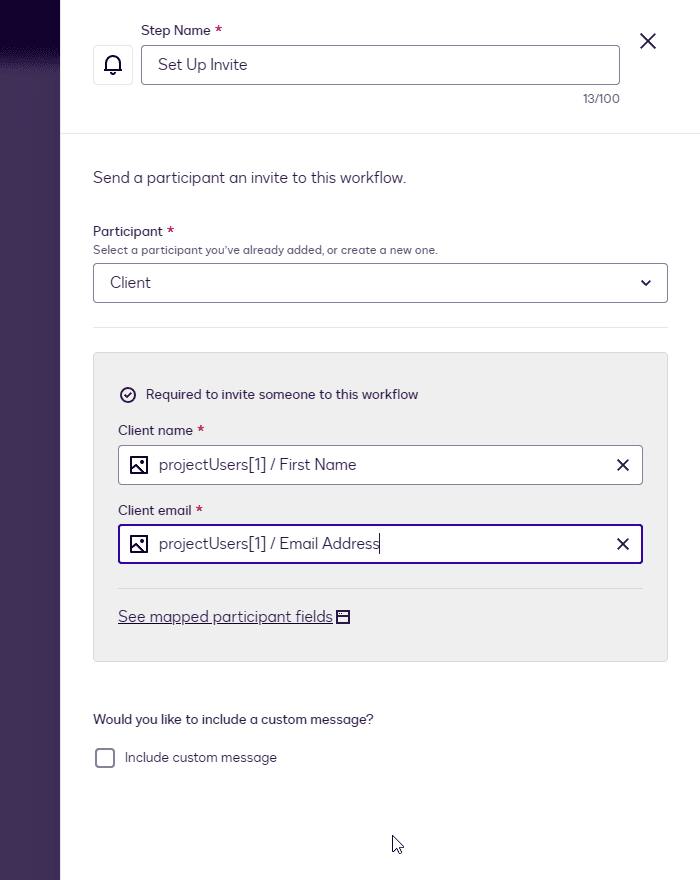
Add Set Up Invite. (in this example it is required Docusign step)
-
Add a participant (e.g. Client)
-
Map participant details from the Read from Procore step:
-
Name → First Name
-
Email → Email Address
-
Apply changes.
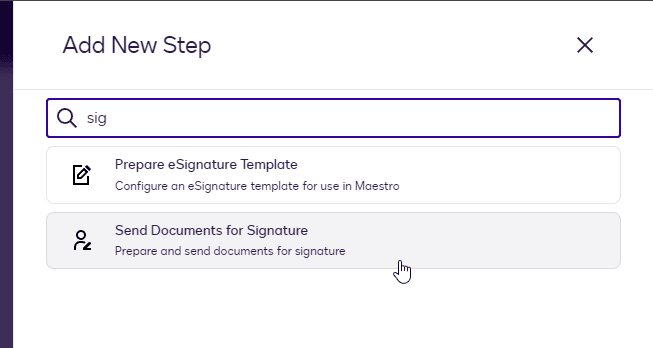
Step 5. Send Document for eSignature
After the document is prepared, the workflow must send it to the correct recipient for signing.
Add the Send Document for eSignature step and open its configuration.
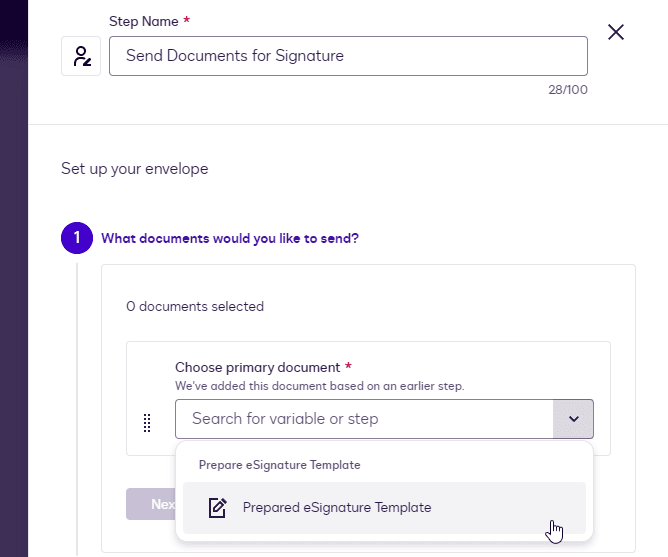
Select the Document
Select the document generated in the Prepare eSignature Template step.
This ensures the workflow sends the exact document that was prepared and prefilled in the previous step.
Confirm Recipient Details
In this step, you define who will sign the document.
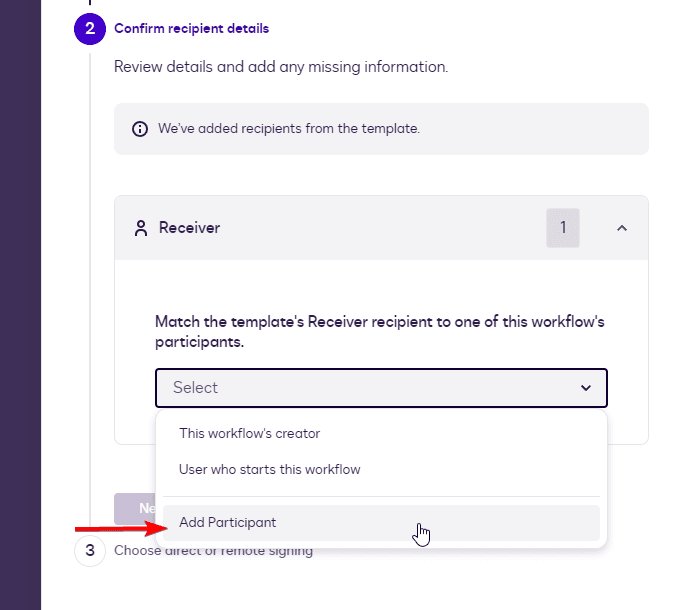
-
Click Add participant
-
Define the participant role
-
For example:
Client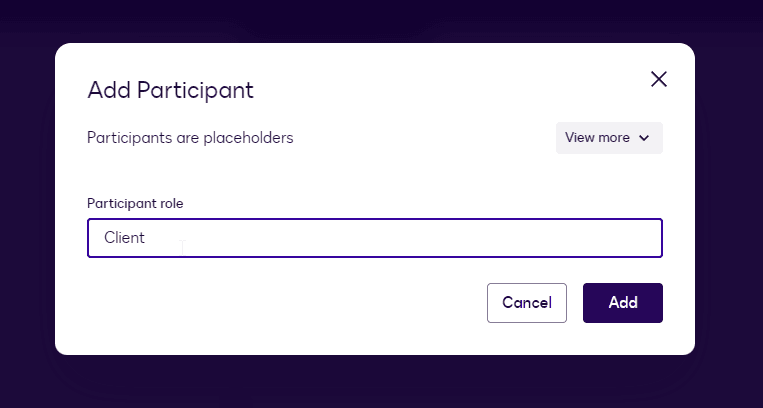
-
Assign participant details using data from Read from Procore
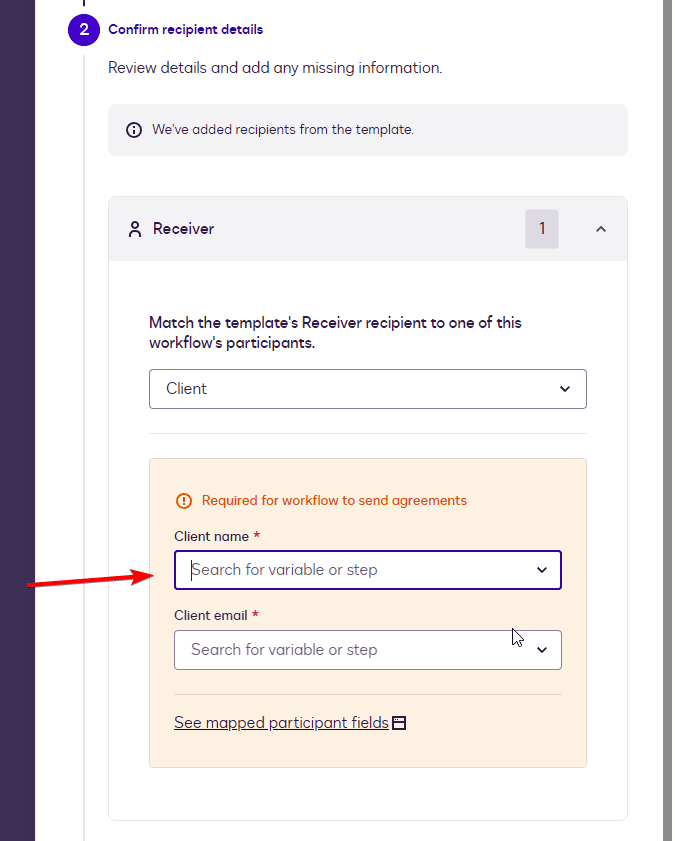
Recommended mapping:
-
Participant Name →
First Name(from Read from Procore) -
Participant Email →
Email Address(from Read from Procore)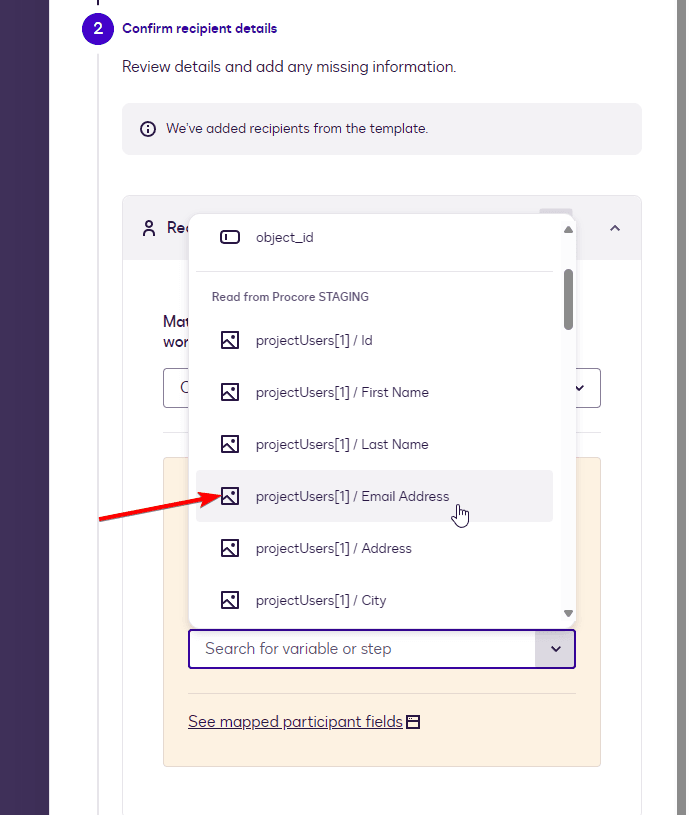
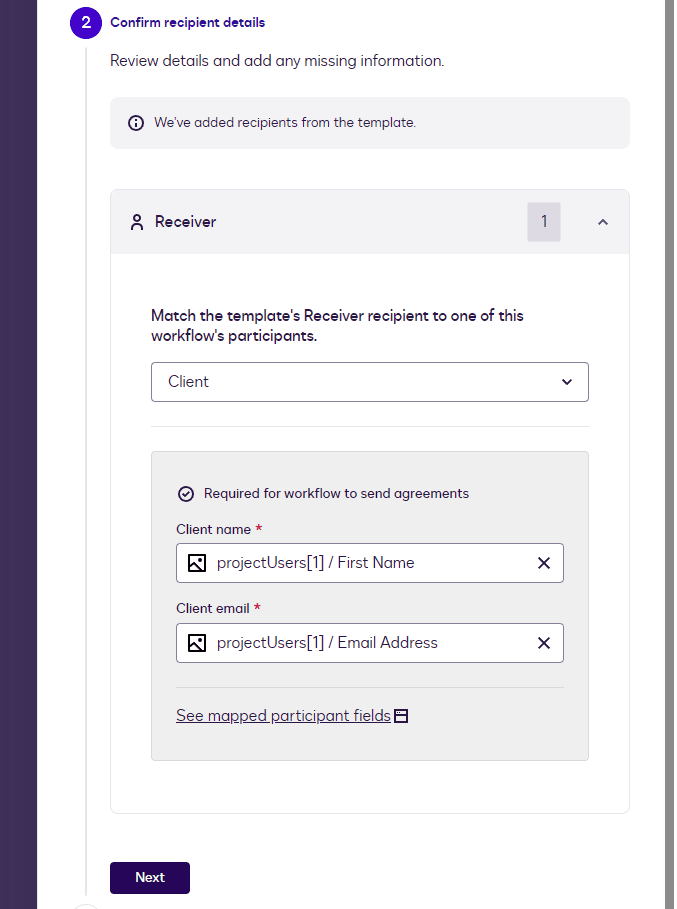
This ensures:
- The document is sent to the correct person
- The recipient is dynamically resolved based on the Procore record used to start the workflow
Once the participant is configured, click Next.
Choose Signing Method
In the Choose signing method step:
-
Select Direct Signing
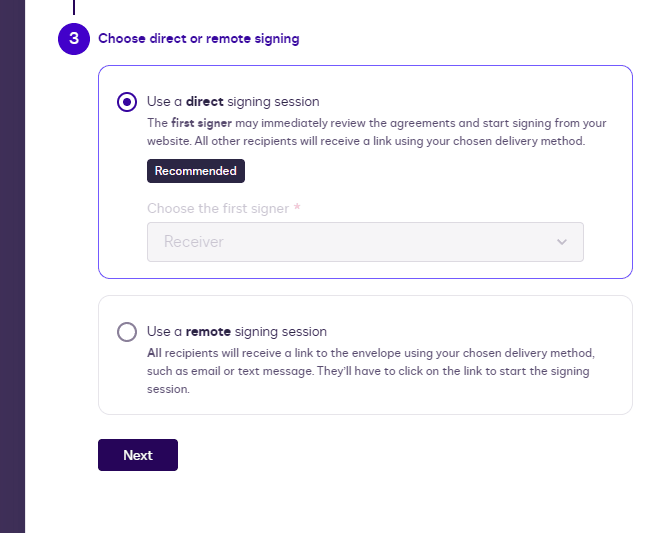
Click Next to save the step configuration.
Step 6. Write Back to Procore
After the document is signed, updated values can be written back to Procore.
Add Writeback to Procore.
Configuration
Where will you write to?
-
Select the same Connection as in Read step
-
Select the same Procore object (
Project Usersin this example, as we work with users\clients) -
Write settings:
Update or Create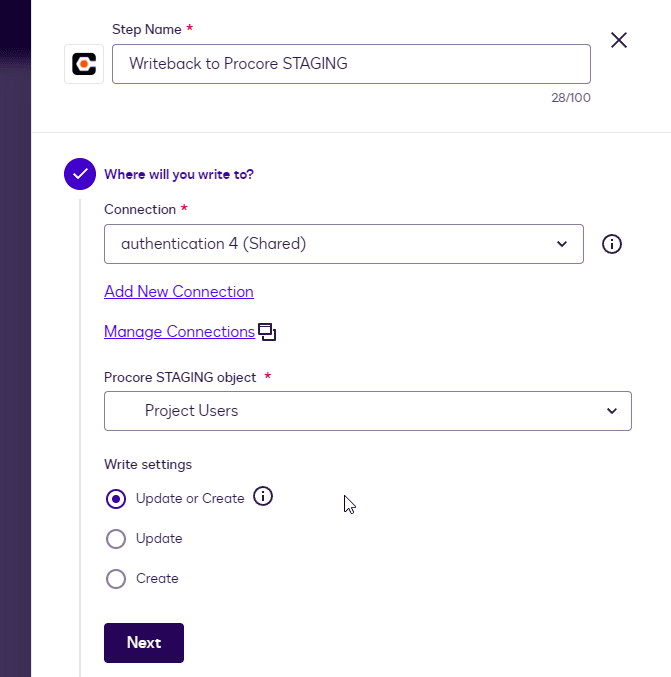
Write Settings Explanation:
- Update – updates an existing record only
- Create – always creates a new record
- Update or Create – updates the record if found, otherwise creates a new one
Select Fields to Write
Select fields that may be updated by the signer, for example:
AddressCityStateZip
Map Fields
Map Procore fields to values from Send Documents for Signature, not from the Read step.
Why this matters:
- Mapping from Read from Procore would write back the original values.
- Mapping from Send Documents for Signature ensures updated values entered by the signer are saved.
Define Which Record to Write To
Configure record identification:
-
Procore field:
Id -
Operator: Equal to
-
Workflow field:
object_id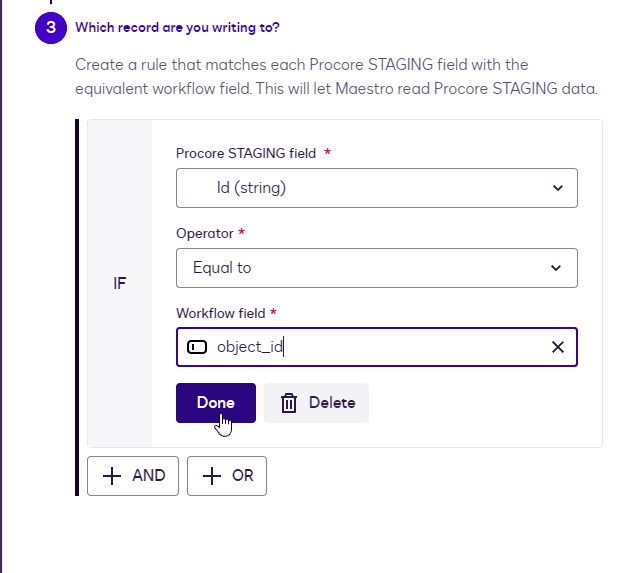
This ensures the update is applied to the correct Procore entity.
Apply changes.
Important:
Make sure that you choose the correct ID!
When the workflow is launched from the Procore Side Panel, Procore always passes theId of the currently opened Vendor or contact_id of the currently opened User.
To ensure correct behavior, object_id must always be matched to the right Id field —
contact_id - for project users, id - for project vendors.
Optional Step: Show Confirmation Screen
Optionally add Show Confirmation Screen to display a success message after workflow completion.
Publish the Workflow
Once all steps are configured, publish the workflow.
It is now available for use both in Docusign and via the Procore Side Panel.
To launch workflow from Procore Workflow Builder Launcher please check Using the Procore Side Panel (Workflow Builder Launcher)
Example workflow full view