Quick Start
Quick Start
1. Installation
- Open the Docusign App Center and search for Zoho CRM.
- Click Install App and grant the required permissions.
- After installing, click Connect Account to link your Zoho CRM organization.
2. Creating a Connection
-
Choose the connection type:
- Shared - accessible by the whole team (recommended).
- Private - accessible only by you.
-
Give your connection a clear name (e.g., "Zoho CRM - Demo").
-
Select your Zoho CRM organization and click Submit, then review the permissions and click Accept.
3. Creating a Workflow
- Navigate to Agreements → Workflows.
- Click Create Workflow to start building.
- Set the workflow start to From an API Call, create an
object_idvariable (Type: Text), and select Automated process.
4. Available Actions
The app provides three actions to use inside your workflow:
- Read from Zoho CRM - retrieve data from a Zoho CRM record (Contacts, Accounts, Leads, Deals, or Vendors).
- Writeback to Zoho CRM - update existing records or create new ones in Zoho CRM.
- File Upload Zoho CRM - attach a signed document to a specific Zoho CRM record.
5. Key Things to Know
- File Upload: In the Select drive dropdown, choose the module that matches your workflow (e.g., Contacts). Use New Subfolder → Add Variable and select the record ID from the Read step to dynamically attach files to the correct record.
- Writeback: Each module has mandatory fields marked with a red asterisk. Always map them, as they are required for the step to work correctly.
- Lookup fields: Never map both the Name and the ID for the same relationship field simultaneously — the operation will fail. See the Implementation Guide & Known Behaviors for details.
Implementation Guide & Known Behaviors
Owner Assignment (User Mapping)
- Reassigning record owners (e.g.,
Contact Owner,Lead Owner,Vendor Owner,Account Owner) is done via exact text name mapping (e.g., passing the string"Manager One"). - The string must match the Zoho CRM user's name exactly. If there are multiple active users in the Zoho CRM environment with the exact same name, the connector will fail to prevent assigning the record to the wrong user.
Working with Lookup Fields
(e.g., Account, Reporting To, Parent Account)
- You can link relational records using either the exact text name (e.g.,
Account Name= "Widget Corp") OR the system ID (e.g.,Account ID= "8967800..."). - Do not map both the Name and the ID for the same entity simultaneously. If both fields are populated in the workflow, the operation will fail. Choose one method per relationship.
- When mapping via Name, if the Zoho CRM database contains multiple records with identical names (e.g., two separate branches of "Widget Corp"), the connector will intentionally fail. This is a safety mechanism to prevent linking data to the incorrect record. In such cases, use the
IDfield instead. - In the Contacts module, if you are mapping both an
Accountand aReporting Tomanager, the manager specified inReporting Tomust be associated with the exact sameAccountin Zoho CRM. Attempting to assign a manager who belongs to a different company (or no company) will result in an API error.
Data Formatting and Validation
- Zoho CRM enforces strict formatting rules on specialized fields (e.g., the
Twitterfield will reject any string containing a space or special sumbols; currency and number fields will reject any alphabetic characters). - Currently, if Zoho rejects a request due to invalid data formats (a 400 Bad Request), the Workflow Builder connector may display a generic technical error (e.g.,
AxiosError) instead of the specific validation message. If a workflow fails during a Writeback step, always double-check the formatting and data types of the values being passed to specialized fields.
Mandatory Fields in Writeback
Each Zoho CRM module has required fields that must be mapped in the Writeback step. These fields are marked with a red asterisk (✱) in the UI. Without them, the step will not save and the workflow will not run correctly.
The mandatory fields per module are:
- Contacts -
Last Name - Leads -
Last Name,Company - Accounts -
Account Name - Deals -
Deal Name,Account Name,Stage,Closing Date - Vendors -
Vendor Name
⚠️ These fields are also used by the connector to identify whether to update an existing record or create a new one. Make sure the value passed to the mandatory field is accurate and consistent with your Zoho CRM data.
Lookup Fields by Module
The table below lists the available lookup fields for each module. Refer to section 2 for the general rules on how to map them correctly.
Contacts
Account- link to an Account record viaAccount NameorAccount IDReporting To- link to another Contact (manager) via name or ID. Must belong to the same Account.
Leads
- None – Unlike other modules, Leads do not use lookup fields to link to existing Accounts or Contacts during creation.
Note: The
Companyfield is a standard text string, not a relational lookup. You do not need an Account ID to fill it.
Accounts
Parent Account- link to a parent Account record viaAccount Nameor Account ID
Deals
Account- link to an Account record viaAccount NameContact- link to a Contact record viaContact NameorContact IDCampaign Source- link to a Campaign record viaCampaign Source NameorCampaign Source ID
⚠️ For each of the above relationships, map either the Name or the ID — never both. Mapping both fields for the same entity may cause workflow failures or unpredictable payload overrides.
Vendors
Vendor Name- link to a Vendor record viaVendor Name
Update Operations – "Overwrite if field value exists" Checkbox
- When configuring an Update (Writeback) operation, Workflow Builder provides an "Overwrite if field value exists" checkbox per mapped field.
- If the checkbox is unchecked, Workflow Builder will only populate fields that are currently blank in Zoho — existing values will not be touched.
- If the checkbox is checked, Workflow Builder will overwrite the existing value with the new one from the workflow.
💡 Rule of thumb: Always check this box if your workflow is intended to explicitly change existing values — including names, numbers, or linked lookups (e.g., changing the
Account Namelinked to a Deal).
Installation and Configuration
Installation and Configuration
This section explains how to install and configure the Zoho CRM integration for use with Docusign Workflow Builder.
Prerequisites
Before starting, ensure that:
- You are logged in to a Zoho CRM account with the required permissions.
- You are logged in to a Docusign account with Admin rights to install and manage applications.
How to Install the App
- Open the Docusign App Center.
- Search for Zoho CRM in the search bar.
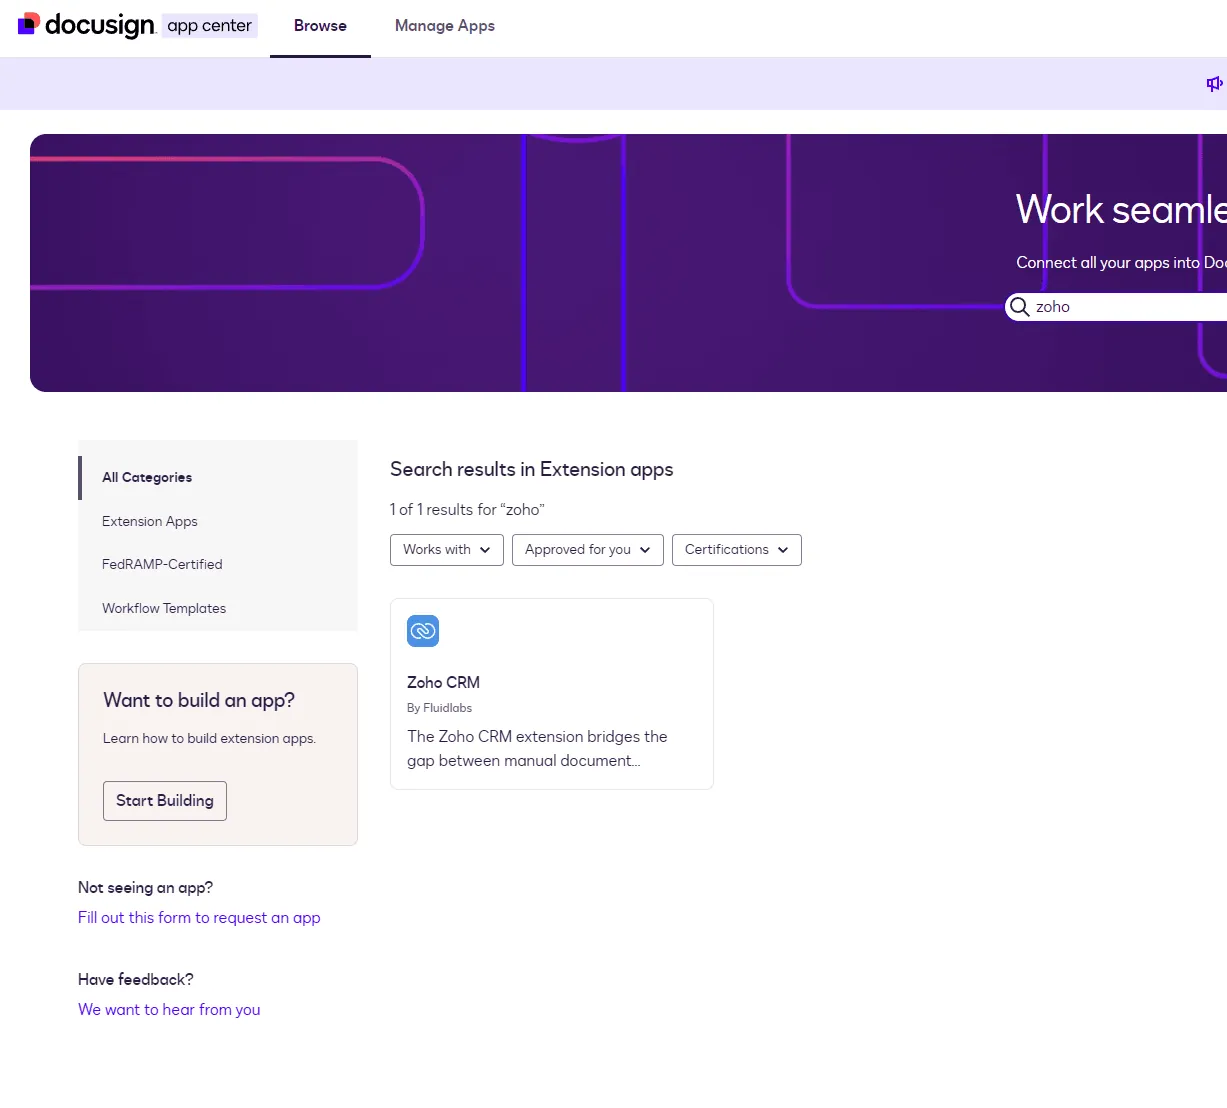 [App Center search results showing the Zoho CRM app by Fluidlabs]
- Click the Zoho CRM app card to open its detail page.
- Click the Install App button to begin.
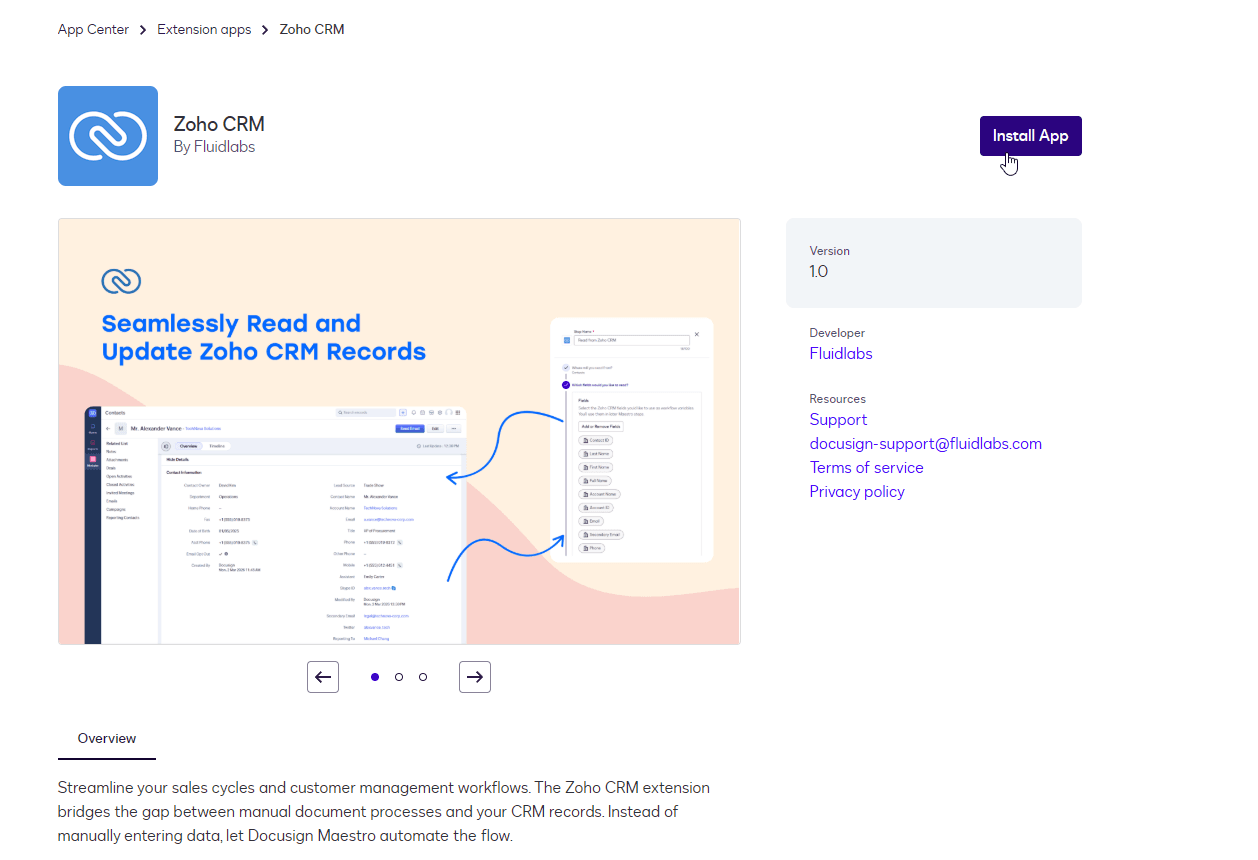 [Zoho CRM app page with the Install App button in the top right corner]
Connecting Your Account
Once the app is installed, you need to authorize the connection between Docusign and Zoho CRM.
-
Initiate Connection: After installation, the app page will show an Installed status. Click the Connect Account button to begin linking your Zoho CRM account.
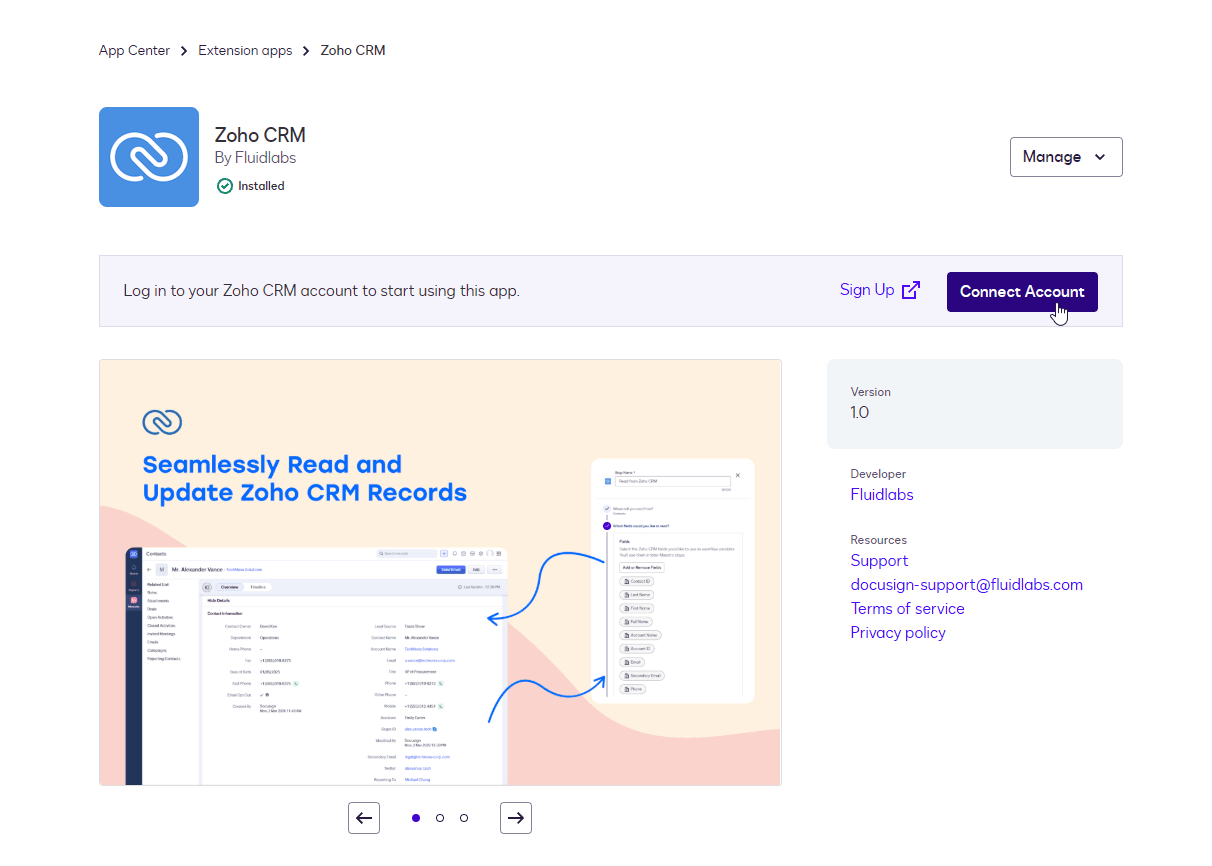 [App page showing "Installed" badge and the Connect Account button]
-
Select Account Type: You will be prompted to choose the connection visibility:
- Private: The connection is accessible only by you in Docusign.
- Shared (Recommended): The connection is accessible by multiple users or the whole team in Docusign. Best for collaborative workflows.
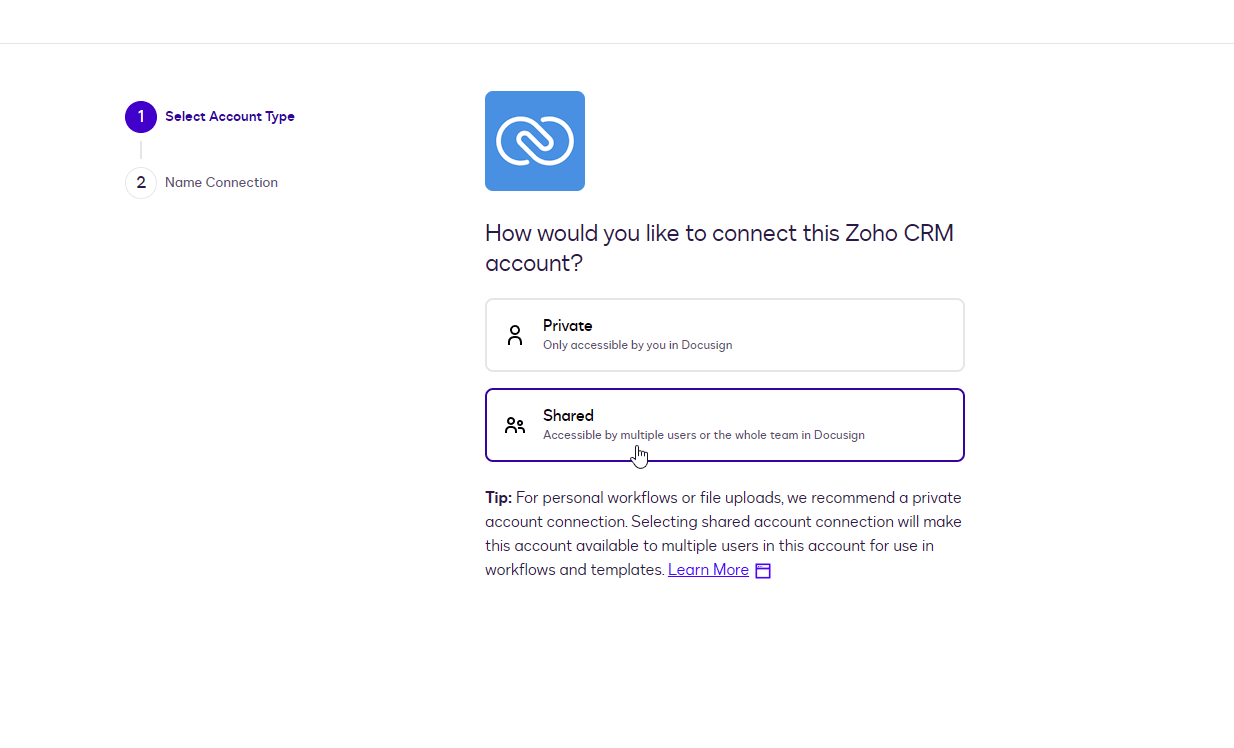 [Select Account Type screen showing Private and Shared options]
-
Name the Connection: Enter a clear name for your connection (e.g., "Zoho CRM - Demo"). This name will appear in Workflow steps, so make it easily identifiable.
 [Name Connection screen with "Zoho CRM - Demo" entered in the field]
-
Authorize with Zoho CRM: You will be redirected to the Zoho authorization screen. The process has two steps:
-
Step 4a — Select Organization:
-
A dialog will appear asking you to choose which Zoho CRM organization to connect. Select your organization from the list and click Submit.
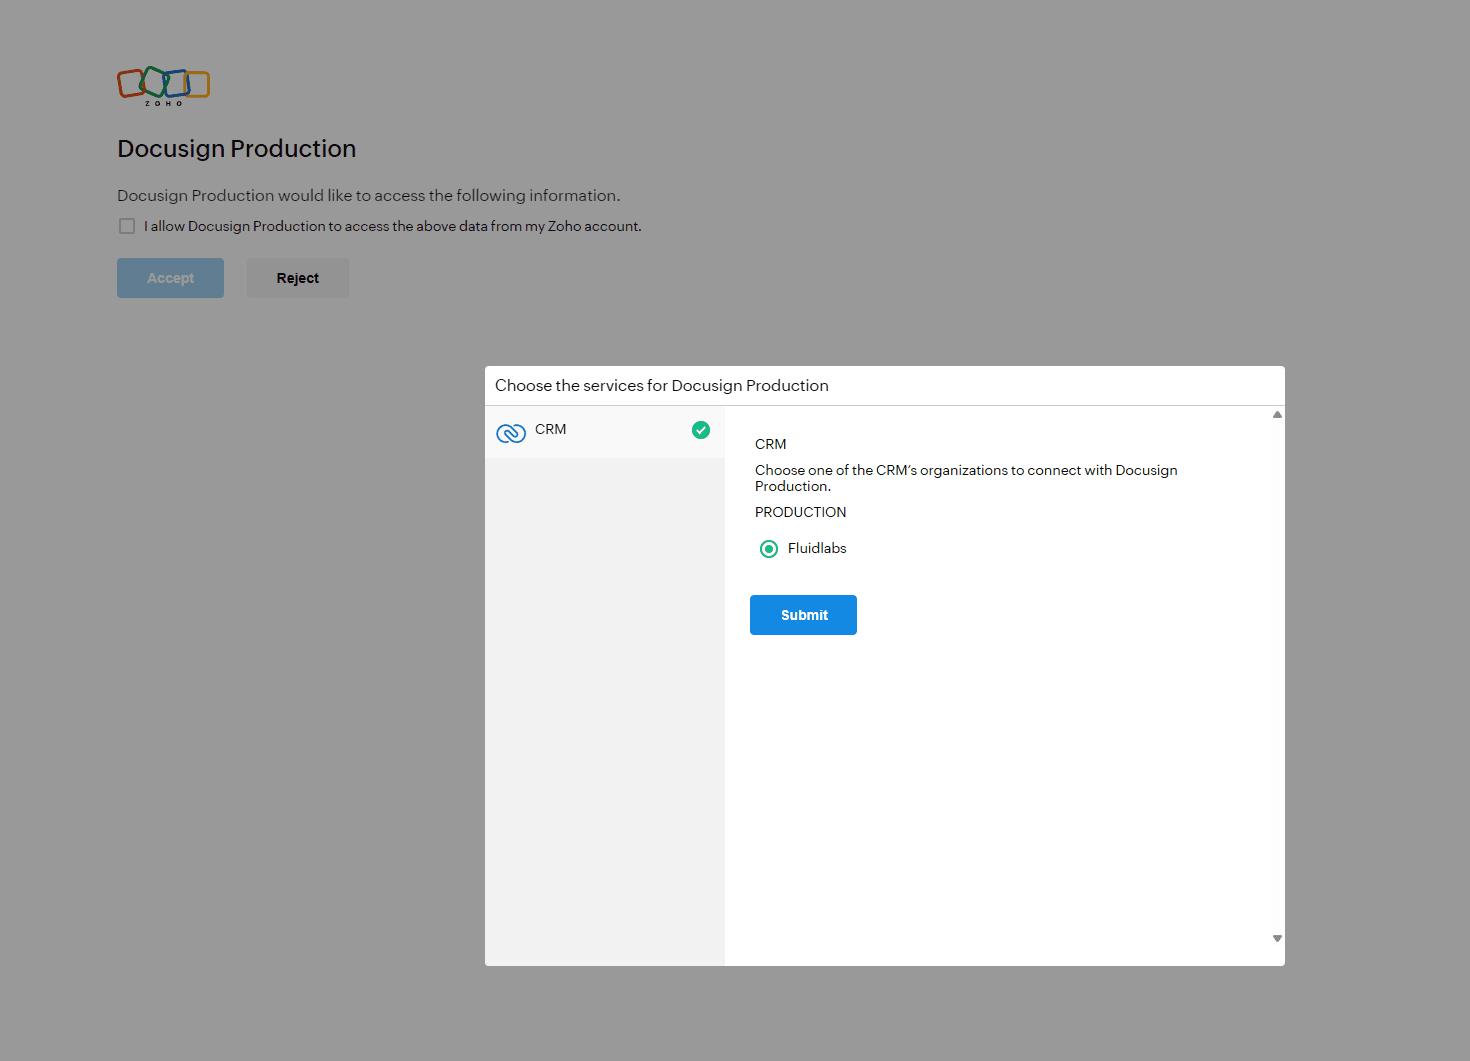 [Zoho org selection dialog showing CRM service and organization list with Submit button]
-
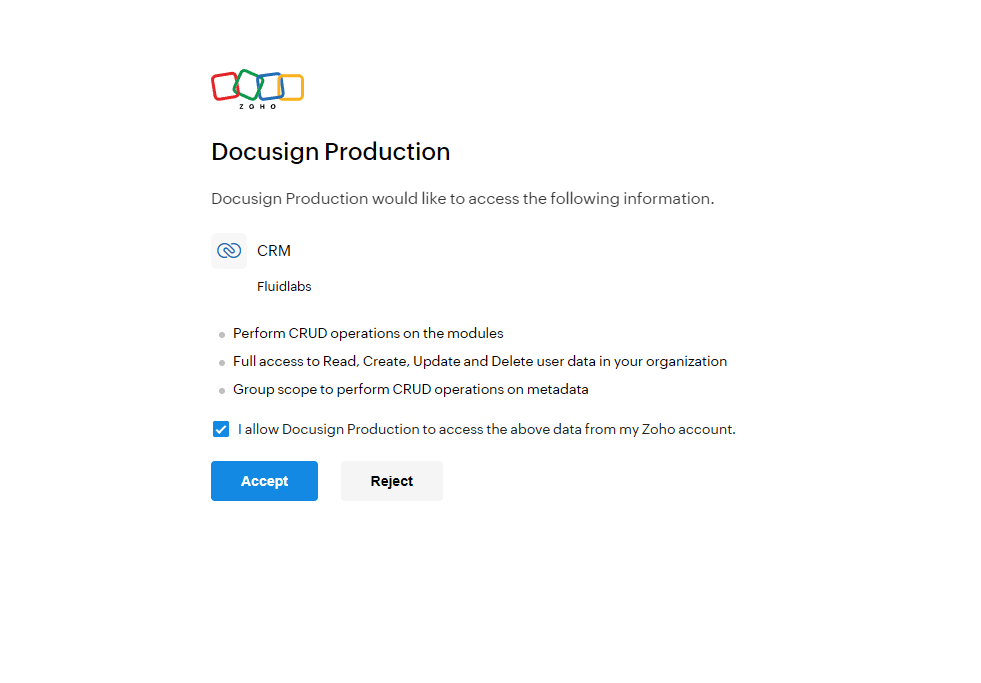
Step 4b — Review and Accept Permissions:
-
Zoho will display the list of permissions being requested (CRUD operations on modules, user data access, metadata). Check the "I allow Docusign Production to access the above data from my Zoho account" checkbox, then click Accept.
 [Zoho permissions review screen with checkbox checked and Accept button]
-
Completion: You will be redirected back to the Docusign App Center. The app status will show as Installed and the connection is ready to use in workflows.
Managing Connections
You can edit, delete, or add new connections at any time without reinstalling the app.
To access connection settings:
- Go to the Docusign App Center and open the Zoho CRM app page.
- Click the Manage dropdown in the top right corner.
- Select Manage Connections.
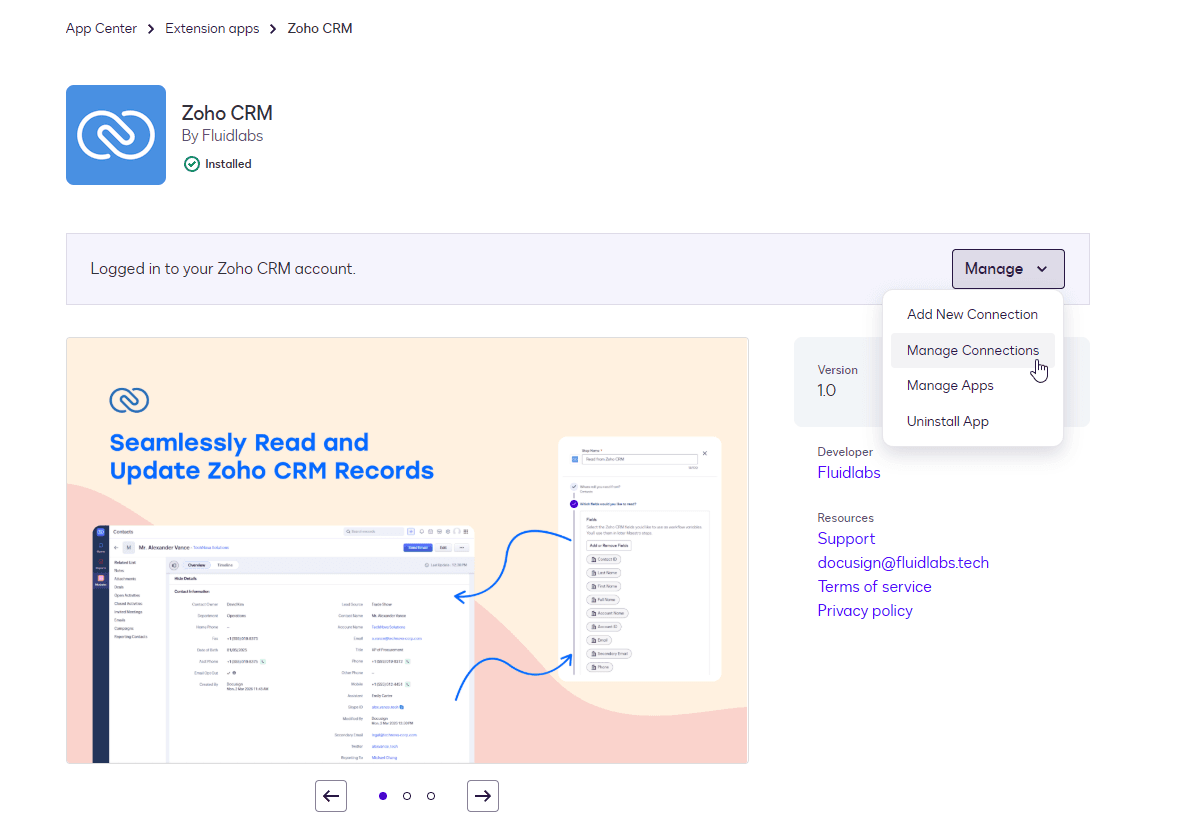 [Manage dropdown showing: Add New Connection, Manage Connections, Manage Apps, Uninstall App]
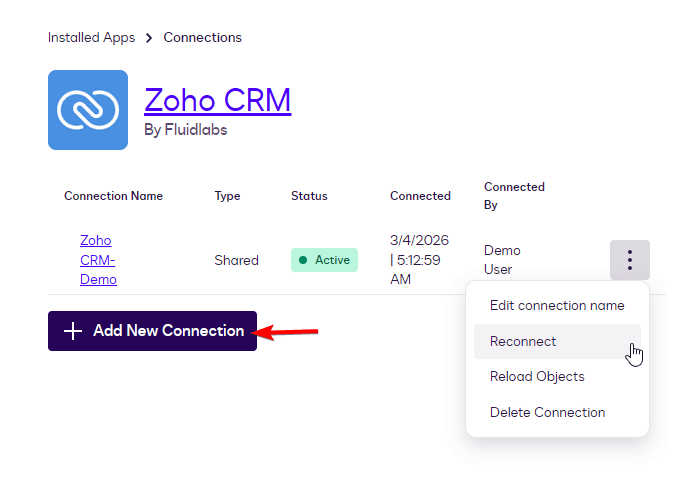
You will be taken to the Connections page, which lists all active connections with their type, status, and the user who created them.
To manage an individual connection, click the three dots (⋮) menu next to it:
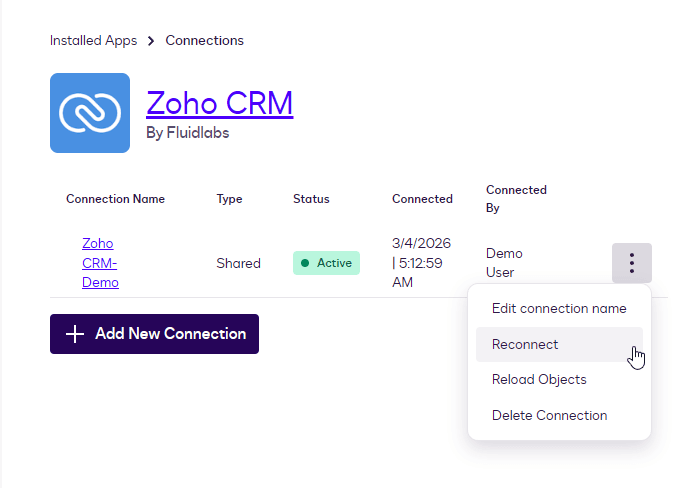 [Connections list showing Zoho CRM-Demo as Shared/Active, with three-dot menu open showing Edit connection name, Reconnect, Reload Objects, Delete Connection]
Available Actions:
- Edit connection name: Rename the connection for better clarity.
- Reconnect: Force a reconnection to refresh tokens or update permissions.
- Reload Objects: Refresh the list of available Zoho CRM modules and fields. Use this if you have added new custom modules in Zoho and they are not yet appearing in the workflow builder.
- Delete Connection: Remove the connection. ⚠️ Warning: This may break existing workflows that use this connection.
Adding a New Connection
To connect an additional Zoho CRM organization, you can either:
- Click the Manage dropdown on the app page and select Add New Connection, or
- Click the + Add New Connection button directly on the Connections page.
Follow the same setup steps as the initial installation.
How to use App
The Zoho CRM app enables you to work with Zoho CRM data directly within Docusign Workflows. Using this app, you can create workflows that read data from Zoho CRM, update Zoho CRM records, and automatically attach signed documents as part of an automated process.
Create a Workflow Builder To start using the integration, you first need to create a Workflow in Docusign.
- Log in to Docusign.
- Navigate to Agreements → Workflows.
- Click Create Workflow.
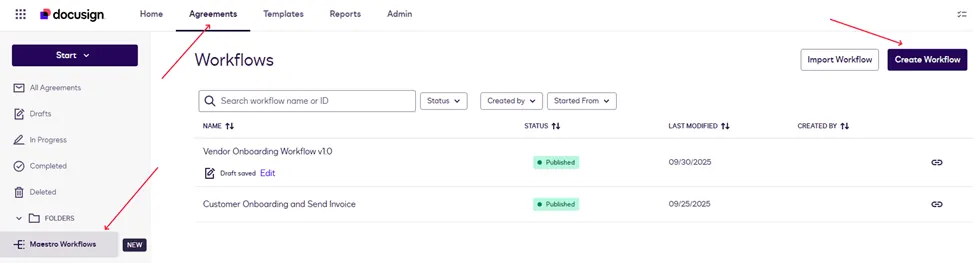 [Docusign Workflows screen with Create Workflow button]
- Build your workflow using the available steps, including Zoho CRM actions provided by the app.
- Publish the workflow when ready.
Available Zoho CRM Actions
Within the Workflow Builder, the Zoho CRM app provides actions to interact with your data. These actions allow Zoho CRM to act as both a source and a destination within the same workflow.
The following actions are available:
- Read from Zoho CRM — Retrieve data from a Zoho CRM record (e.g., Contact or Lead details).
- Writeback to Zoho CRM — Update existing records or create new ones in Zoho CRM based on the workflow output.
- File Upload Zoho CRM — Attach a specific file (e.g., a signed agreement) to a Zoho CRM record.
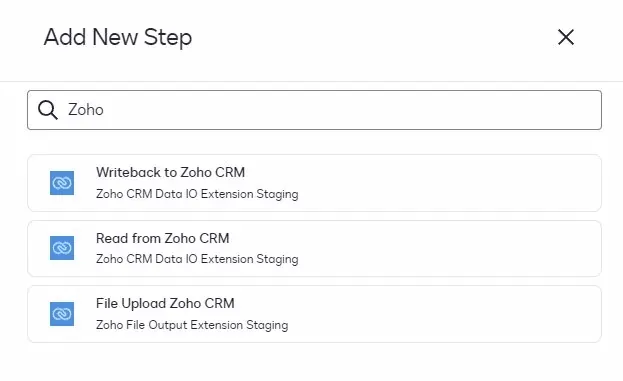
["Add New Step" dialog with "Zoho" searched, showing all three Zoho CRM actions]
Configuring Actions: Workflow Start
In this documentation, we use object_id as the workflow startup variable. This is a common pattern when triggering workflows from an external system via API.
To configure the workflow trigger:
Step 1 — Select Trigger Type
Select From an API Call as the workflow start method.
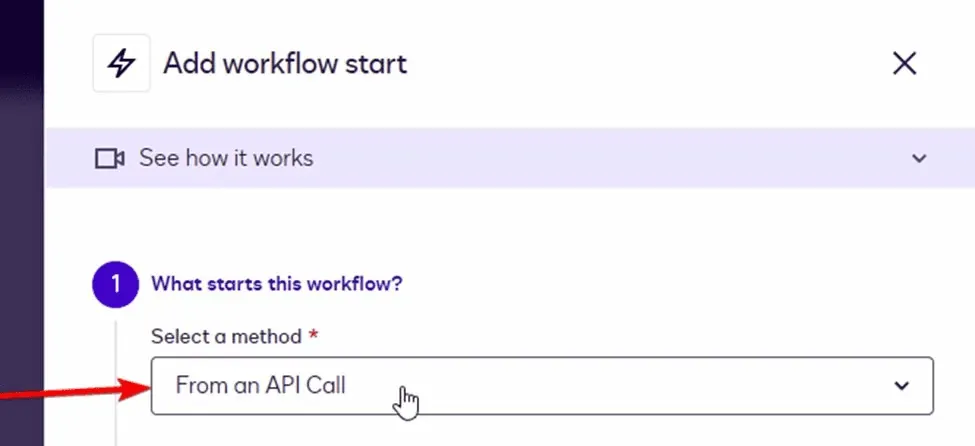
- ["Add workflow start" dialog with "From an API Call" selected in the dropdown]
Step 2 — Create the object_id Variable
Create a variable named object_id (Type: Text).
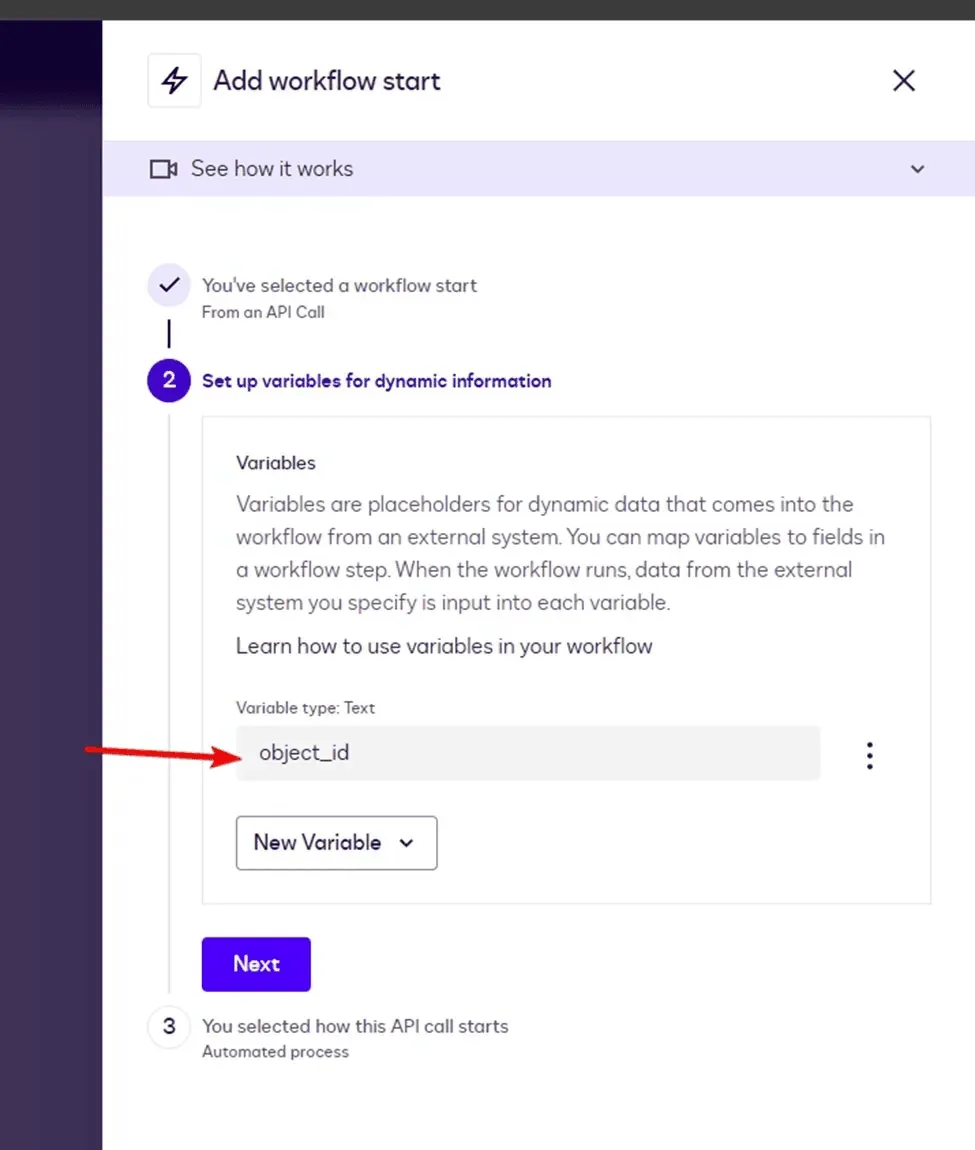
- ["Set up variables" step showing object_id variable of type Text]
Step 3 — Select Process Type
Choose Automated process as the trigger type.
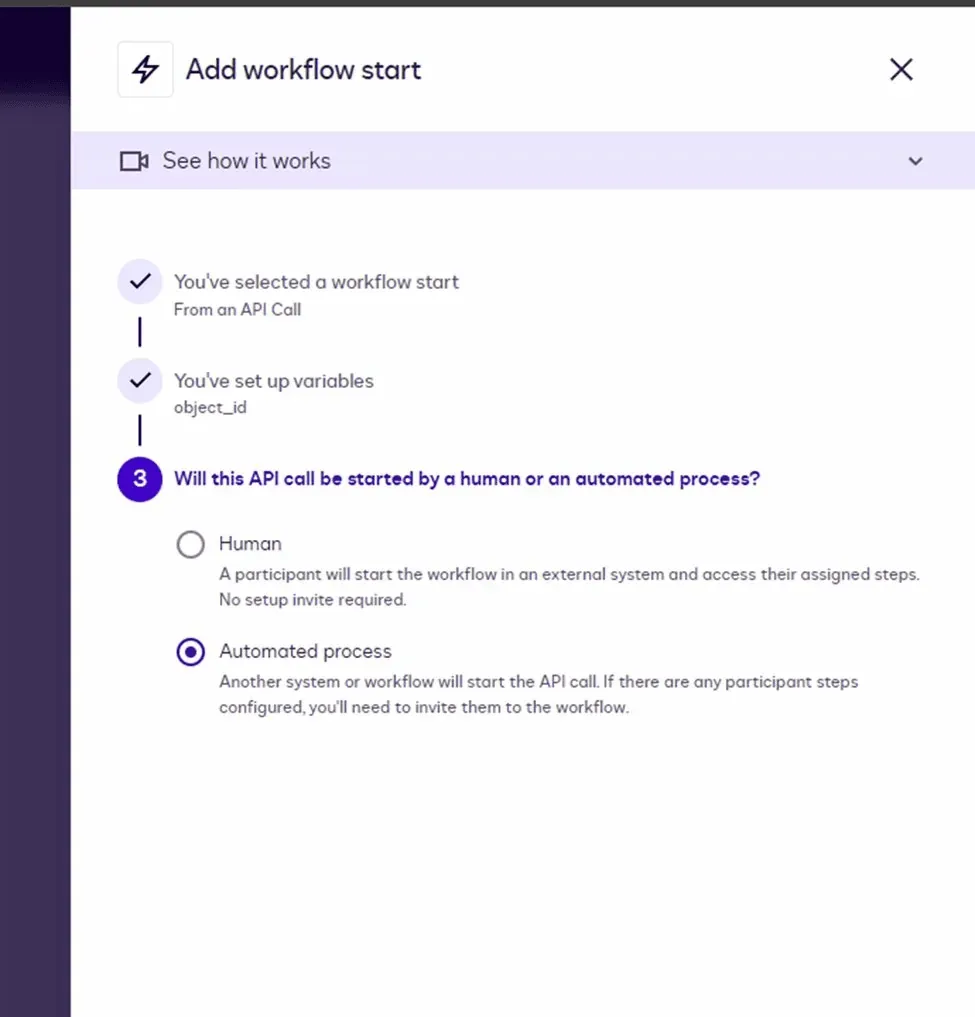
- [Step 3 showing "Automated process" selected]
This configuration allows external systems to trigger the workflow and pass a specific identifier (such as a Zoho CRM record ID) into the object_id variable. This variable can then be used in subsequent steps (like Read from Zoho CRM) to identify which record to process.
Read from Zoho CRM
The Read from Zoho CRM step allows a workflow to retrieve data from any Zoho CRM module. To do this correctly, the workflow must be able to identify which specific record it should work with.
Step Overview
Configuring this step involves three main stages:
- Selecting the Zoho CRM connection and module (object).
- Choosing which fields to read (retrieve).
- Defining the rule to identify the target record.
1. Add the Step to Your Workflow
-
In your workflow builder, click + Add Step.
-
Search for and select Read from Zoho CRM.
-
Once the block appears, click Configure to start the setup.
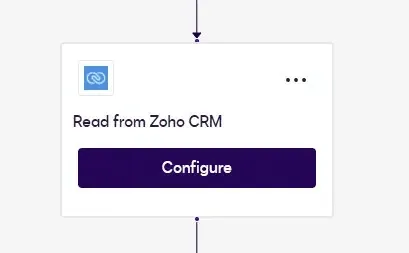
- ["Read from Zoho CRM" step block in the workflow builder with the Configure button]
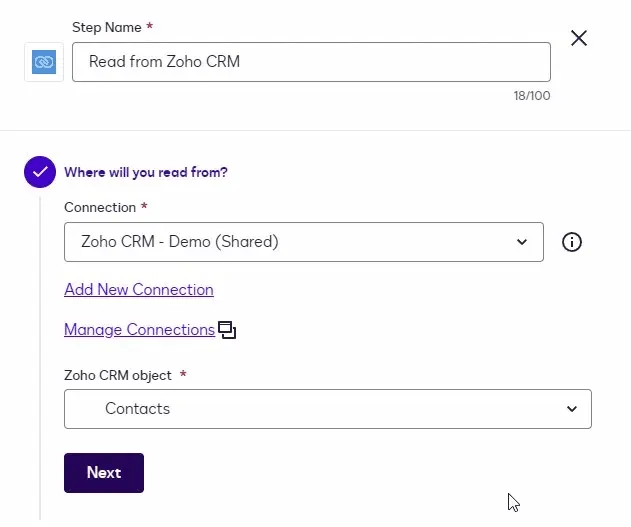
2. Configure Connection and Object
You will be prompted to select where to read data from.
-
Connection: Choose the Zoho CRM connection you created earlier (e.g., "Zoho CRM - Demo (Shared)").
-
Zoho CRM object: Select the module you want to work with. The integration currently supports the following modules:
- Accounts
- Contacts
- Vendors
- Deals
- Leads
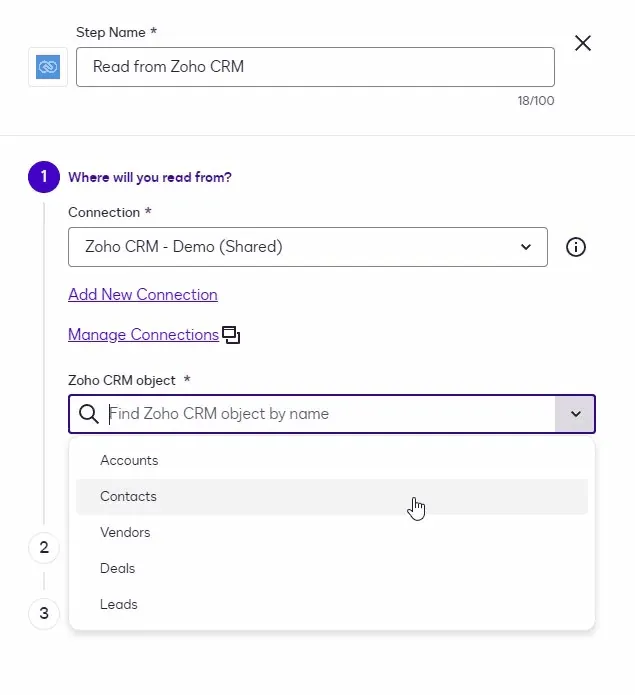
- [Object dropdown open showing the list of available Zoho CRM modules]
💡 Note: The configuration logic described below is identical for all five supported modules - select your fields, define the matching rule, and the retrieved data becomes available as workflow variables. The examples in this guide use the Contacts module.
-
In this example, select Contacts.
- [Connection and Object configured with Contacts selected, Next button visible]
-
Click Next.
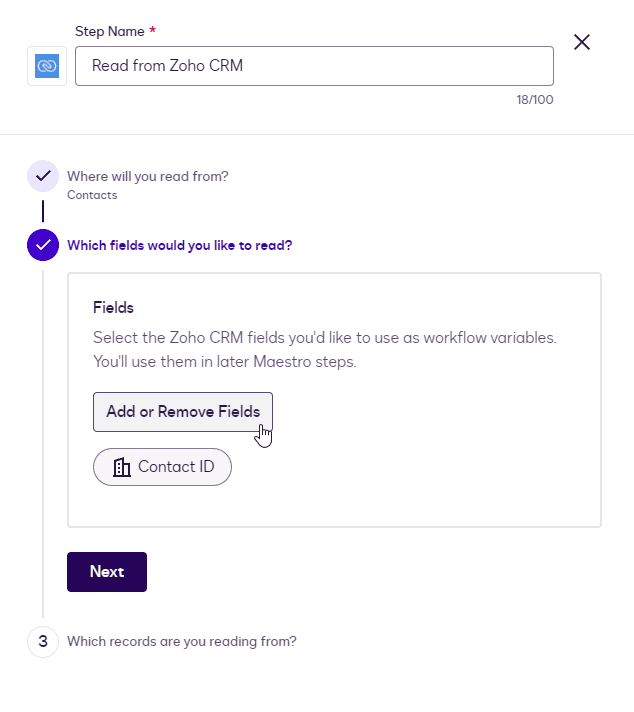
3. Select Fields
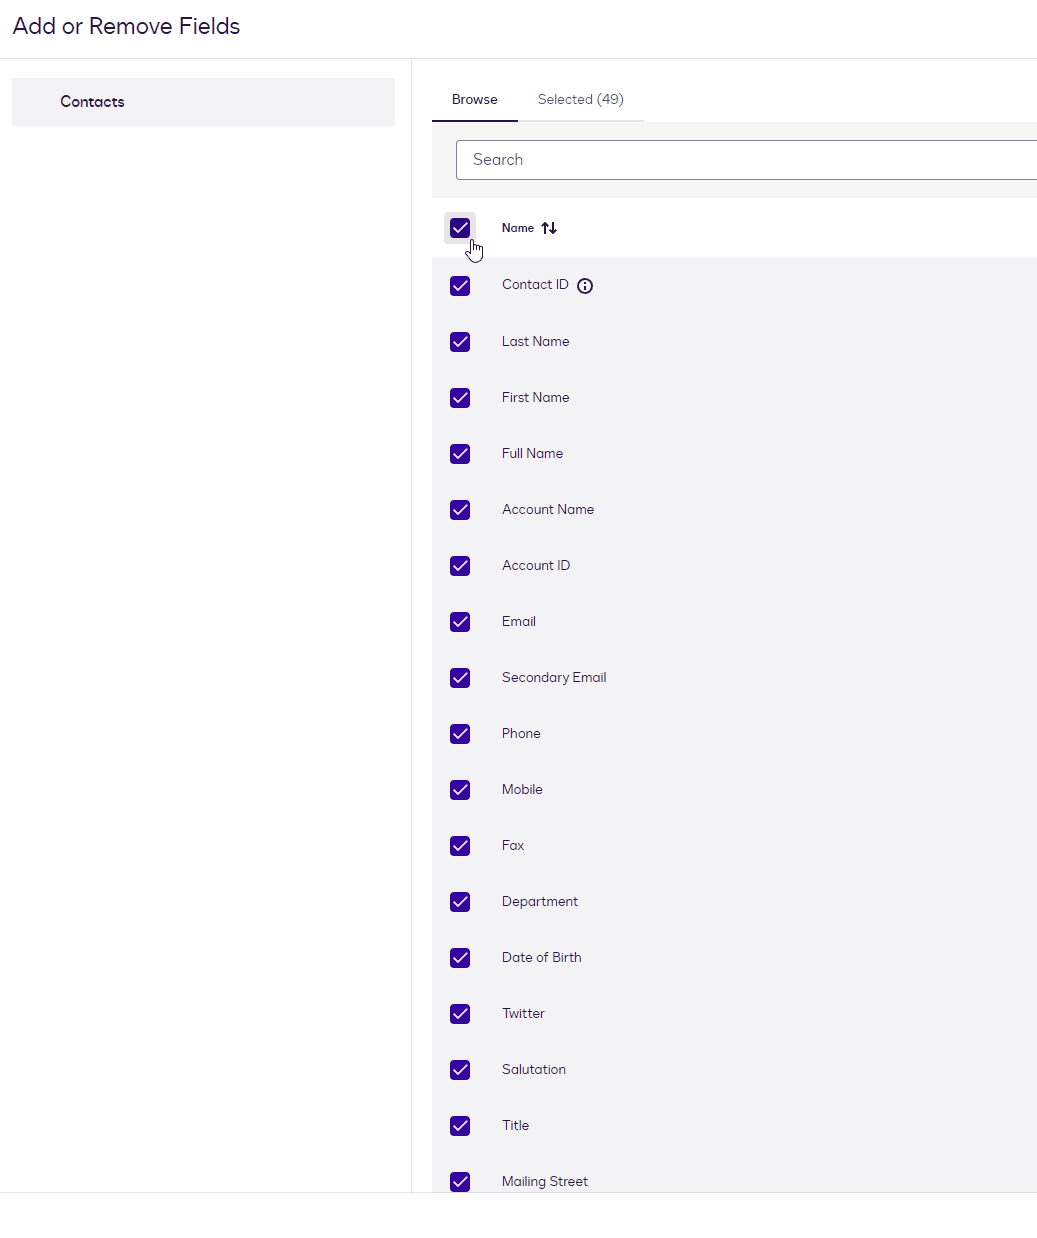
Choose the specific data points you want to retrieve from the Zoho CRM record.
-
Click Add or Remove Fields.
- [Fields step showing the Add or Remove Fields button with Contact ID already selected]
-
A field browser will open showing all available fields for the selected module. Select the fields you need (e.g., Name, Contact ID, First Name, Last Name, Full Name, Email, Phone, Account Name, etc.).
- ["Add or Remove Fields" browser showing the Contacts module field list with multiple fields selected]
-
The selected fields will become available as workflow variables for use in later steps.
-
Click Next.
💡 Note: For information on working with special field types, data formatting rules, and other nuances specific to Zoho CRM, refer to the Implementation Guide & Known Behaviors.
4. Identify the Record
In this step, you define which specific Zoho CRM record the workflow should read. You do this by creating a matching rule.
Create a rule that matches a Zoho CRM field to a workflow variable:
-
Zoho CRM field: Select a unique identifier field (e.g.,
Contact ID (string)). -
Operator: Select
Equal to. -
Workflow field: Select the variable that contains the identifier (e.g.,
object_id, configured at the workflow start).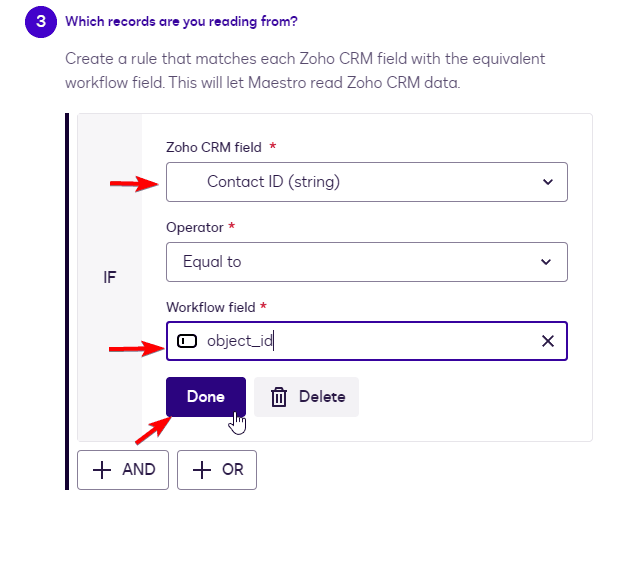
- [Step 3 "Which records are you reading from?" showing Contact ID matched to object_id variable]
Example Logic: This rule tells the system: "Find the Zoho CRM Contact whose Contact ID matches the object_id provided when the workflow started."
Click Done. The rule is now saved.
Once configured, this step will find the correct record in Zoho CRM and pull the selected field data into the workflow as variables. You can now use these variables in subsequent steps (e.g., to pre-fill a document or pass data to a Writeback step).
Writeback to Zoho CRM
The Writeback to Zoho CRM step allows a workflow to update existing records or create new ones in Zoho CRM using data collected during the workflow (e.g., from a signed document or a web form).
Step Overview
This step is typically used at the end of a workflow to save results back to Zoho CRM. A common pattern:
- Read record data from Zoho CRM.
- Send documents for signature using that data.
- Receive updated information from the signer.
- Writeback: update the record in Zoho CRM with the new data.
1. Add the Step to Your Workflow
-
In your workflow builder, click + Add Step.
-
Search for and select Writeback to Zoho CRM.
-
Once the block appears, click Configure to start the setup.
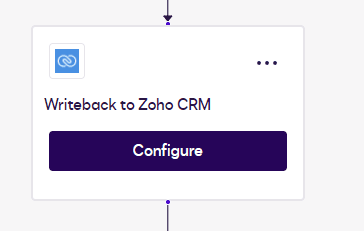
- ["Writeback to Zoho CRM" step block in the workflow builder with the Configure button]
2. Configure Connection and Object
-
Connection: Select your Zoho CRM connection (e.g., "Zoho CRM - Demo (Shared)").
-
Zoho CRM object: Select the module you want to write to. The same five modules are supported: Accounts, Contacts, Vendors, Deals, and Leads.
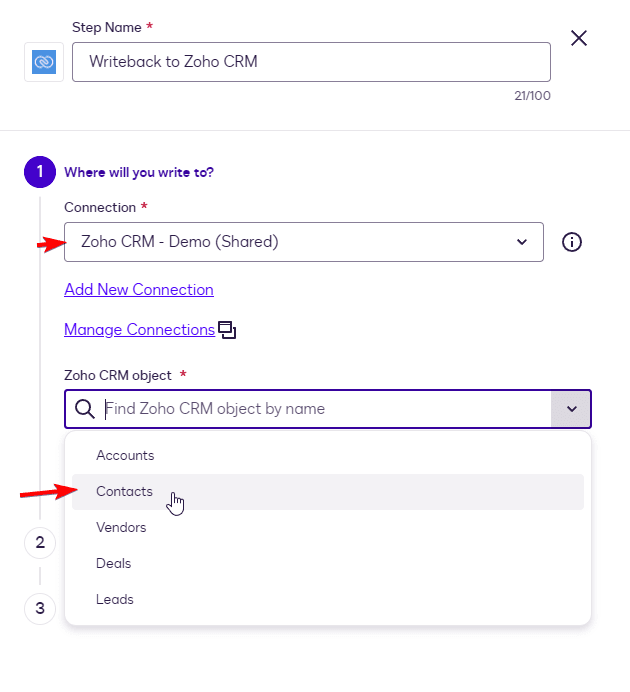
- [Object dropdown open showing the five available modules with Contacts highlighted]
-
Write settings: Choose how the system should handle the data:
- Update or Create (Recommended) - checks if a matching record exists; updates it if found, or creates a new one if not.
- Update - updates an existing record only. Fails if no match is found.
- Create - always creates a new record, regardless of whether one already exists.
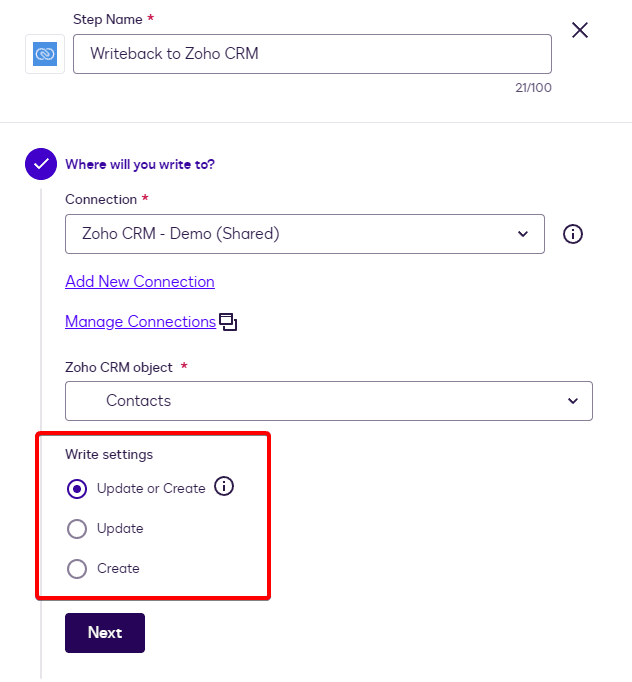
- [Write settings section showing the three options with "Update or Create" selected]
-
Click Next.
3. Map Fields
In this step, you map workflow data to the corresponding Zoho CRM fields. This tells the system where to write each piece of data.
-
Click Add or Remove Fields to select which Zoho CRM fields you want to populate.
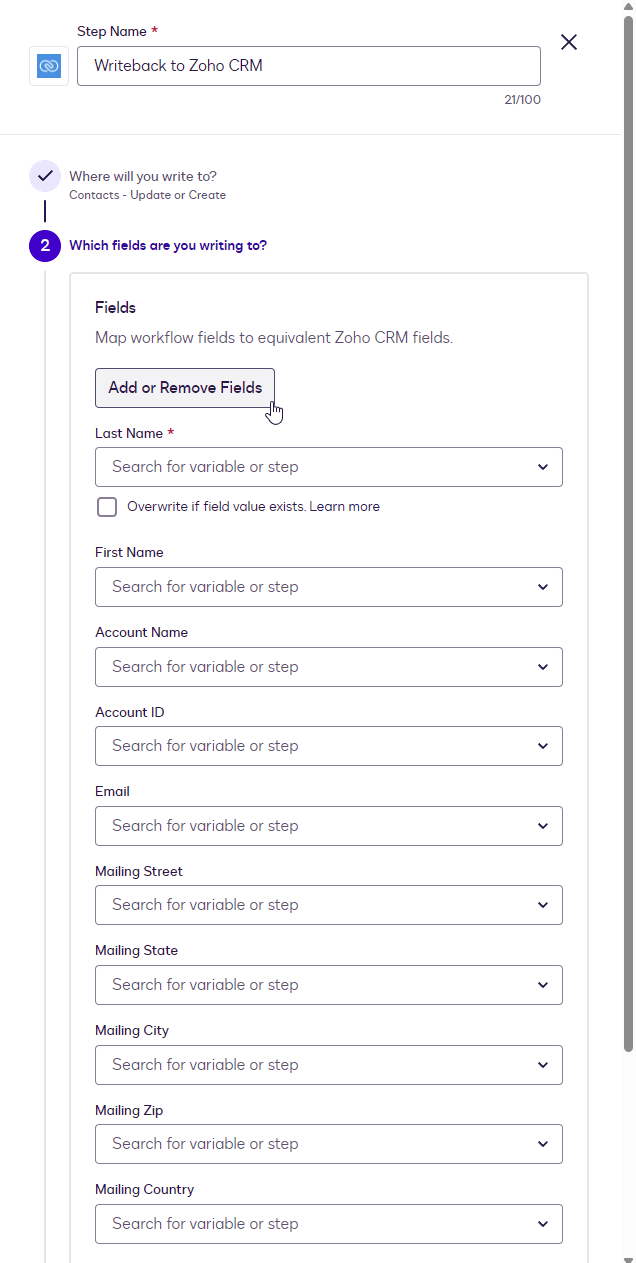
- [Fields step showing field list with Last Name marked as mandatory (red asterisk)]
-
For each field, select the source variable from your workflow. Data can come from any previous step - for example, from a Send Documents for Signature step (i.e., data filled in by the signer on the signed form).
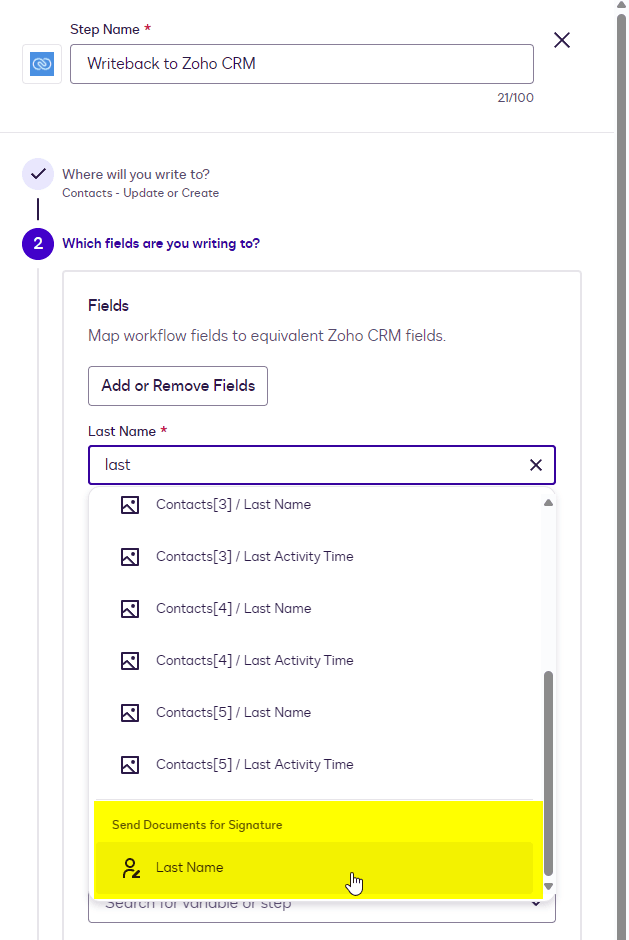
- [Field mapping dropdown showing variables from "Send Documents for Signature" step highlighted]
⚠️ Mandatory fields: Each Zoho CRM module has required fields marked with a red asterisk (e.g., Last Name for Contacts). These fields must be mapped for the step to work. They are also used by the connector to identify whether to update an existing record or create a new one. For the full list of mandatory fields per module, refer to the [Implementation Guide & Known Behaviors]([INSERT LINK]).
-
Click Next.
4. Identify the Record
Define which specific record in Zoho CRM the workflow should write to by creating a matching rule.
-
Zoho CRM field: Select a field that can uniquely identify the record (e.g.,
Email (string)). -
Operator: Select
Equal to. -
Workflow field: Select the corresponding workflow variable (e.g.,
Emailfrom the signed form).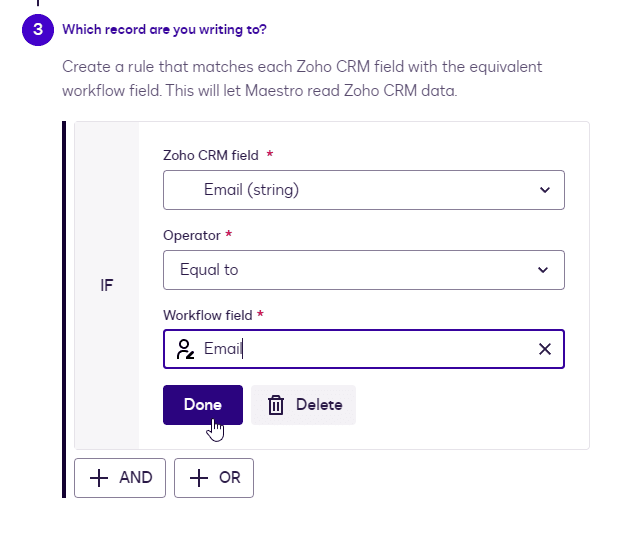
- [Step 3 showing Email field matched to Email workflow variable]
⚠️ Important: The identifier field must be unique in your Zoho CRM data. If the system finds multiple records matching the rule (e.g., two contacts with the same email), the step will fail. Use the most reliable unique field available, or refer to the Implementation Guide & Known Behaviors for guidance.
Click Done. The step is now configured and will automatically update or create Zoho CRM records when the workflow runs.
File Upload Zoho CRM
The File Upload Zoho CRM step allows a Workflow to upload and attach a file directly to a record in Zoho CRM.
Add the Step to Your Workflow
-
In your workflow builder, click + Add Step.
-
Search for and select File Upload Zoho CRM.
-
Once the block appears, click Configure to start the setup.
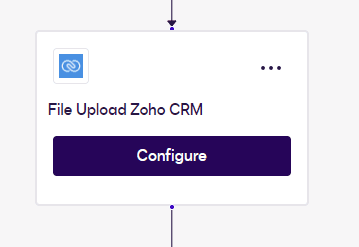
- ["File Upload Zoho CRM" step block in the workflow builder with the Configure button]
2. Select the File to Upload
Select which file from the workflow should be uploaded.
-
Select a file or envelope: Choose Combined Envelope File (or another file variable generated by a previous step).
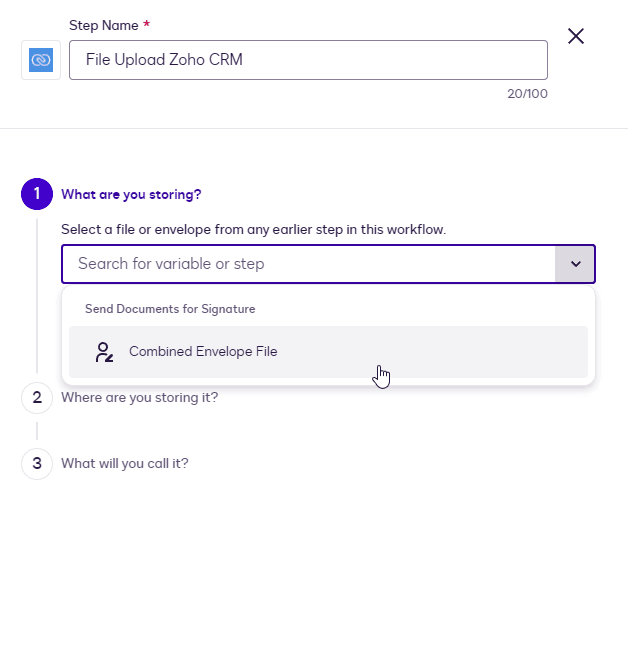
- [Step 1 "What are you storing?" with Combined Envelope File option visible in the dropdown]
💡 If no file is available in the dropdown, it means the file has not been generated yet at this point in the workflow. Make sure a Send Documents for Signature (or something is generating this file) step exists before the File Upload step.
3. Choose the Upload Location
-
Select connection: Choose your Zoho CRM connection (e.g., "Zoho CRM - Demo (Shared)").
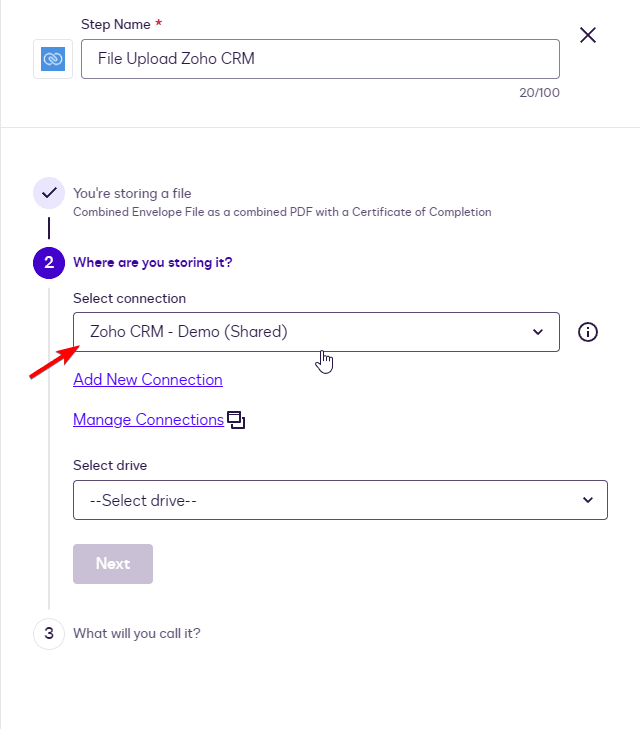
- [Step 2 "Where are you storing it?" with connection selected and empty drive dropdown]
-
Select drive: Choose the Zoho CRM module you want to attach the file to. Each option includes a helpful hint about how the folder structure will work:
- Accounts (Use Account ID as new folder name)
- Contacts (Use Contact ID as new folder name)
- Deals (Use Deal ID as new folder name)
- Leads (Use Lead ID as new folder name)
- Vendors (Use Vendor ID as new folder name)
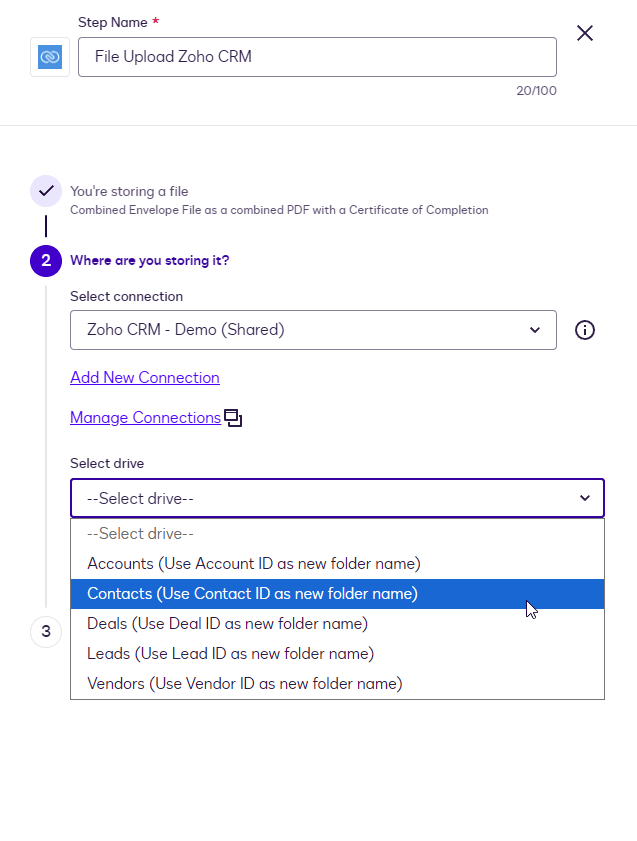
- [Drive dropdown open showing all five module options with Contacts highlighted]
-
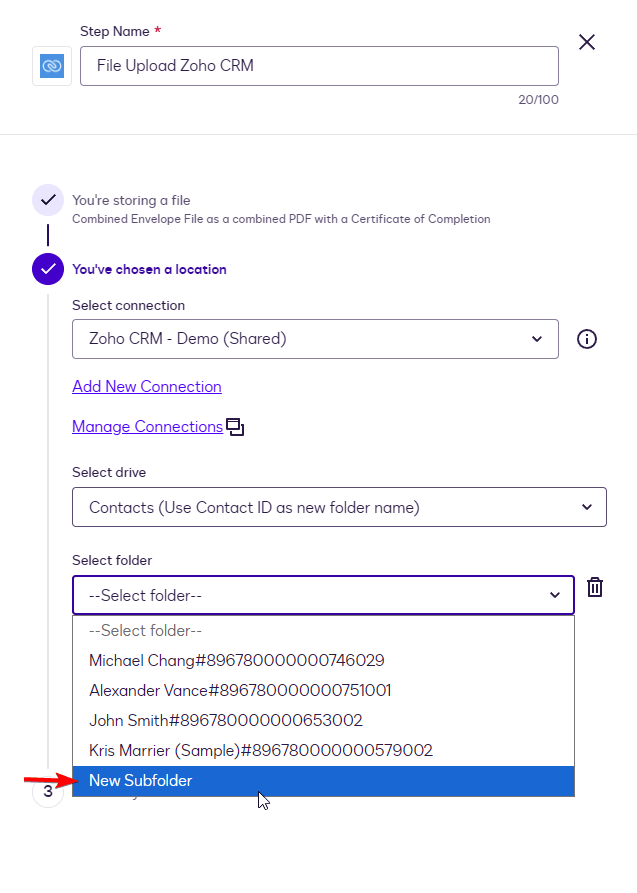
Select folder: After selecting the drive, click Add Folder + to define where within the module the file will be attached.
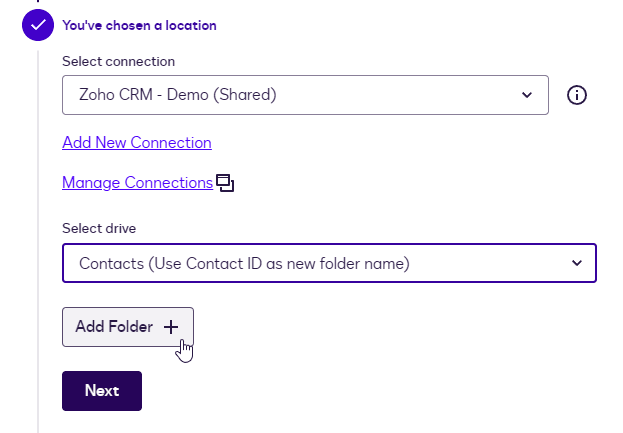
-
You have two options:
Method A - Select a Record from the List
After clicking Add Folder +, a dropdown will show existing records from your Zoho CRM (displayed as Name#RecordID). Select the specific record you want to attach the file to.
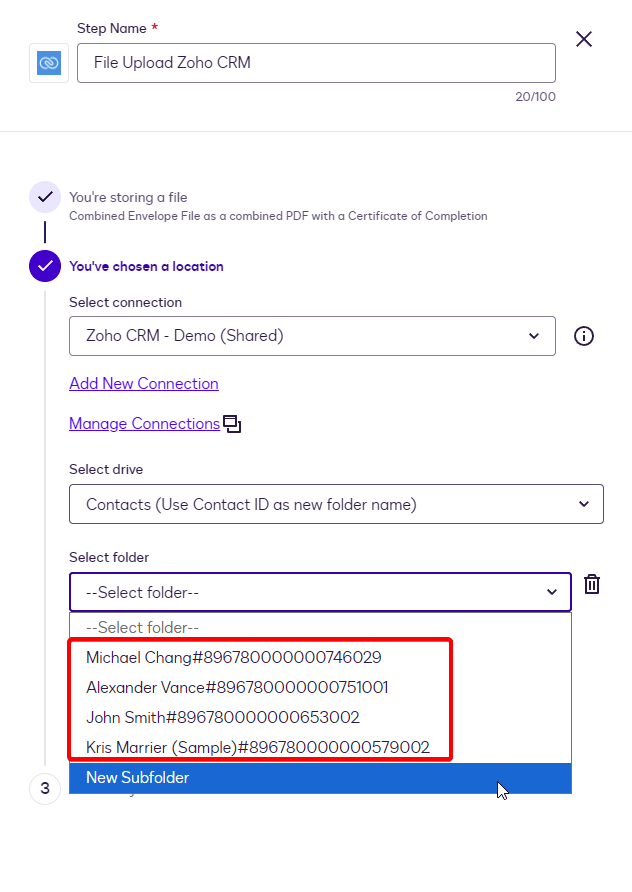
- [Select folder dropdown showing existing Zoho CRM contacts by name and ID, with New Subfolder option at the bottom]
- Result: The file will always be attached to this specific record, regardless of who is involved in the workflow run.
- Use case: Useful when all files should go to a single central record (e.g., a shared company account).
Method B - Attach Dynamically via Record ID
This method uses the record ID retrieved from an earlier Read from Zoho CRM step to dynamically attach the file to the correct record for each workflow run.
-
In the Select folder dropdown, choose New Subfolder.
- [Select folder dropdown with "New Subfolder" highlighted]
-
In the New folder dialog, click Add Variable.
![New folder dialog showing variable selection for folder names like 'Contacts[] / Contact ID'.](/images/documentation/zoho-for-docusign/cb9418db94b2a435f6ba742b3e7f6f1e.webp)
- ["New folder" dialog with Add Variable dropdown open, showing Read from Zoho CRM as the source and Contact ID as the suggested variable]
-
Select the variable source Read from Zoho CRM and choose Contact ID (or the relevant ID field for your module).
-
The folder name field will populate with the ID variable (e.g.,
Contacts[1] / Contact ID). Click Add.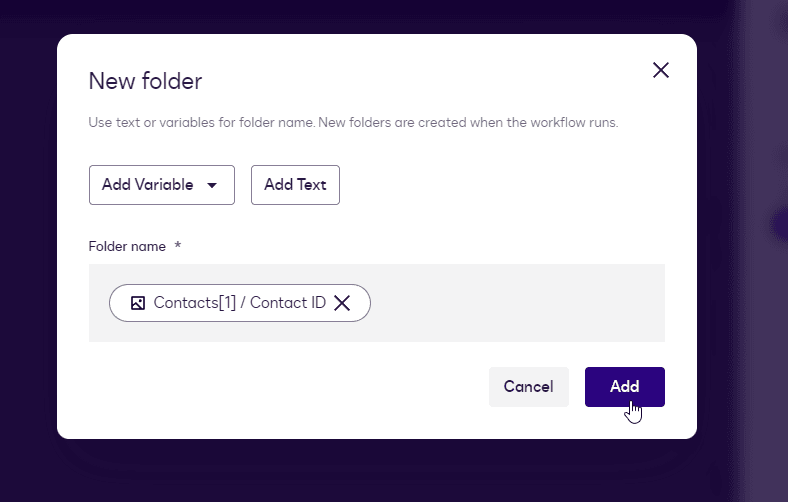
- ["New folder" dialog showing "Contacts[1] / Contact ID" as the folder name, with Add button]
-
The Select folder field will now show
[Contacts[1] / Contact ID].
- [Location step showing connection, Contacts drive, and the Contact ID variable in the folder field, with Next button]
-
Result: The file will be attached to the specific record involved in the current workflow run.
-
Use case: The recommended approach for universal workflows where signed documents need to reach the correct client record automatically.
Click Next.
4. Name the File
Use variables and text to create a custom file name.
-
Click Add Variable to insert a workflow variable, or Add Text to type a static name.
-
Enter your desired file name (e.g.,
Signed-MSA). -
The File path preview at the bottom will show the full path where the file will be stored.
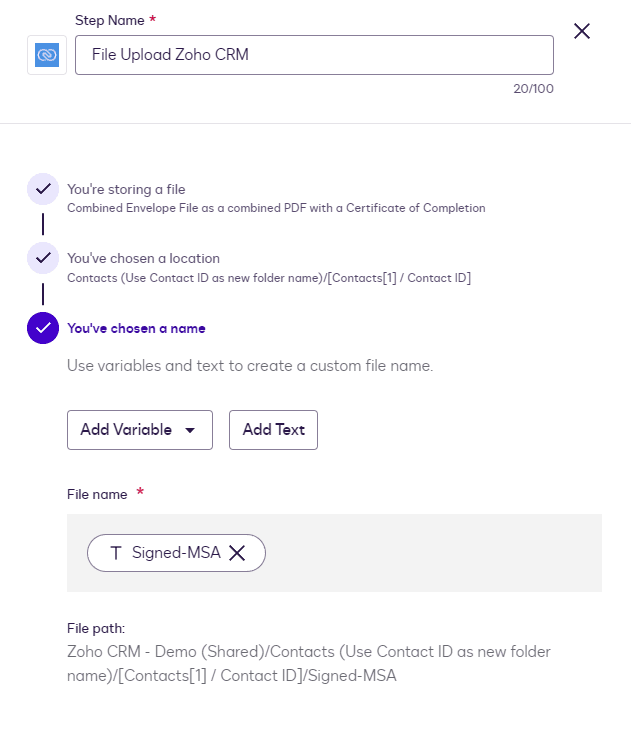
- [Step 3 "What will you call it?" showing "Signed-MSA" as the file name and the full file path preview]
-
Click Apply.
Once the workflow runs, the file will be attached to the specified record in Zoho CRM. To verify, open the record in Zoho CRM and navigate to the Attachments section — the uploaded file will appear there, listed with the source as Docusign.
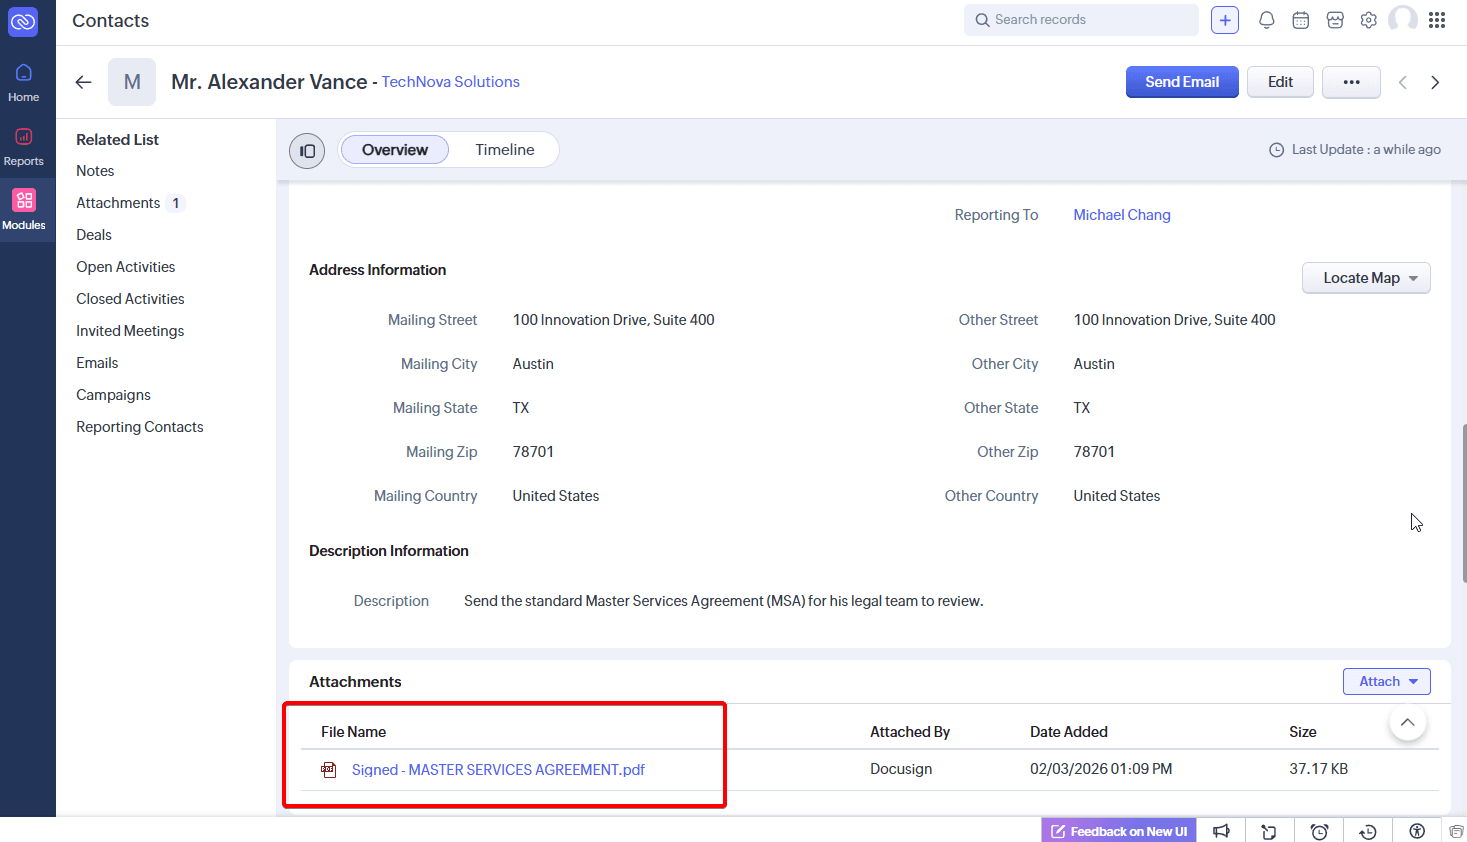
- [Zoho CRM Contact record showing the signed PDF in the Attachments section, uploaded by Docusign]
FAQ & Troubleshooting
FAQ & Troubleshooting
Here are the most common configuration issues and how to resolve them.
File Upload Issues
Q: I don't see any files available in the "Select a file or envelope" dropdown.
A: This happens when the workflow hasn't generated a file yet at the point where the File Upload step is placed.
- Cause: No document has been generated before this step.
- Solution: Make sure a Send Documents for Signature (or other step that generates document) step exists before the File Upload step in your workflow.
Q: The file upload is failing or the file is going to the wrong record.
A: This is usually caused by an incorrect folder configuration in the upload location.
- Cause: The New Subfolder is either missing or was configured with a text value instead of the Contact ID variable.
- Solution: In the File Upload step, make sure the Select folder field uses the ID variable from the Read from Zoho CRM step (e.g.,
[Contacts[1] / Contact ID]), not a static text name. See the File Upload Zoho CRM guide for the full configuration steps.
Writeback Issues
Q: The Writeback step created a duplicate record instead of updating the existing one.
A: This happens when the matching rule in Step 3 doesn't find the correct record.
- Cause: The identifier field used in the rule (e.g., Email) either doesn't match any existing record, or the field value isn't unique and matches multiple records.
- Solution: Make sure the identifier field is unique across your Zoho CRM data. If duplicates exist, use a more reliable field.
Q: The Writeback step is failing and won't save.
A: Check whether all mandatory fields are mapped.
- Cause: Each Zoho CRM module has required fields (marked with a red asterisk in the UI) that must be populated for the step to work. For example, Last Name is mandatory for Contacts.
- Solution: Open the Writeback step configuration and make sure all required fields have a mapped workflow variable. Refer to the Implementation Guide & Known Behaviors for the full list of mandatory fields per module.
Q: The Writeback step fails with a generic error like AxiosError.
A: This is typically a data formatting issue on a specialized field.
- Cause: Zoho CRM enforces strict formatting rules on certain fields. For example, the
Twitterfield rejects values containing spaces, and currency or number fields reject any alphabetic characters. When Zoho returns a 400 Bad Request, the connector may display a generic error instead of the specific validation message. - Solution: Double-check the format and data type of all values being passed to specialized fields. Refer to the Implementation Guide & Known Behaviors for more details.
Connection Issues
Q: The workflow is failing with a token or authentication error.
A: The connection to Zoho CRM may have expired or lost its authorization.
-
Solution:
- Go to the Docusign App Center and open the Zoho CRM app page.
- Click Manage → Manage Connections.
- Find the affected connection, click the three dots (⋮) menu, and select Reconnect.
- Complete the Zoho authorization flow again.
Lokup Field Issues
Q: A Writeback step fails when trying to link a related record (e.g., Account or Reporting To).
A: This is caused by mapping both the Name and the ID for the same lookup field simultaneously.
- Cause: The Zoho CRM API does not allow both the Name and the ID of the same relationship to be sent at the same time. If both are populated in the workflow, the operation will fail.
- Solution: Choose one method per relationship - either map the Name or the ID, but never both. If duplicate names exist in your Zoho CRM data, always prefer the ID. For full details, refer to the Implementation Guide & Known Behaviors.