Onboard a supplier from a NetSuite vendor and file the signed agreement

The workflow reads the vendor and its contact from NetSuite and fills the supplier agreement, which the supplier completes with its legal name and tax ID and signs, and the person who started the workflow countersigns. It then writes the legal name and tax ID back to the vendor and files the signed agreement on the vendor record.

Your ERP
Starts
From the vendor with Baton Launcher, an API call or by hand
Steps
6
Document
Supplier agreement, 2 pages
Signers
The supplier contact, then the person who starts it
Last test run
10 November 2026
Supplier agreement from NetSuite
  1. Start WorkflowFrom an API call
  2. 1Read Vendor from NetSuite
  3. 2Read Contact from NetSuite
  4. 3Prepare eSignature Template
  5. 4Send Documents for Signature
  6. 5Update Vendor in NetSuite
  7. 6File signed agreement on the Vendor
  8. Path End
The steps of this workflow in Docusign Workflow Builder.

What it does

  1. Start: Start WorkflowFrom the NetSuite vendor with Baton Launcher, from an API call, or Run Workflow by hand. Inputs: Vendor_ID, the vendor's internal ID, and the Supplier participant's name and email.
  2. 1
    Read Vendor from NetSuiteVendor where Record ID equals Vendor_ID, one record: Company Name, Legal Name, Email, Phone, Subsidiary, Tax ID, Terms Name and the default billing address.
  3. 2
    Read Contact from NetSuiteContact where Company equals the vendor's Record ID, first match: Contact Name, Email, Job Title.
  4. 3
    Prepare eSignature TemplateThe supplier agreement template, with its eight data labels mapped. The supplier enters its legal business name, federal tax ID, entity type and year established, and the Title field starts with the contact's Job Title.
  5. 4
    Send Documents for SignatureTo the Supplier participant first, then to the person who started the workflow, with the subject "Please complete: Honeycomb Mfg. supplier onboarding agreement".
  6. 5
    Update Vendor in NetSuiteVendor where Record ID equals the vendor read in step 1: Legal Name and Tax ID from what the supplier entered.
  7. 6
    File signed agreement on the VendorFile Upload to NetSuite: the signed agreement, attached to the vendor.

Field map

Where each data label on the supplier agreement is filled from in NetSuite
Data label on the supplier agreementNetSuite fieldStep
Supplier_NameVendor / Company Name1
Supplier_NumberVendor / Record ID1
Supplier_StreetVendor / Default Billing Address 1 and 21
Supplier_CityVendor / Default Billing City, State and Zip1
Contact_NameContact / Contact Name2
Contact_EmailContact / Email2
Supplier_PhoneVendor / Phone1
Payment_TermsVendor / Terms Name1

Written back: Legal Name = Legal_Name, as the supplier entered it; Tax ID = Tax_ID, as the supplier entered it

Filed to: Vendor drive / {Vendor Record ID} / Signed Supplier Agreement - {Company Name} - {Instance ID}.pdf

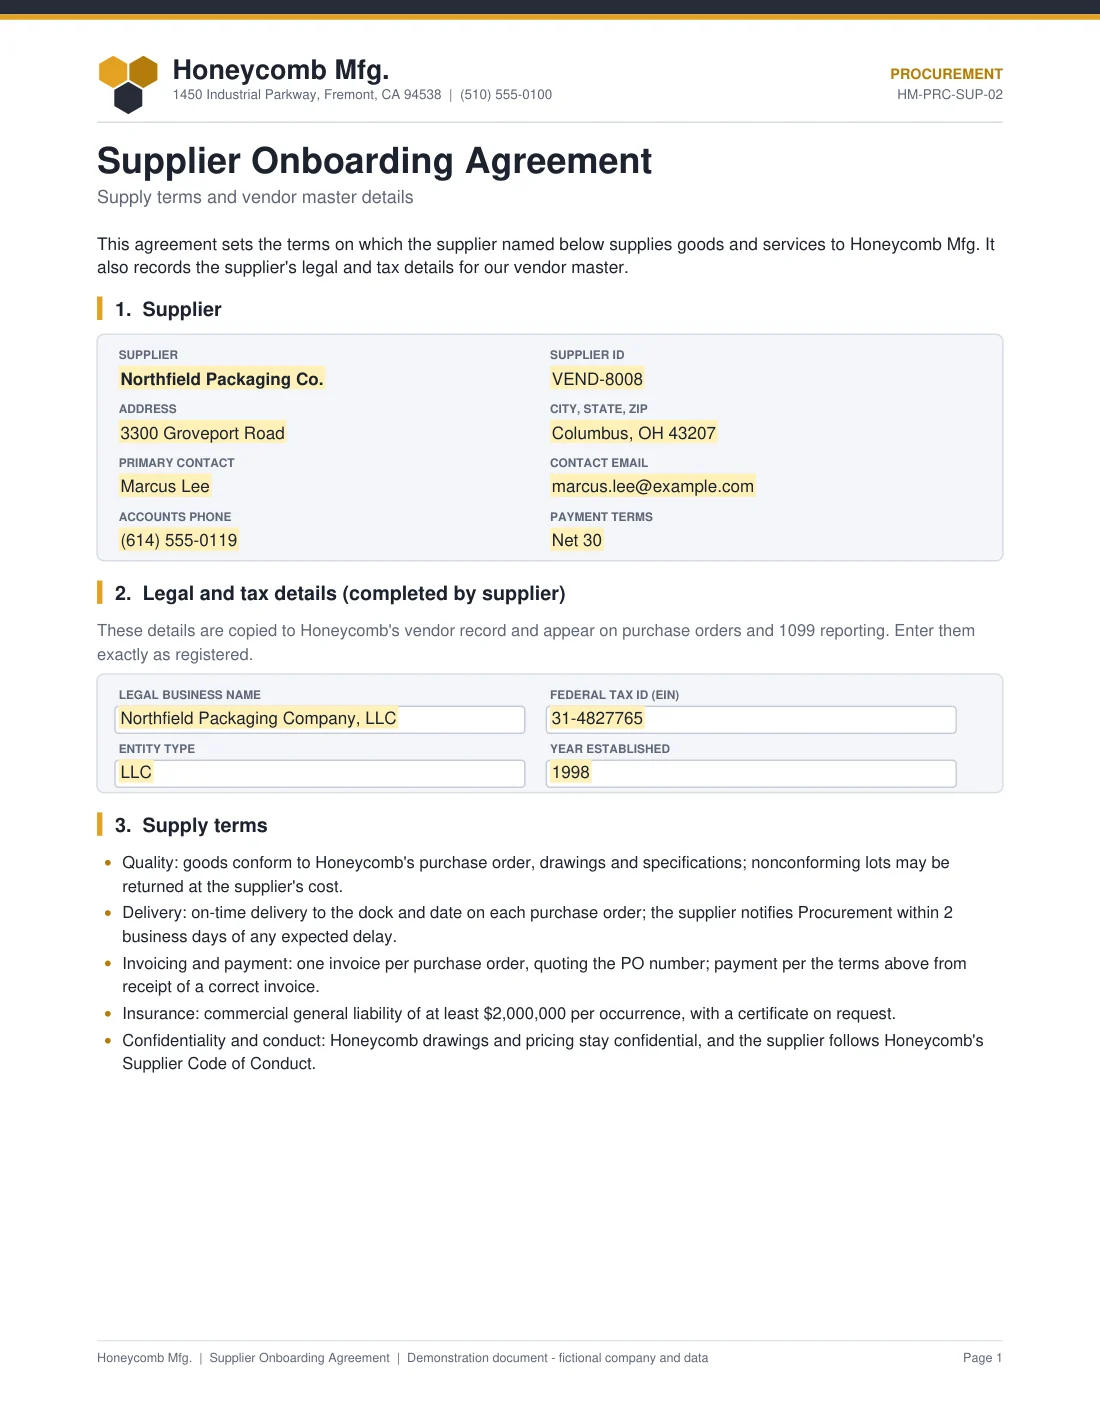
Page preview of the sample supplier agreement, with its data label fields highlighted and filled with sample values.
Honeycomb Mfg. is a fictional company. This is a demonstration document. Sample document for workflow testing. Have counsel review before use.
The document

A supplier agreement that fills itself

The highlighted fields are the supplier agreement's data labels, shown here with sample values. The field map lists where each one comes from in NetSuite or the start inputs. Each field sits on a hidden anchor tag, so you can use your own supplier agreement: keep the eight data labels and the workflow keeps working.

Set it up

  1. Install and connect the app

    Install NetSuite for Docusign IAM from the Docusign App Center and connect it to your NetSuite account. An account admin does this once.

  2. Upload the template

    In Docusign, upload the supplier agreement template (.json) under Templates. It carries the document and its fields.

  3. Build the workflow

    In Agreements, Workflows, Create Workflow, add the steps listed above in order. Use the definition file to check the settings of each step, pick your NetSuite connection, and map the fields as the field map shows.

  4. Test with a sample record

    Run it once on a test record addressed to your own inbox, and check the write-back and the file.

Make it yours

  • Onboard suppliers outside the US: NetSuite stores Tax ID only on a vendor in a US subsidiary, so map the number to VAT Registration No. for a UK vendor or to Business Number for a Canadian one.
  • Keep the entity type and year established in NetSuite: add custom Vendor fields and map them in Update Vendor in NetSuite.
  • Countersign with a named buyer instead of the person who starts the workflow: change the second recipient in Send Documents for Signature.

Questions

Is the workflow file ready to run as is?

No. It is the definition exported from the tested workflow, kept as a reference. Build the workflow step by step in Docusign Workflow Builder and use the file to check the settings of each step. The account, connection and template ids in it are placeholders.

Who starts the workflow?

Procurement, on the NetSuite vendor with Baton Launcher, or anyone with Run Workflow and the vendor's internal ID. Another system can start it through the API with Vendor_ID.

Which vendor fields are written back?

Legal Name and Tax ID, as the supplier entered them on the agreement. The entity type and year established stay on the signed agreement unless you map them to fields of your own.

Is Honeycomb Mfg. a real company?

No. Honeycomb Mfg. is a fictional company and every sample value is invented. Put your own company, terms and template in place before you use the workflow.

Need it to match your approval process?

We adapt library workflows to your stages, approvals and documents, and build private apps when a system has no app yet.

Finance and procurement

Send a credit application from a NetSuite customer

Fills a credit application from the customer record, collects the customer and credit manager signatures and updates the customer.

  1. Read
  2. Read
  3. Template
  4. Send
  5. Write
  6. File
Starts: API or by handTested 10 Nov 2026
HR and recruiting

Send a new hire packet from a NetSuite employee record

Fills an onboarding packet from the employee record, collects the new hire's details and signature, and writes their phones back.

  1. Read
  2. Template
  3. Send
  4. Write
  5. File
Starts: API or by handTested 10 Nov 2026

Docusign is a trademark of Docusign, Inc. NetSuite for Docusign IAM is published by Fluidlabs. To ask us to remove a mark, email hello@fluidlabs.com.